Canon PIXMA MP530 User's Guide - Page 108
Print Head Deep Cleaning, Aligning the Print Head Automatically
 |
View all Canon PIXMA MP530 manuals
Add to My Manuals
Save this manual to your list of manuals |
Page 108 highlights
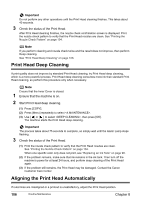
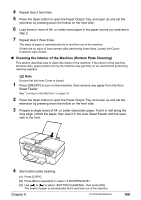
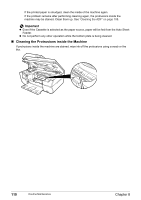
Important Do not perform any other operations until the Print Head cleaning finishes. This takes about 40 seconds. 3 Check the status of the Print Head. After Print Head cleaning finishes, the nozzle check confirmation screen is displayed. Print the nozzle check pattern to verify that the Print Head nozzles are clean. See "Printing the Nozzle Check Pattern" on page 104. Note If you perform cleaning and nozzle check twice and the result does not improve, then perform Deep cleaning. See "Print Head Deep Cleaning" on page 106. Print Head Deep Cleaning If print quality does not improve by standard Print Head cleaning, try Print Head deep cleaning, which is a more powerful process. Print Head deep cleaning consumes more ink than standard Print Head cleaning, so perform this procedure only when necessary. Note Ensure that the Inner Cover is closed. 1 Ensure that the machine is on. 2 Start Print Head deep cleaning. (1) Press [COPY]. (2) Press [Menu] repeatedly to select . (3) Use [ ] or [ ] to select , then press [OK]. The machine starts the Print Head deep cleaning. Important The process takes about 75 seconds to complete, so simply wait until the Alarm Lamp stops flashing. 3 Check the status of the Print Head. (1) Print the nozzle check pattern to verify that the Print Head nozzles are clean. See "Printing the Nozzle Check Pattern" on page 104. When one specific color only does not print, see "Replacing an Ink Tank" on page 98. (2) If the problem remains, make sure that ink remains in the ink tank. Then turn off the machine's power for at least 24 hours, and perform deep cleaning of the Print Head again. (3) If the problem still remains, the Print Head may be damaged. Contact the Canon Customer Care Center. Aligning the Print Head Automatically If ruled lines are misaligned or a printout is unsatisfactory, adjust the Print Head position. 106 Routine Maintenance Chapter 8
-
 1
1 -
2
-
3
-
4
-
5
-
6
-
7
-
8
-
9
-
10
-
11
-
12
-
13
-
14
-
15
-
16
-
17
-
18
-
19
-
20
-
21
-
22
-
23
-
24
-
25
-
26
-
27
-
28
-
29
-
30
-
31
-
32
-
33
-
34
-
35
-
36
-
37
-
38
-
39
-
40
-
41
-
42
-
43
-
44
-
45
-
46
-
47
-
48
-
49
-
50
-
51
-
52
-
53
-
54
-
55
-
56
-
57
-
58
-
59
-
60
-
61
-
62
-
63
-
64
-
65
-
66
-
67
-
68
-
69
-
70
-
71
-
72
-
73
-
74
-
75
-
76
-
77
-
78
-
79
-
80
-
81
-
82
-
83
-
84
-
85
-
86
-
87
-
88
-
89
-
90
-
91
-
92
-
93
-
94
-
95
-
96
-
97
-
98
-
99
-
100
-
101
-
102
-
 103
103 -
 104
104 -
 105
105 -
 106
106 -
 107
107 -
 108
108 -
 109
109 -
 110
110 -
 111
111 -
 112
112 -
 113
113 -
114
-
115
-
116
-
117
-
118
-
119
-
120
-
121
-
122
-
123
-
124
-
125
-
126
-
127
-
128
-
129
-
130
-
131
-
132
-
133
-
134
-
135
-
136
-
137
-
138
-
139
-
140
-
141
-
142
-
143
-
144
-
145
-
146
-
147
-
148
-
149
-
150
-
151
-
152
-
153
-
154
-
155
-
156
-
157
-
158
-
159
-
160
-
161
-
162
-
163
-
164
-
165
-
166
-
167
-
168
-
169
-
170
-
171
-
172
-
173
-
174
-
175
-
176
 |
 |
