Canon S820D S820D Quick Start Guide
Canon S820D Manual
 |
View all Canon S820D manuals
Add to My Manuals
Save this manual to your list of manuals |
Canon S820D manual content summary:
- Canon S820D | S820D Quick Start Guide - Page 1
Setting Up 4 Preparing the Printer 4 Connecting the Printer to the Computer 4 Installing the Print Head 6 Loading Paper 9 Installing the Printer Driver 10 Aligning the Print Head 16 Basic Operations 22 Printing with Windows 22 Printing with Macintosh 24 Printing Without Using the - Canon S820D | S820D Quick Start Guide - Page 2
Canada. International ENERGY STAR® Program As an ENERGY STAR Partner, Canon Inc. has determined that this product meets the ENERGY STAR guidelines for The targeted products are office equipment such as computers, monitors, printers, faxes and copiers. Their standards and logos are uniform among - Canon S820D | S820D Quick Start Guide - Page 3
anything is missing or is damaged, contact your Canon Authorised Dealer or Sales Representative. t Printer t Setup Software & User's Guide CD-ROM t Quick Start Guide t Print Head t 6 Ink Tanks t PCMCIA Card Adapter t Bubble Jet Printer - digital camera connection cable * Cables should be purchased - Canon S820D | S820D Quick Start Guide - Page 4
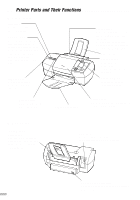
memory card cannot be read. Paper Guide When loading paper, ensure the left edge just touches this guide. To move the paper guide, pinch the knob and slide in the cover when installing the optional TFT Image Viewer (see page 31). USB Port Used to connect the printer to a computer - Canon S820D | S820D Quick Start Guide - Page 5
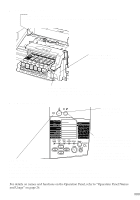
gap between the print head and the surface of the printing paper. Print Head Holder Install the print head here. Print Head Lock Lever Locks the print head into the holder. Once the print head is installed, do not touch this lever. s Operation Panel POWER Button Press to turn the printer on or - Canon S820D | S820D Quick Start Guide - Page 6
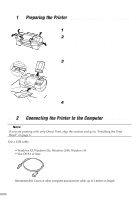
2 s Connecting the Printer to the Computer sssssssssss ¯Note If you are printing with only Direct Print, skip this section and go to "Installing the Print Head" on page 6. Use a USB cable. USB cable • Windows XP, Windows Me, Windows 2000, Windows 98 • Mac OS 8.6 or later Recommended: Canon or other - Canon S820D | S820D Quick Start Guide - Page 7
a long period of time, unplug the power cord from the power outlet after turning off the printer. Follow the steps below to install the printer driver correctly. 1 Ensure the printer and the computer are switched off. 2 Connect the cable. ¯Note If the Add New Hardware Wizard or Found New Hardware - Canon S820D | S820D Quick Start Guide - Page 8
electric shock. • Always push the plug all the way into the power outlet. s Installing the Print Head 1 Plug the printer in. 2 Turn on the printer. Do NOT turn on the computer yet. The POWER lamp flashes and the printer begins to operate. Wait until the POWER lamp remains fully lit. 3 Open the front - Canon S820D | S820D Quick Start Guide - Page 9
it has been removed. electrical contacts print head nozzles 7 Place the print head in the holder. print head holder 8 Lock the print head into place by lowering the lever. Do not touch the lock lever once the print head has been installed. s Installing the Ink Tanks • For safety reasons, store - Canon S820D | S820D Quick Start Guide - Page 10
the positions specified by the labels. • If ink tanks are not installed in the right position, colours will not be printed correctly. Immediately reinstall the tank in the correct position and carry out print head cleaning. For details, refer to the User's Guide. 6 Close the front cover. Wait until - Canon S820D | S820D Quick Start Guide - Page 11
the paper guide and slide it against the left side of the stack of paper. You now need to install the printer driver: Windows: Go to page 10 Macintosh: Go to page 12 (If you are printing with only Direct Print, you do not need to install the printer driver. Go to "Aligning the Print Head" on page - Canon S820D | S820D Quick Start Guide - Page 12
and go to "Aligning the Print Head" on page 16. s Installing the Printer Driver - Windows ¯Notes • Do not disconnect the cable or remove the CD-ROM during the installation. The driver cannot be correctly installed. • The screens below refer to Windows Me installation. Screen may differ depending on - Canon S820D | S820D Quick Start Guide - Page 13
Next button. 4 Follow the instructions displayed on the screen. When the screen shown on the left is displayed, click Install. 5 When the screen shown on the left appears, turn the printer on. If the printer is recognised, the printer driver will be automatically installed. ¯Note If the connection - Canon S820D | S820D Quick Start Guide - Page 14
Before you can use the printer, you must carry out print head alignment on page 16. 7 Click Install to install the memory card utility. 8 Click OK after having completed the installation. 9 When the screen shown on the left appears, click Exit. ¯Notes • To view the User's Guide, please refer to page - Canon S820D | S820D Quick Start Guide - Page 15
1 Turn on the Mac. 2 Place the Setup Software & User's Guide CD-ROM in the CD-ROM drive. 3 Double-click the Printer Driver folder, then select a language. 4 Double-click Installer. 5 Read the Licence Agreement and click Accept to continue. 6 Click Install. Wait for the installation to finish. ¯Note - Canon S820D | S820D Quick Start Guide - Page 16
Memory Card Utility of the CANON BJ folder. 9 Double click the BJ Installer. 10Click . 11Read the Software License Agreement and if you agree, click Agree and then click . 12Click Install. Installation is started, and when completed, a message for successful installation will be displayed. Click - Canon S820D | S820D Quick Start Guide - Page 17
13Select Chooser in the Apple Menu. 14Click the icon for the printer you are using and close Chooser. Before you use the printer, you must carry out print head alignment on page 18. ¯Note Refer to the User's Guide when using this printer as a network printer. 15 - Canon S820D | S820D Quick Start Guide - Page 18
Print Head - Windows 1 Click Start and select Printers in Settings. ¯Note For Windows XP, click Start and select Control Panel - Printers and Other Hardware - Printers and Faxes. 2 Click the icon for your printer. 3 Open the File menu and select: • Windows Me/Windows 98¡ [Properties] • Windows XP - Canon S820D | S820D Quick Start Guide - Page 19
is not printed successfully, open the front cover and ensure that the ink tanks are correctly installed. 8 Look at the print-out. From printed with the least irregularities from each of Columns B to F, enter their numbers, and click OK. 10 Click OK. This completes the printer setup. The printer - Canon S820D | S820D Quick Start Guide - Page 20
Utilities. 3 Select Test Print from the menu and click the Print Head Alignment icon. 4 Check that paper is loaded in the printer and click OK. If the pattern is not printed successfully, open the front cover and ensure that the ink tanks are correctly installed. 5 Look at the print-out. From the - Canon S820D | S820D Quick Start Guide - Page 21
6 In the same way, one by one, select the most even patterns printed with the least irregularities from each of Columns B to F, enter their numbers and click Send. 7 Click Close. 8 Click OK. This completes the printer setup. The printer is now ready to use. 19 - Canon S820D | S820D Quick Start Guide - Page 22
more beautifully, be sure to adjust the position of the print head before you begin printing on your purchased printer for the first time. You should also adjust the print head position if lines or smudges appear when you print photographs. 1 Press the Maintenance button. The Sheets. icon is - Canon S820D | S820D Quick Start Guide - Page 23
F, the icon appears. 8 Press the Print button. The icon appears. 9 Press the Maintenance button. This completes the preparations for the printer. ¯Note Before turning off the power If you are using Windows XP or Windows 2000, the computer recognizes the printer as a removable disk that is - Canon S820D | S820D Quick Start Guide - Page 24
off and always unplug the printer. Contact your local Canon service representative. • To avoid injury, never put your hand or fingers inside the printer while it is printing. ss 1 s Printing with Windows ssssssssssssssssssssssssss Adjusting the print settings according to your needs allows you - Canon S820D | S820D Quick Start Guide - Page 25
, select Manual. Click this for more details on the functions in the tab. (This may not appear when using Windows XP or Windows 2000. If this happens in Windows XP, click Start then select All Programs - Canon S820D Guide. In Windows 2000, click Start then select Programs Canon S820D - Guide). Click - Canon S820D | S820D Quick Start Guide - Page 26
details, refer to "Page Setup" on page 25. 3 Open the Print dialog box in your application to print the document. On the File menu, click Print. Check the application's user's manual for the actual procedures. 4 Specify the print settings according to your requirements. For details, refer to "Basic - Canon S820D | S820D Quick Start Guide - Page 27
to the type of document you want to print. To specify more detailed settings for the print quality or colour, select Manual and click Details.... Click this to start printing. ¯Notes • See Balloon Help for more information about other printer driver functions. Select Show Balloons in the Help menu - Canon S820D | S820D Quick Start Guide - Page 28
Cursor Buttons" on page 27. Maintenance button Press this button to perform printer maintenance operations, such as print head cleaning. Cancel button Press this button to stop printing or to stop maintenance. Print button Press this button to start printing or to apply the maintenance setting. 26 - Canon S820D | S820D Quick Start Guide - Page 29
Operating the Cursor Buttons Moving between Items To move the (cursor), press the (down) buttons. (up) and Changing a Setting To change the photograph number or a setting, press the (left) and (right) buttons. The (right) button increases the photograph number; the (left) button decreases the - Canon S820D | S820D Quick Start Guide - Page 30
card adapters that are supported by a digital camera, ask the digital camera manufacturer. Setting the Memory Card ¯Note The operation procedure is different if you are using a memory card when the printer is connected to the computer. See the "User's Guide." 1 Turn on the printer. 2 Set the memory - Canon S820D | S820D Quick Start Guide - Page 31
"User's Guide." Indicator lamp Eject button. 1 Check that the indicator lamp is not blinking. ¯Note If you remove the memory card or switch off the power to the printer while the indicator lamp is blinking, the data of the memory card may be destroyed. 2 Press the printer power button to turn off - Canon S820D | S820D Quick Start Guide - Page 32
Power button on the printer to turn the printer on/off.) If the printer is not connected to a computer, print head cleaning begins automatically when the power plug is unplugged and then reinserted. This action maintains the optimal print head condition but also consumes ink. • This product should - Canon S820D | S820D Quick Start Guide - Page 33
type can be used Photo Paper Pro for Borderless Printing (PR-101) Glossy Photo Cards (FM-101) Photo Paper Pro (PC-101S) Photo Paper Pro Letter size (PR-101) Photo Paper Pro A4 size (PR-101) Digital camera setting Card #1 Card #2 Card #3 LTR A4 1 Turn on the printer 2 Connect the digital camera - Canon S820D | S820D Quick Start Guide - Page 34
order they were shot. Switching the Viewer Display Off The viewer display goes off under the following conditions: • The printer is turned off. • A digital camera that can print data directly is connected (see page 31). • The inserted memory card is ejected. ¯Note If no key operation on - Canon S820D | S820D Quick Start Guide - Page 35
be adjusted from maintenance mode. Adjusting the Brightness 1 Check that the printer power is on. 2 Insert a memory card to which JPEG data has the (right) button five times. The icon is displayed. 5 Press the Print button. The Image. icon appears in Optimize 6 Adjust the brightness by using - Canon S820D | S820D Quick Start Guide - Page 36
printer is on. 2 Insert a memory card to which JPEG data has been saved (see page 28). 3 Press the Maintenance button. The Sheets. icon appears in Required 4 Press the (right) button six times. The icon appears. 5 Press the Print (1 to 9). 7 Press the Print button. The data is displayed in - Canon S820D | S820D Quick Start Guide - Page 37
(see page 28). 2 Selecting a print method Select a print method from the five selections. Index Printing (see page 37) Prints a list of the photographs. All Frames Printing (see page 39) Prints all photographs individually. Single Frame Printing (see page 39) Prints the selected one photograph - Canon S820D | S820D Quick Start Guide - Page 38
Layout (see page 45) … Setting the Print Quality (see page 46) † Printing the Date (see page 46) ˆ ‡ Correcting Photographs (see page 47) ˆ Operating the Cursor Buttons (see page 27) 4 Printing Load paper into the printer, and press the Print button. Loading the paper: Regular Paper (see page - Canon S820D | S820D Quick Start Guide - Page 39
. See "Specifying the range and print the photographs" on page 38. 3 Load paper in the printer. You will need the number of sheets indicated in On Required Sheets. ¯Note For instructions on loading the paper, see "Loading Paper" on page 9 or the "User's Guide." For details on the paper types - Canon S820D | S820D Quick Start Guide - Page 40
pressing the (left) and (right) buttons. 3 Move the (cursor) to Last by pressing the (down) button. 4 Display the number of the photograph to be printed last by pressing the (left) and (right) buttons. If you specify a photograph number that is smaller than the First number, the photographs will be - Canon S820D | S820D Quick Start Guide - Page 41
some of the photographs. See "Specifying a Print Range" on page 38. 3 Load paper into the printer. On You will need the number of sheets displayed in Required Sheets. ¯Note For instructions on loading paper, see "Loading Paper" on page 9 or the "User's Guide." For details on the paper types that - Canon S820D | S820D Quick Start Guide - Page 42
one sheet of paper. See "Setting the Print Layout (Layout)" on page 45. 5 Load paper into the printer. You will need the number of sheets displayed in Required Sheets. ¯Note For instructions on loading paper, see "Loading Paper" on page 9 or the "User's Guide." For details on the paper types that - Canon S820D | S820D Quick Start Guide - Page 43
and Layout settings, the top, bottom, right, or left section of the photograph may be cut off when the photograph is printed. 1 Press the Mode button, and select Print Selected. 2 Move the (cursor) to First/-Order- by pressing the (top) and On (bottom) buttons. 3 Display [-01-] by pressing the - Canon S820D | S820D Quick Start Guide - Page 44
. 9 Set Media Type and Layout. See "Print Applications" on page 44. 10 Load paper into the printer. You will need the number of sheets displayed in Required Sheets. ¯Note For instructions on loading paper, see "Loading Paper" on page 9 or the "User's Guide." For details on the paper types that can - Canon S820D | S820D Quick Start Guide - Page 45
Specify the number of copies and date printing from the digital camera. On 3 Load paper into the printer. You will need the number of sheets displayed in Required Sheets. ¯Note For instructions on loading paper, see "Loading Paper" on page 9 or the "User's Guide." For details on the paper types that - Canon S820D | S820D Quick Start Guide - Page 46
if eight copies in Copies and four patterns in one sheet in Layout are specified, two sheets are needed to print. 1 Set Single Frame mode. See "Printing Photographs One at a Time (Single Frame Printing)" on page 39. 2 Move the press the buttons. (cursor) to Copies by (top) and (bottom) Up to 99 - Canon S820D | S820D Quick Start Guide - Page 47
[G] Media name and size Photo Paper Pro for Borderless printing (PR-101) Glossy Photo Cards (FM-101) Photo Paper Pro (PC-101S) Photo Paper Pro Letter size (PR-101) Photo Paper Pro A4 size (PR-101) Plain Paper Letter Plain Paper A4 1 Set the print mode. See "Printing Photographs" on page 35. 2 Move - Canon S820D | S820D Quick Start Guide - Page 48
. 3 Select the layout by pressing the (left) and (right) buttons. Select to print a borderless photograph. Select to print a bordered photograph. s Setting the Print Quality (Quality) You can set the print quality. ¯Note The print quality that can be set differs according to the media type and the - Canon S820D | S820D Quick Start Guide - Page 49
do not have proper exposure. ¯Notes • When image correction is performed, printing may take a long time. • The actual image and coloring may differ from the printed ones depending on the photograph. 1 Set the print mode. See "Printing Photographs" on page 35. 2 Move the (cursor) to Optimize Image by - Canon S820D | S820D Quick Start Guide - Page 50
below. 1 Select ON (enable) for Optimize Image by pressing the (left) or (right) button. To use only the correction function for colour fogginess and exposure (Photo Optimizer PRO function) 2 Press the (right) button once. The display changes to [POP[ON]], and only the - Canon S820D | S820D Quick Start Guide - Page 51
of the ink tanks. See "Installing the Ink Tanks" on page 7. • Check the remaining amount of ink. If ink has run out, replace the ink tanks. STEP1 Printing the Nozzle Check Pattern (see page 50) Print the check pattern for checking whether ink is being ejected properly from the print head nozzles and - Canon S820D | S820D Quick Start Guide - Page 52
the Nozzle Check Pattern Print the nozzle check pattern and check whether inks is being ejected properly from the print head nozzles and whether the print head is correctly positioned. ¯Note You can also print the nozzle check pattern by pressing the Reset button of the printer. Follow the procedure - Canon S820D | S820D Quick Start Guide - Page 53
s Cleaning the Print Head Clean the print head if a nozzle in the print head becomes clogged. Perform print head cleaning only when necessary because the operation consumes a lot of ink. ¯Note You can also perform print head cleaning by pressing the Reset button on the printer. Follow the procedure - Canon S820D | S820D Quick Start Guide - Page 54
4 Press the Maintenance button. 5 Print the nozzle check pattern, and check that the pattern is printed correctly. See "Printing the Nozzle Check Pattern" on page 50. If there is no improvement, the print head may be damaged. Contact the store where you bought the printer or a nearby repair center - Canon S820D | S820D Quick Start Guide - Page 55
are not operating properly even through an error is not displayed, turn off the printer, unplug the power cord, and then turn on the power again. error number Black Photo-cyan Photo-magenta Cyan Magenta Yellow ¯Note The colour of the ink tank affected by the error can be checked in Media Type - Canon S820D | S820D Quick Start Guide - Page 56
start printing. For instructions on printing from a digital camera, see the user's guide that comes with the digital camera. Error number: 802, 803, 809 Cause: Error occurred in printer. Corrective action: Press the Cancel button to stop printing, turn off the printer, wait awhile, and then turn on - Canon S820D | S820D Quick Start Guide - Page 57
the indicator lamp goes on. • Check whether the PC card adapter is ATA-compliant. ¯Note If the error is not corrected by the above procedure, turn off the printer, unplug the power cord, and then turn on the power again. 55 - Canon S820D | S820D Quick Start Guide - Page 58
operation panel, refer to "If Photographs Cannot Be Printed Clearly" on page 49. Perform print head cleaning to improve the print quality. Ensure that the printer is turned on and follow the instructions below. • Windows Open the printer driver settings screen and click the Maintenance tab. Click - Canon S820D | S820D Quick Start Guide - Page 59
Notes on Handling the USB Interface (for Windows Users) If installation of the printer driver does not proceed as instructed in this Quick Start Guide, there may be a problem with the USB driver installation. Try reinstalling the printer driver. s Reinstalling If you cannot proceed beyond the - Canon S820D | S820D Quick Start Guide - Page 60
Installer. Follow the instructions on the screen to install Acrobat Reader. (2) Double-click the Manual folder. (3) Select a language folder. (4) Double-click the icon for the S820D_UG_UK.PDF file. s BJ Printer Driver Systems Requirements For Windows • Windows XP, Windows Me, Windows 2000, Windows - Canon S820D | S820D Quick Start Guide - Page 61
Requirements for User's Guide To install Adobe Acrobat Reader and view the User's Guide: • 8MB of available hard-disk space for Windows • 13MB of available hard-disk space for Mac OS • 640 x 480 pixels or greater, minimum 256 colours video display s Specifications Printing method: Bubble Jet - Canon S820D | S820D Quick Start Guide - Page 62
%, 50 Hz AC 120 V, 60 Hz AC 240 V, 50 Hz Power consumption: Standby: 8 W Printing: 26 W Dimensions (without a paper rest and paper output tray): 430 (W) x 301 (D) x Paper Envelopes Glossy Photo Paper High Gloss Photo Film Glossy Photo Cards Photo Paper Pro PR-101 Photo Paper Pro PC-101S - Canon S820D | S820D Quick Start Guide - Page 63
101 PC-101S CF-102 TR-201 Graphic image printing: Data format: Canon extended mode: Raster image format Resolution: Canon extended mode: 600, 1200, 2400 dpi Print Head: Black, Photo Cyan, Photo Magenta, Cyan, Magenta, Yellow: 256 nozzles (1200 dpi) Ink Tanks: Capacity (page): Black (BCI-6BK) Cyan - Canon S820D | S820D Quick Start Guide - Page 64
Storage function: Supported operating systems Windows XP, Windows 2000, Windows Me, Windows 98 Mac OS 8.6 or later Utilities Use the storage utility that comes with the printer. Functions Read, write Direct print function: Interface Card slot, Connector for digital camera print Operation panel Large - Canon S820D | S820D Quick Start Guide - Page 65
Correction function Photo Optimizer PRO, VIVID Photo DPOF function Ver. 1.00-compliant (Print index prints, Set the number of copies, Select images for print, Include the date on the print, Include the file number on the print) Resolution Up to 2400×1200 dpi Specifications subject to change without - Canon S820D | S820D Quick Start Guide - Page 66
64 - Canon S820D | S820D Quick Start Guide - Page 67
- Canon S820D | S820D Quick Start Guide - Page 68
QA7-1957-V01 12345678 ©CANON INC.2002 PRINTED IN THAILAND
-
 1
1 -
 2
2 -
 3
3 -
 4
4 -
 5
5 -
 6
6 -
 7
7 -
8
-
9
-
10
-
11
-
12
-
13
-
14
-
15
-
16
-
17
-
18
-
19
-
20
-
21
-
22
-
23
-
24
-
25
-
26
-
27
-
28
-
29
-
30
-
31
-
32
-
33
-
34
-
35
-
36
-
37
-
38
-
39
-
40
-
41
-
42
-
43
-
44
-
45
-
46
-
47
-
48
-
49
-
50
-
51
-
52
-
53
-
54
-
55
-
56
-
57
-
58
-
59
-
60
-
61
-
62
-
63
-
64
-
65
-
66
-
67
-
68
 |
 |
Table of Contents
Preface
1
Shipping Materials
1
Introduction
1
Printer Parts and Their Functions
2
Setting Up
4
Preparing the Printer
4
Connecting the Printer to the Computer
4
Installing the Print Head
6
Loading Paper
9
Installing the Printer Driver
10
Aligning the Print Head
16
Basic Operations
22
Printing with Windows
22
Printing with Macintosh
24
Printing Without Using the Computer
26
Before Printing
26
Printing Photographs
35
Print Applications
44
If Photographs Cannot Be Printed Clearly
(Operation Panel Section)
49
If an Error Is Displayed on the Operation Panel
53
Print Head Maintenance
56
Notes on Handling the USB Interface (for Windows Users)
57
For Further Details...
58
Quick Start Guide
BUBBLE JET PRINTER
QA7-1957-V01
BE