Canon S820D S820D Quick Start Guide - Page 44
Printing According to Camera Settings DPOF Printing
 |
View all Canon S820D manuals
Add to My Manuals
Save this manual to your list of manuals |
Page 44 highlights
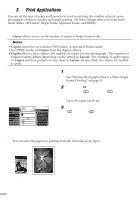
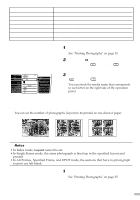
7 Display [-02-] by pressing the (right) button. [-02-] indicates the second frame. 8 To specify a frame after the second frame, repeat step 2 to 5. If you select ---- for Last, that frame will not be printed. 9 Set Media Type and Layout. See "Print Applications" on page 44. 10 Load paper into the printer. You will need the number of sheets displayed in Required Sheets. ¯Note For instructions on loading paper, see "Loading Paper" on page 9 or the "User's Guide." For details on the paper types that can be used, see "Setting the Media Type" on page 44. 11 Press the Print button. Printing starts. s Printing According to Camera Settings (DPOF Printing) If Digital Print Order Format (DPOF) settings are specified in the digital camera, the printing begins automatically according to the specified settings. ¯Notes • This printer supports the following DPOF functions. - Specification of photographs to be printed - Print style (standard, index) - Date printing/photograph number printing (If both are selected, only date printing will be set.) - Number of copies to be printed All other DPOF functions (shooting information, trimming function, etc.) are not supported. • Printing is enlarged or reduced automatically to match the paper size. Depending on the Media Type and Layout settings, the top, bottom, right, or left section of the photograph may be cut off when the photograph is printed. 42
-
 1
1 -
2
-
3
-
4
-
5
-
6
-
7
-
8
-
9
-
10
-
11
-
12
-
13
-
14
-
15
-
16
-
17
-
18
-
19
-
20
-
21
-
22
-
23
-
24
-
25
-
26
-
27
-
28
-
29
-
30
-
31
-
32
-
33
-
34
-
35
-
36
-
37
-
38
-
 39
39 -
 40
40 -
 41
41 -
 42
42 -
 43
43 -
 44
44 -
 45
45 -
 46
46 -
 47
47 -
 48
48 -
 49
49 -
50
-
51
-
52
-
53
-
54
-
55
-
56
-
57
-
58
-
59
-
60
-
61
-
62
-
63
-
64
-
65
-
66
-
67
-
68
 |
 |
