Canon S820D S820D Quick Start Guide - Page 56
Error number, Cause, Corrective action, Print, Cancel
 |
View all Canon S820D manuals
Add to My Manuals
Save this manual to your list of manuals |
Page 56 highlights
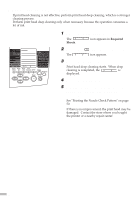
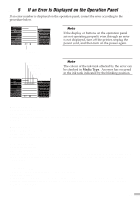
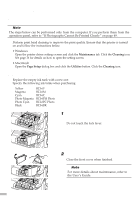
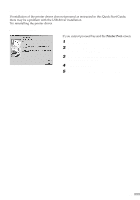
Error number: 103 Cause: Position of paper thickness lever is incorrect and ink level is low. Corrective action: Prepare a replacement ink tank. Replace the ink tank (see page 56), and set the paper thickness lever to the correct position to start printing. Press the Print button to restart printing under the current conditions. Error number: 201 Cause: Ink has run out. Corrective action: Press the Cancel button to stop printing, and then replace the ink tank (see page 56). Press the Reset button on the printer to start printing without any ink. Error number: 202 Cause: Waste ink tank is full. Corrective action: Press the Reset button on the printer to restart printing. Immediately contact the store where you bought the printer or a repair center and request replacement of the waste ink tank. Error number: 301, 302 Cause: No paper, paper cannot be fed, or paper jam Corrective action: Load paper correctly, and press the Reset button on the printer to start printing. If a sheet is jammed, remove the jammed sheet (see page 2), load paper correctly, and then press the Reset button on the printer. Error number: 401 Cause: Front cover is open. Corrective action: Close the front cover to start printing. Error number: 402 Cause: Print head is not attached. Corrective action: Attach the print head (see page 6). If the print head is attached, remove the print head, ensure that the contact sections are clean, and then reattach the print head. Error number: 611, 612 Cause: • Time Out is activated during communication with the digital camera. • A message that this printer does not support is sent from the digital camera. Corrective action: Remove the connected cable to reset the error. Reconnect the cable to the digital camera, and then start printing. For instructions on printing from a digital camera, see the user's guide that comes with the digital camera. Error number: 802, 803, 809 Cause: Error occurred in printer. Corrective action: Press the Cancel button to stop printing, turn off the printer, wait awhile, and then turn on the power again. If the condition does not improve, contact the store where you bought the printer or a nearby repair center. 54
-
 1
1 -
2
-
3
-
4
-
5
-
6
-
7
-
8
-
9
-
10
-
11
-
12
-
13
-
14
-
15
-
16
-
17
-
18
-
19
-
20
-
21
-
22
-
23
-
24
-
25
-
26
-
27
-
28
-
29
-
30
-
31
-
32
-
33
-
34
-
35
-
36
-
37
-
38
-
39
-
40
-
41
-
42
-
43
-
44
-
45
-
46
-
47
-
48
-
49
-
50
-
 51
51 -
 52
52 -
 53
53 -
 54
54 -
 55
55 -
 56
56 -
 57
57 -
 58
58 -
 59
59 -
 60
60 -
 61
61 -
62
-
63
-
64
-
65
-
66
-
67
-
68
 |
 |