Canon imageRUNNER ADVANCE C5240 imageRUNNER ADVANCE C5200 Srs Basic Operation - Page 122
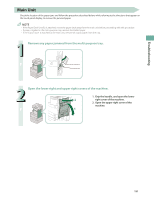
Remove any jammed paper from the output unit.
 |
View all Canon imageRUNNER ADVANCE C5240 manuals
Add to My Manuals
Save this manual to your list of manuals |
Page 122 highlights
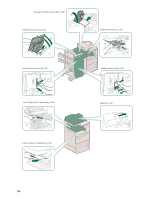
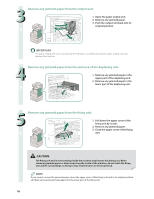
3 Remove any jammed paper from the output unit. 1. Open the paper output unit. 2. Remove any jammed paper. 1 3. Push the output unit back into its original position. 3 2 The paper output unit can be opened up to 40 degrees. Forcefully opening the paper output unit may damage the machine. 4 Remove any jammed paper from the entrance of the duplexing unit. 1. Remove any jammed paper in the upper part of the duplexing unit. 2. Remove any jammed paper in the 1 lower part of the duplexing unit. 2 5 Remove any jammed paper from the fixing unit. 1. Pull down the upper cover of the 2 fixing unit by its tab. 2. Remove any jammed paper. 3. Close the upper cover of the fixing unit. 13 The fixing unit and its surroundings inside the machine may become hot during use. When removing jammed paper or when inspecting the inside of the machine, do not touch the fixing unit and its surroundings, as doing so may result in burns or electrical shock. If you cannot remove the jammed paper, return the upper cover of the fixing unit back to its original position, and then remove the jammed paper from the lower part of the fixing unit. 122
-
 1
1 -
2
-
3
-
4
-
5
-
6
-
7
-
8
-
9
-
10
-
11
-
12
-
13
-
14
-
15
-
16
-
17
-
18
-
19
-
20
-
21
-
22
-
23
-
24
-
25
-
26
-
27
-
28
-
29
-
30
-
31
-
32
-
33
-
34
-
35
-
36
-
37
-
38
-
39
-
40
-
41
-
42
-
43
-
44
-
45
-
46
-
47
-
48
-
49
-
50
-
51
-
52
-
53
-
54
-
55
-
56
-
57
-
58
-
59
-
60
-
61
-
62
-
63
-
64
-
65
-
66
-
67
-
68
-
69
-
70
-
71
-
72
-
73
-
74
-
75
-
76
-
77
-
78
-
79
-
80
-
81
-
82
-
83
-
84
-
85
-
86
-
87
-
88
-
89
-
90
-
91
-
92
-
93
-
94
-
95
-
96
-
97
-
98
-
99
-
100
-
101
-
102
-
103
-
104
-
105
-
106
-
107
-
108
-
109
-
110
-
111
-
112
-
113
-
114
-
115
-
116
-
 117
117 -
 118
118 -
 119
119 -
 120
120 -
 121
121 -
 122
122 -
 123
123 -
 124
124 -
 125
125 -
 126
126 -
 127
127 -
128
-
129
-
130
-
131
-
132
-
133
-
134
-
135
-
136
-
137
-
138
-
139
-
140
-
141
-
142
-
143
-
144
-
145
-
146
-
147
-
148
-
149
-
150
-
151
-
152
-
153
-
154
-
155
-
156
-
157
-
158
-
159
-
160
-
161
-
162
-
163
-
164
-
165
-
166
-
167
-
168
-
169
-
170
-
171
-
172
-
173
-
174
-
175
-
176
-
177
-
178
-
179
-
180
-
181
-
182
-
183
-
184
-
185
-
186
-
187
-
188
-
189
-
190
-
191
-
192
-
193
-
194
-
195
-
196
-
197
-
198
-
199
-
200
-
201
-
202
-
203
-
204
 |
 |
