Canon imageRUNNER ADVANCE C5240 imageRUNNER ADVANCE C5200 Srs Basic Operation - Page 125
Paper Sources, Paper Drawer 1
 |
View all Canon imageRUNNER ADVANCE C5240 manuals
Add to My Manuals
Save this manual to your list of manuals |
Page 125 highlights
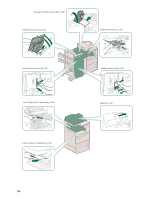
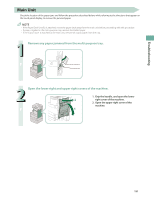
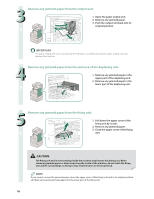
Troubleshooting Paper Sources Check the location of the paper jam, and follow the procedure described below, while referring to the directions that appear on the touch panel display, to remove the jammed paper. • The Cassette Feeding Unit-AD2 and Paper Deck Unit-B2 are optional products. • If paper is loaded in the multi-purpose tray, remove the loaded paper. Paper Drawer 1 • If the Paper Deck Unit-B2 is attached, move the paper deck unit away from the main unit before proceeding with this procedure. • If the Copy Tray-J1 is attached to the main unit, remove all output paper from the tray. 1 Open the lower right and upper right covers of the machine. 1. Grip the handle, and open 2 the lower right cover of the machine. 2. Open the upper right cover 1 of the machine. 2 Remove any jammed paper. 125
-
 1
1 -
2
-
3
-
4
-
5
-
6
-
7
-
8
-
9
-
10
-
11
-
12
-
13
-
14
-
15
-
16
-
17
-
18
-
19
-
20
-
21
-
22
-
23
-
24
-
25
-
26
-
27
-
28
-
29
-
30
-
31
-
32
-
33
-
34
-
35
-
36
-
37
-
38
-
39
-
40
-
41
-
42
-
43
-
44
-
45
-
46
-
47
-
48
-
49
-
50
-
51
-
52
-
53
-
54
-
55
-
56
-
57
-
58
-
59
-
60
-
61
-
62
-
63
-
64
-
65
-
66
-
67
-
68
-
69
-
70
-
71
-
72
-
73
-
74
-
75
-
76
-
77
-
78
-
79
-
80
-
81
-
82
-
83
-
84
-
85
-
86
-
87
-
88
-
89
-
90
-
91
-
92
-
93
-
94
-
95
-
96
-
97
-
98
-
99
-
100
-
101
-
102
-
103
-
104
-
105
-
106
-
107
-
108
-
109
-
110
-
111
-
112
-
113
-
114
-
115
-
116
-
117
-
118
-
119
-
 120
120 -
 121
121 -
 122
122 -
 123
123 -
 124
124 -
 125
125 -
 126
126 -
 127
127 -
 128
128 -
 129
129 -
 130
130 -
131
-
132
-
133
-
134
-
135
-
136
-
137
-
138
-
139
-
140
-
141
-
142
-
143
-
144
-
145
-
146
-
147
-
148
-
149
-
150
-
151
-
152
-
153
-
154
-
155
-
156
-
157
-
158
-
159
-
160
-
161
-
162
-
163
-
164
-
165
-
166
-
167
-
168
-
169
-
170
-
171
-
172
-
173
-
174
-
175
-
176
-
177
-
178
-
179
-
180
-
181
-
182
-
183
-
184
-
185
-
186
-
187
-
188
-
189
-
190
-
191
-
192
-
193
-
194
-
195
-
196
-
197
-
198
-
199
-
200
-
201
-
202
-
203
-
204
 |
 |
