Casio WK 3500 User Guide - Page 64
Reco r d
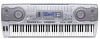 |
UPC - 079767312756
View all Casio WK 3500 manuals
Add to My Manuals
Save this manual to your list of manuals |
Page 64 highlights
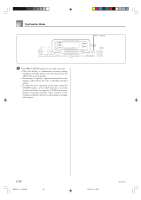
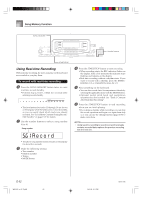
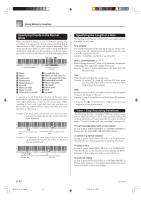
Song Memory Function SONG MEMORY Number buttons START/STOP Using Real-time Recording With real-time recording, the notes you play on the keyboard are recorded as you play them. To record with real-time recording 1 Press the SONG MEMORY button twice to enter real-time record standby. • Perform step 2, below, within five seconds after entering record standby. • The level meters for tracks 11 through 16 are shown on the display while the keyboard is in record standby, so you can easily check which tracks are already recorded. See "Level Meter Contents During Record/ Edit Standby" on page E-69 for details. 2 Use the number buttons to select a song number (0 to 4). Song number Reco r d • The above song number screen remains on the display for about five seconds. 3 Make the following settings. • Tone number • Rhythm number • Tempo • MODE button 4 Press the START/STOP button to start recording. • When recording starts, the REC indicator flashes on the display. After a few moments the indicator stops flashing, and remains on the display. • Real-time recording without a rhythm starts. If you want to record with a rhythm, press the INTRO/ ENDING 1/2 or VARIATION/FILL-IN 1/2. 5 Play something on the keyboard. • You can also record Auto Accompaniment chords by selecting the applicable mode with the MODE button. • Optional pedal, pitch bend and modulation operations are also recorded. See "Track 1 Contents After Real-time Recording". 6 Press the START/STOP button to end recording when you are finish playing. • If you make a mistake while recording, you can stop the record operation and begin over again from step 1, or you can use the editing function (page E-70) to make corrections. NOTE • Using real-time recording to record to a track that already contains recorded data replaces the previous recording with the new one. E-62 WK3100_e_61-73.p65 62 04.3.26, 0:11 PM 735A-E-064B
-
 1
1 -
2
-
3
-
4
-
5
-
6
-
7
-
8
-
9
-
10
-
11
-
12
-
13
-
14
-
15
-
16
-
17
-
18
-
19
-
20
-
21
-
22
-
23
-
24
-
25
-
26
-
27
-
28
-
29
-
30
-
31
-
32
-
33
-
34
-
35
-
36
-
37
-
38
-
39
-
40
-
41
-
42
-
43
-
44
-
45
-
46
-
47
-
48
-
49
-
50
-
51
-
52
-
53
-
54
-
55
-
56
-
57
-
58
-
 59
59 -
 60
60 -
 61
61 -
 62
62 -
 63
63 -
 64
64 -
 65
65 -
 66
66 -
 67
67 -
 68
68 -
 69
69 -
70
-
71
-
72
-
73
-
74
-
75
-
76
-
77
-
78
-
79
-
80
-
81
-
82
-
83
-
84
-
85
-
86
-
87
-
88
-
89
-
90
-
91
-
92
-
93
-
94
-
95
-
96
-
97
-
98
-
99
-
100
-
101
-
102
-
103
-
104
-
105
-
106
-
107
-
108
-
109
-
110
-
111
-
112
-
113
-
114
-
115
-
116
-
117
-
118
-
119
-
120
-
121
-
122
-
123
-
124
-
125
-
126
-
127
-
128
-
129
-
130
-
131
-
132
-
133
-
134
-
135
-
136
-
137
-
138
-
139
-
140
-
141
-
142
-
143
-
144
-
145
-
146
-
147
-
148
 |
 |
