Casio WK 3500 User Guide - Page 78
F r . Ho r nG
 |
UPC - 079767312756
View all Casio WK 3500 manuals
Add to My Manuals
Save this manual to your list of manuals |
Page 78 highlights
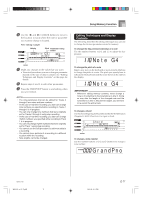
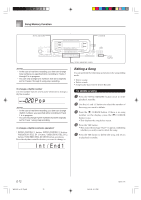
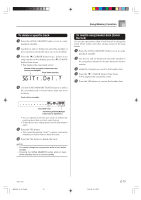
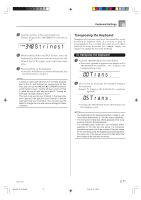
Keyboard Settings TRANSPOSE/FUNCTION TONE Using Layer and Split Together You can use layer and split together to create a layered split keyboard. It makes no difference whether you layer tones first and then split the keyboard, or split the keyboard and then layer tones. When you use layer and split in combination, the high range of the keyboard is assigned two tones (main tone + layered tone), and the low range two tones (split tone + layered split tone). LAYER SPLIT Split Tone (PIZZICATO GM) + Layered Split Tone (STRINGS 1) Main Tone (BRASS GM) + Layered Tone (FRENCH HORN GM) Split point [+]/[-] SPLIT LAYER To split the keyboard and then layer tones 1 Press the TONE button and then input the tone number of the main tone. Example: To set "361 BRASS GM" as the main tone. B r a s s _G 2 Press the SPLIT button and then input the number of the split tone. Example: To set "345 PIZZICATO GM" as the split tone. P i z z _G • After specifying the split tone, press the SPLIT button to unsplit the keyboard. 3 Press the LAYER button and then input the number of the layered tone. Example: To set "360 FRENCH HORN GM" as the layered tone. F r . Ho r nG 4 Press the SPLIT button or the LAYER button so both of the SPLIT and LAYER indicators are displayed. E-76 WK3000_e_74-88.p65 76 04.3.26, 0:11 PM 735A-E-078A
-
 1
1 -
2
-
3
-
4
-
5
-
6
-
7
-
8
-
9
-
10
-
11
-
12
-
13
-
14
-
15
-
16
-
17
-
18
-
19
-
20
-
21
-
22
-
23
-
24
-
25
-
26
-
27
-
28
-
29
-
30
-
31
-
32
-
33
-
34
-
35
-
36
-
37
-
38
-
39
-
40
-
41
-
42
-
43
-
44
-
45
-
46
-
47
-
48
-
49
-
50
-
51
-
52
-
53
-
54
-
55
-
56
-
57
-
58
-
59
-
60
-
61
-
62
-
63
-
64
-
65
-
66
-
67
-
68
-
69
-
70
-
71
-
72
-
 73
73 -
 74
74 -
 75
75 -
 76
76 -
 77
77 -
 78
78 -
 79
79 -
 80
80 -
 81
81 -
 82
82 -
 83
83 -
84
-
85
-
86
-
87
-
88
-
89
-
90
-
91
-
92
-
93
-
94
-
95
-
96
-
97
-
98
-
99
-
100
-
101
-
102
-
103
-
104
-
105
-
106
-
107
-
108
-
109
-
110
-
111
-
112
-
113
-
114
-
115
-
116
-
117
-
118
-
119
-
120
-
121
-
122
-
123
-
124
-
125
-
126
-
127
-
128
-
129
-
130
-
131
-
132
-
133
-
134
-
135
-
136
-
137
-
138
-
139
-
140
-
141
-
142
-
143
-
144
-
145
-
146
-
147
-
148
 |
 |
