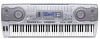
Casio WK 3500 User Guide - Page 99
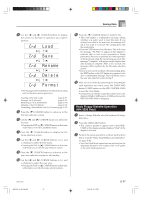
Sa Lo Re De Fo
 |
UPC - 079767312756
View all Casio WK 3500 manuals
Add to My Manuals
Save this manual to your list of manuals |
Page 99 highlights
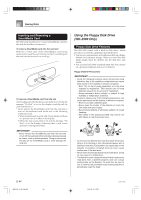
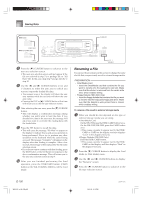
Saving Data 4 Use the [̇] and [̈] CURSOR buttons to display the screen for the type of operation you want to perform. Load [̈] [̇] Save [̈] [̇] Re n ame [̈] [̇] De l e t e [̈] [̇] Fo rma t • See the pages referenced below for details about using each of the above menu operations. Loading a file (Crd Load): page E-99 Saving a file (Crd Save): page E-98 Renaming a file (Crd Rename): page E-100 Deleting a file (Crd Delete): page E-101 Formatting a SmartMedia card (Crd Format): page E-102 5 Press the [̄] CURSOR button to advance to the file type selection screen. 6 Use the [̇] and [̈] CURSOR buttons to select the file type. • Pressing the EXIT or [̄] CURSOR button at this time will return you to the Card Mode menu. 7 Press the [̄] CURSOR button to display the file name selection screen. 8 Use the [̇] and [̈] CURSOR buttons or [+] and [-] buttons to select the file name. • Pressing the EXIT or [̆] CURSOR button at this time will return you to the file type selection screen. 9 Press the [̄] CURSOR button to advance to the user area selection screen for file loading. 0 Use the [̇] and [̈] CURSOR buttons or [+] and [-] buttons to select the user area. • Pressing the EXIT or [̆] CURSOR button at this time will return you to the file name selection menu. A Press the [̄] CURSOR button to load the file. • This will display a confirmation message asking whether you really want to load the data. If you already have data in the user area, the message will ask if you want to overwrite the existing data with the loaded data. • Press the YES button to load the data. This will cause the message "Pls Wait" to appear on the display to indicate that a card access operation is being performed. Never try to perform any other operation on the keyboard while the card is being accessed. The message "Complete" will appear on the display after data loading is complete. After a few seconds, the message will be replaced by the file name selection screen. • If you do not want to continue with data loading, press the EXIT button or the NO button in response to the above confirmation message. This will return you to the user area selection screen in step 9. B After you are finished performing the SmartMedia card operation you want, press the DISK/CARD button (CARD button on the WK-3100/WK-3000) to exit the Card Mode. • Exiting the Card Mode causes the pointer next to the display's DISK/CARD pointer (CARD pointer on the WK-3100/WK-3000) to disappear. Basic Floppy Diskette Operation (WK-3500 Only) 1 Insert a floppy diskette into the keyboard's floppy disk drive. 2 Press the DISK/CARD button. • This causes a pointer to appear next to the DISK/ CARD on the display, and also displays "Disk" in the display's text area. 3 Perform the same operations as those starting from step 3 of under "Basic SmartMedia Card Operation" on page E-96. • Note that Disk Mode operations are indicated on the display by the prefix "Fd" in place of the "Crd" prefix of the Card Mode operations. 735A-E-099C WK3100_e_89-105.p65 97 04.3.26, 0:11 PM E-97
-
 1
1 -
2
-
3
-
4
-
5
-
6
-
7
-
8
-
9
-
10
-
11
-
12
-
13
-
14
-
15
-
16
-
17
-
18
-
19
-
20
-
21
-
22
-
23
-
24
-
25
-
26
-
27
-
28
-
29
-
30
-
31
-
32
-
33
-
34
-
35
-
36
-
37
-
38
-
39
-
40
-
41
-
42
-
43
-
44
-
45
-
46
-
47
-
48
-
49
-
50
-
51
-
52
-
53
-
54
-
55
-
56
-
57
-
58
-
59
-
60
-
61
-
62
-
63
-
64
-
65
-
66
-
67
-
68
-
69
-
70
-
71
-
72
-
73
-
74
-
75
-
76
-
77
-
78
-
79
-
80
-
81
-
82
-
83
-
84
-
85
-
86
-
87
-
88
-
89
-
90
-
91
-
92
-
93
-
 94
94 -
 95
95 -
 96
96 -
 97
97 -
 98
98 -
 99
99 -
 100
100 -
 101
101 -
 102
102 -
 103
103 -
 104
104 -
105
-
106
-
107
-
108
-
109
-
110
-
111
-
112
-
113
-
114
-
115
-
116
-
117
-
118
-
119
-
120
-
121
-
122
-
123
-
124
-
125
-
126
-
127
-
128
-
129
-
130
-
131
-
132
-
133
-
134
-
135
-
136
-
137
-
138
-
139
-
140
-
141
-
142
-
143
-
144
-
145
-
146
-
147
-
148
 |
 |
