Cisco 7940G Phone Guide - Page 25
Basic Call Handling, Placing a Call - speed dial
 |
UPC - 746320907345
View all Cisco 7940G manuals
Add to My Manuals
Save this manual to your list of manuals |
Page 25 highlights
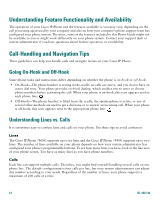
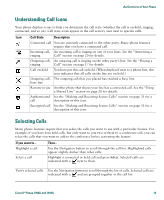
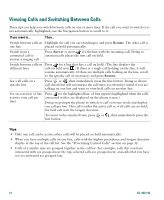
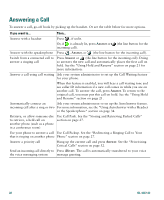
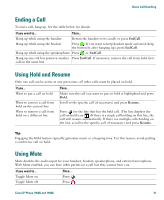
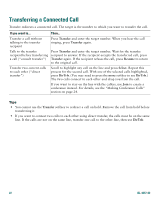
Basic Call Handling Basic Call Handling This section covers basic call-handling tasks such as placing, answering, and transferring calls. The features you use to perform these tasks are standard and available on most phone systems. Placing a Call To place a call, pick up the handset and dial. Or use one of the other options outlined in the table below. If you want to... Then... Dial on-hook (no dial Enter a phone number and do one of the following actions to go off-hook: tone) • Lift the handset • Press or • Press Dial • Press (a line button) Dial using the speakerphone Press New Call and enter a phone number. Or, you can press after dialing, re-dialing or speed dialing a number. before or Many of the actions that you can take to dial will automatically trigger speakerphone mode, if the handset is in its cradle and is not lit. These actions include pressing Redial or a speed dial button. Redial the most recently dialed number Press Redial. By default, Redial uses your primary line. However, you can open a secondary line and then press Redial. To open a line, press . Speed dial a number Do one of the following: • Press (a speed-dial button) before or after going off-hook. • Enter a speed dial index number (1-99 on the keypad) while on-hook and press AbbrDial. For details, see the "Setting Up Speed Dial Features" section on page 37. Place a call when Press another call is active (using a new line) for the new line. Doing so automatically places the first call on hold. Place a call when Press Hold, next press New Call, then dial, re-dial, or speed dial a number. another call is active Or, continue to talk on the active call while preparing to dial from a call log (using the same line) or corporate directory. (See the next two rows in this table for details.) Cisco IP Phone 7960G and 7940G 17
-
 1
1 -
2
-
3
-
4
-
5
-
6
-
7
-
8
-
9
-
10
-
11
-
12
-
13
-
14
-
15
-
16
-
17
-
18
-
19
-
 20
20 -
 21
21 -
 22
22 -
 23
23 -
 24
24 -
 25
25 -
 26
26 -
 27
27 -
 28
28 -
 29
29 -
 30
30 -
31
-
32
-
33
-
34
-
35
-
36
-
37
-
38
-
39
-
40
-
41
-
42
-
43
-
44
-
45
-
46
-
47
-
48
-
49
-
50
-
51
-
52
-
53
-
54
-
55
-
56
-
57
-
58
-
59
-
60
-
61
-
62
 |
 |
