Cisco 7940G Phone Guide - Page 44
Customizing Rings and Message Indicators, Customizing the Phone Screen
 |
UPC - 746320907345
View all Cisco 7940G manuals
Add to My Manuals
Save this manual to your list of manuals |
Page 44 highlights
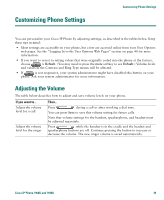
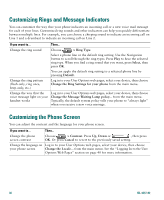
Customizing Rings and Message Indicators You can customize the way that your phone indicates an incoming call or a new voice mail message for each of your lines. Customized ring sounds and other indicators can help you quickly differentiate between multiple lines. For example, you can choose a chirping sound to indicate an incoming call on Line 1 and a drumbeat to indicate an incoming call on Line 2. If you want to... Then... Change the ring sound Choose > Ring Type. Select a phone line or the default ring setting. Use the Navigation button to scroll through the ring types. Press Play to hear the selected ring type. When you find a ring sound that you want, press Select, then press OK. You can apply the default ring setting to a selected phone line by pressing Default. Change the ring pattern (flash-only, ring once, beep-only, etc.) Log in to your User Options web pages, select your device, then choose Change the Ring Settings for your phone from the main menu. Change the way that the voice message light on your handset works Log in to your User Options web pages, select your device, then choose Change the Message Waiting Lamp policy... from the main menu. Typically, the default system policy tells your phone to "always light" when you receive a new voice message. Customizing the Phone Screen You can adjust the contrast and the language for your phone screen. If you want to... Then... Change the phone screen contrast Choose > Contrast. Press Up, Down or , then press OK. Or press Cancel to revert to the previously saved setting. Change the language on Log in to your User Options web pages, select your device, then choose your phone screen Change the Locale... from the main menu. See the "Logging In to the User Options Web Pages" section on page 40 for more information. 36 OL-4637-02
-
 1
1 -
2
-
3
-
4
-
5
-
6
-
7
-
8
-
9
-
10
-
11
-
12
-
13
-
14
-
15
-
16
-
17
-
18
-
19
-
20
-
21
-
22
-
23
-
24
-
25
-
26
-
27
-
28
-
29
-
30
-
31
-
32
-
33
-
34
-
35
-
36
-
37
-
38
-
 39
39 -
 40
40 -
 41
41 -
 42
42 -
 43
43 -
 44
44 -
 45
45 -
 46
46 -
 47
47 -
 48
48 -
 49
49 -
50
-
51
-
52
-
53
-
54
-
55
-
56
-
57
-
58
-
59
-
60
-
61
-
62
 |
 |
