D-Link DSL-504T Product Manual - Page 26
Configure Windows ME for DHCP - d link ip address
 |
UPC - 790069265204
View all D-Link DSL-504T manuals
Add to My Manuals
Save this manual to your list of manuals |
Page 26 highlights
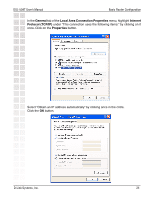
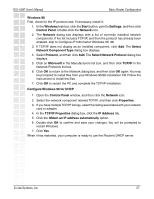
DSL-504T User's Manual Basic Router Configuration Windows ME First, check for the IP protocol and, if necessary, install it: 1. In the Windows task bar, click the Start button, point to Settings, and then click Control Panel. 2. Double-click the Network and Dial-up Connections icon. 3. In the Network and Dial-up Connections window, right-click the Network icon, and then select Properties. 4. The Network Properties dialog box displays with a list of currently installed network components. If the list includes Internet Protocol (TCP/IP), then the protocol has already been enabled. Skip ahead to Configure Windows ME for DHCP. 5. If Internet Protocol (TCP/IP) does not display as an installed component, click Add. 6. In the Select Network Component Type dialog box, select Protocol, and then click Add. 7. Select Microsoft in the Manufacturers box. 8. Select Internet Protocol (TCP/IP) in the Network Protocols list, and then click OK. 9. You may be prompted to install files from your Windows Me installation CD or other media. Follow the instructions to install the files. 10. If prompted, click OK to restart your computer with the new settings. Configure Windows ME for DHCP 1. In the Control Panel, double-click the Network and Dial-up Connections icon. 2. In the Network and Dial-up Connections window, right-click the Network icon, and then select Properties. 3. In the Network Properties dialog box, select TCP/IP, and then click Properties. 4. In the TCP/IP Settings dialog box, click the Obtain and IP address automatically option. 5. Double-click OK twice to confirm and save your changes, and then close the Control Panel. Your computer is now ready to use the Router's DHCP server. D-Link Systems, Inc. 26
-
 1
1 -
2
-
3
-
4
-
5
-
6
-
7
-
8
-
9
-
10
-
11
-
12
-
13
-
14
-
15
-
16
-
17
-
18
-
19
-
20
-
 21
21 -
 22
22 -
 23
23 -
 24
24 -
 25
25 -
 26
26 -
 27
27 -
 28
28 -
 29
29 -
 30
30 -
 31
31 -
32
-
33
-
34
-
35
-
36
-
37
-
38
-
39
-
40
-
41
-
42
-
43
-
44
-
45
-
46
-
47
-
48
-
49
-
50
-
51
-
52
-
53
-
54
-
55
-
56
-
57
-
58
-
59
-
60
-
61
-
62
-
63
-
64
-
65
-
66
-
67
-
68
-
69
-
70
-
71
-
72
-
73
-
74
-
75
-
76
-
77
-
78
-
79
-
80
-
81
-
82
-
83
-
84
-
85
-
86
-
87
-
88
-
89
-
90
-
91
-
92
-
93
-
94
-
95
-
96
-
97
-
98
-
99
 |
 |
