Dell 2330d User's Guide (HTML) - Page 127
Software Overview, Status Monitor Center, Set IP Address Utility
 |
UPC - 884116003618
View all Dell 2330d manuals
Add to My Manuals
Save this manual to your list of manuals |
Page 127 highlights
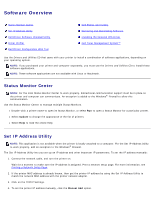
Software Overview Status Monitor Center Set IP Address Utility Dell Printer Software Uninstall Utility Driver Profiler Dell Printer Configuration Web Tool Dell Printer Alert Utility Removing and Reinstalling Software Installing the Optional XPS Driver Dell Toner Management System™ Use the Drivers and Utilities CD that came with your printer to install a combination of software applications, depending on your operating system. NOTE: If you purchased your printer and computer separately, you must use the Drivers and Utilities CD to install these software applications. NOTE: These software applications are not available with Linux or Macintosh. Status Monitor Center NOTE: For the local Status Monitor Center to work properly, bidirectional communication support must be in place so the printer and computer can communicate. An exception is added to the Windows® Firewall to allow this communication. Use the Status Monitor Center to manage multiple Status Monitors. Double-click a printer name to open its Status Monitor, or select Run to open a Status Monitor for a particular printer. Select Update to change the appearance of the list of printers. Select Help to read the online Help. Set IP Address Utility NOTE: This application is not available when the printer is locally attached to a computer. For the Set IP Address Utility to work properly, add an exception to the Windows® Firewall. The Set IP Address Utility lets you set up an IP address and other important IP parameters. To set the IP address manually: 1. Connect the network cable, and turn the printer on. Wait for a moment to make sure the IP address is assigned. Print a network setup page. For more information, see Printing a Network Setup Page. 2. If the printer MAC address is already known, then get the printer IP address by using the Set IP Address Utility to match the network MAC address with the printer network adapter. 3. Click on the TCP/IP Settings. 4. To set the printer IP address manually, click the Manual Add option.
-
 1
1 -
2
-
3
-
4
-
5
-
6
-
7
-
8
-
9
-
10
-
11
-
12
-
13
-
14
-
15
-
16
-
17
-
18
-
19
-
20
-
21
-
22
-
23
-
24
-
25
-
26
-
27
-
28
-
29
-
30
-
31
-
32
-
33
-
34
-
35
-
36
-
37
-
38
-
39
-
40
-
41
-
42
-
43
-
44
-
45
-
46
-
47
-
48
-
49
-
50
-
51
-
52
-
53
-
54
-
55
-
56
-
57
-
58
-
59
-
60
-
61
-
62
-
63
-
64
-
65
-
66
-
67
-
68
-
69
-
70
-
71
-
72
-
73
-
74
-
75
-
76
-
77
-
78
-
79
-
80
-
81
-
82
-
83
-
84
-
85
-
86
-
87
-
88
-
89
-
90
-
91
-
92
-
93
-
94
-
95
-
96
-
97
-
98
-
99
-
100
-
101
-
102
-
103
-
104
-
105
-
106
-
107
-
108
-
109
-
110
-
111
-
112
-
113
-
114
-
115
-
116
-
117
-
118
-
119
-
120
-
121
-
 122
122 -
 123
123 -
 124
124 -
 125
125 -
 126
126 -
 127
127 -
 128
128 -
 129
129 -
 130
130 -
 131
131 -
 132
132 -
133
 |
 |