Dell 2330d User's Guide (HTML) - Page 63
Dell 2330d - Laser Printer B/W Manual
 |
UPC - 884116003618
View all Dell 2330d manuals
Add to My Manuals
Save this manual to your list of manuals |
Page 63 highlights
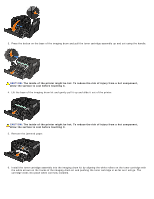
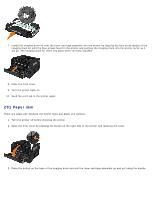
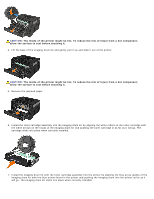
CAUTION: The inside of the printer might be hot. To reduce the risk of injury from a hot component, allow the surface to cool before touching it. 4. Lift the base of the imaging drum kit and gently pull it up and slide it out of the printer. CAUTION: The inside of the printer might be hot. To reduce the risk of injury from a hot component, allow the surface to cool before touching it. 5. Remove the jammed paper. 6. Install the toner cartridge assembly into the imaging drum kit by aligning the white rollers on the toner cartridge with the white arrows on the tracks of the imaging drum kit and pushing the toner cartridge in as far as it will go. The cartridge clicks into place when correctly installed. 7. Install the imaging drum kit with the toner cartridge assembly into the printer by aligning the blue arrow guides of the imaging drum kit with the blue arrows found in the printer and pushing the imaging drum into the printer as far as it will go. The imaging drum kit clicks into place when correctly installed.
-
 1
1 -
2
-
3
-
4
-
5
-
6
-
7
-
8
-
9
-
10
-
11
-
12
-
13
-
14
-
15
-
16
-
17
-
18
-
19
-
20
-
21
-
22
-
23
-
24
-
25
-
26
-
27
-
28
-
29
-
30
-
31
-
32
-
33
-
34
-
35
-
36
-
37
-
38
-
39
-
40
-
41
-
42
-
43
-
44
-
45
-
46
-
47
-
48
-
49
-
50
-
51
-
52
-
53
-
54
-
55
-
56
-
57
-
 58
58 -
 59
59 -
 60
60 -
 61
61 -
 62
62 -
 63
63 -
 64
64 -
 65
65 -
 66
66 -
 67
67 -
 68
68 -
69
-
70
-
71
-
72
-
73
-
74
-
75
-
76
-
77
-
78
-
79
-
80
-
81
-
82
-
83
-
84
-
85
-
86
-
87
-
88
-
89
-
90
-
91
-
92
-
93
-
94
-
95
-
96
-
97
-
98
-
99
-
100
-
101
-
102
-
103
-
104
-
105
-
106
-
107
-
108
-
109
-
110
-
111
-
112
-
113
-
114
-
115
-
116
-
117
-
118
-
119
-
120
-
121
-
122
-
123
-
124
-
125
-
126
-
127
-
128
-
129
-
130
-
131
-
132
-
133
 |
 |
