Dell Dimension 4500C Dell Dimension 4500C Owner's Manual - Page 84
Adding PC Cards Optional
 |
View all Dell Dimension 4500C manuals
Add to My Manuals
Save this manual to your list of manuals |
Page 84 highlights
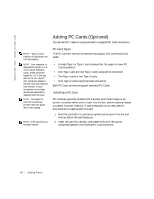
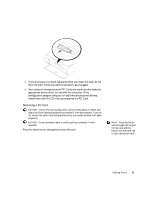
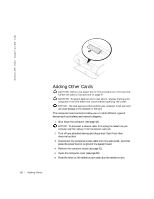
www.jp.dell.com | support.jp.dell.com Adding PC Cards (Optional) You can add PC Cards to computers with integrated PC Card connectors. HINT: "Type" of card refers to its thickness, not its functionality. HINT: Your computer is designed for either 5-V or 3.3-V 16-bit PCMCIA cards. Some cards are keyed for 3.3 V only but will not fit into the PC slot. Cards are keyed to prevent incorrect insertion into the slot. If card orientation is not clear, see the documentation supplied with the card. HINT: The length of some PC Cards may prevent the front-panel door from closing. HINT: A PC Card is not a bootable device. PC Card Types The PC Card slot has two connectors that support four combinations of cards: • A single Type I or Type II card (using either the upper or lower PC Card connector) • One Type I card and one Type II card (using either connector) • Two Type I cards or two Type II cards • One Type III card (using the lower connector) Both PC Card connectors support extended PC Cards. Installing a PC Card PC Cards are generally marked with a symbol (such as a triangle or an arrow) to indicate which end to insert into the slot, and the cards are keyed to prevent incorrect insertion. If card orientation is not clear, see the documentation supplied with the card. 1 Hold the card with its orientation symbol pointing into the slot and the top side of the card facing up. 2 Insert the card into the slot, and press firmly until the card is completely seated in the internal PC Card connector. 84 A d d i n g Pa r ts
-
 1
1 -
2
-
3
-
4
-
5
-
6
-
7
-
8
-
9
-
10
-
11
-
12
-
13
-
14
-
15
-
16
-
17
-
18
-
19
-
20
-
21
-
22
-
23
-
24
-
25
-
26
-
27
-
28
-
29
-
30
-
31
-
32
-
33
-
34
-
35
-
36
-
37
-
38
-
39
-
40
-
41
-
42
-
43
-
44
-
45
-
46
-
47
-
48
-
49
-
50
-
51
-
52
-
53
-
54
-
55
-
56
-
57
-
58
-
59
-
60
-
61
-
62
-
63
-
64
-
65
-
66
-
67
-
68
-
69
-
70
-
71
-
72
-
73
-
74
-
75
-
76
-
77
-
78
-
 79
79 -
 80
80 -
 81
81 -
 82
82 -
 83
83 -
 84
84 -
 85
85 -
 86
86 -
 87
87 -
 88
88 -
 89
89 -
90
-
91
-
92
-
93
-
94
-
95
-
96
-
97
-
98
-
99
-
100
-
101
-
102
-
103
-
104
-
105
-
106
-
107
-
108
-
109
-
110
 |
 |