Dell Inspiron 2500 Solutions Guide - Page 72
Replacing a Hard Drive
 |
View all Dell Inspiron 2500 manuals
Add to My Manuals
Save this manual to your list of manuals |
Page 72 highlights
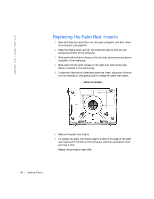
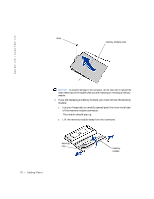
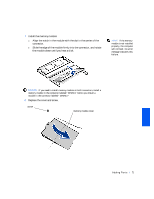
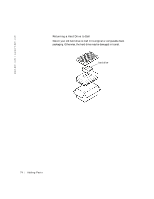
w w w . de ll .c om | sup port .d ell.c om HINT: Dell does not guarantee compatibility or provide support for hard drives from sources other than Dell. HINT: You need the Operating System CD to install the Windows operating system. You also need the Drivers and Utilities CD to install the drivers and utilities on the new hard drive. 9 Insert the battery into the battery bay, or connect the AC adapter to your computer and an electrical outlet. 10 Turn on the computer. As the computer boots, it will detect the additional memory and automatically update the system configuration information. Replacing a Hard Drive NOTICE: Hard drives are extremely fragile and must be handled carefully. Even a slight bump can damage the drive. CAUTION: If you remove the hard drive from the computer when the drive is hot, do not touch the metal housing of the hard drive. NOTICE: To prevent data loss, turn off your computer (see page24) before removing or installing a hard drive. Do not remove the hard drive while the computer is in standby mode or hibernate mode, or if the power light is lit. 1 Save and close any open files, exit any open programs, and shut down the computer (see page24). 2 Remove all installed batteries, and disconnect the AC adapter cable and any external devices from the computer. 3 Turn the computer over, and remove the hard drive screw. 72 Adding Parts
-
 1
1 -
2
-
3
-
4
-
5
-
6
-
7
-
8
-
9
-
10
-
11
-
12
-
13
-
14
-
15
-
16
-
17
-
18
-
19
-
20
-
21
-
22
-
23
-
24
-
25
-
26
-
27
-
28
-
29
-
30
-
31
-
32
-
33
-
34
-
35
-
36
-
37
-
38
-
39
-
40
-
41
-
42
-
43
-
44
-
45
-
46
-
47
-
48
-
49
-
50
-
51
-
52
-
53
-
54
-
55
-
56
-
57
-
58
-
59
-
60
-
61
-
62
-
63
-
64
-
65
-
66
-
 67
67 -
 68
68 -
 69
69 -
 70
70 -
 71
71 -
 72
72 -
 73
73 -
 74
74 -
 75
75 -
 76
76 -
 77
77 -
78
-
79
-
80
-
81
-
82
-
83
-
84
-
85
-
86
-
87
-
88
-
89
-
90
-
91
-
92
-
93
-
94
-
95
-
96
-
97
-
98
-
99
-
100
-
101
-
102
-
103
-
104
-
105
-
106
-
107
-
108
-
109
-
110
-
111
-
112
-
113
-
114
-
115
-
116
-
117
-
118
 |
 |