Dell P703w User Guide - Page 17
Copying Using the Computer
 |
View all Dell P703w manuals
Add to My Manuals
Save this manual to your list of manuals |
Page 17 highlights
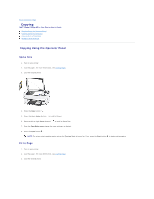
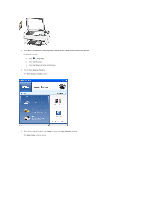
Photo Layout You can set the layout for making copies of photos on your printer. The following layouts are supported: l Borderless (default) l Bordered l 2 per Page l 3 per Page l 4 per Page l 9 per Page l 2x2 Poster l 3x3 Poster l 4x4 Poster 1. Turn on your printer. 2. Load the paper. For more information, see Loading Paper. 3. Load the original photo. 4. Press the Copy button . 5. Press the down Arrow button to scroll to Output. 6. Press the left or right Arrow button to scroll to Photo Layouts. 7. Press the down Arrow button to scroll to Size. 8. Press the left or right Arrow button to change the layout. 9. From the Copy Mode menu change the copy settings, as desired. 10. Press the Start button . NOTE: The printer starts making copies unless the Preview Mode is turned on. If so, press the Start button to begin making copies. Copying Using the Computer 1. Turn on your computer and printer, and ensure that they are connected. 2. Load the paper. For more information, see Loading Paper. 3. Load the original photo.
-
 1
1 -
2
-
3
-
4
-
5
-
6
-
7
-
8
-
9
-
10
-
11
-
 12
12 -
 13
13 -
 14
14 -
 15
15 -
 16
16 -
 17
17 -
 18
18 -
 19
19 -
 20
20 -
 21
21 -
 22
22 -
23
-
24
-
25
-
26
-
27
-
28
-
29
-
30
-
31
-
32
-
33
-
34
-
35
-
36
-
37
-
38
-
39
-
40
-
41
-
42
-
43
-
44
-
45
-
46
-
47
-
48
-
49
-
50
-
51
-
52
-
53
-
54
-
55
-
56
-
57
-
58
-
59
-
60
-
61
-
62
-
63
-
64
-
65
-
66
-
67
-
68
-
69
-
70
-
71
-
72
-
73
-
74
-
75
-
76
-
77
-
78
-
79
-
80
-
81
-
82
-
83
-
84
-
85
-
86
-
87
-
88
-
89
-
90
 |
 |
