Dell P703w User Guide - Page 76
Transferring Pictures Problems, Wireless Network Problem - printing problems
 |
View all Dell P703w manuals
Add to My Manuals
Save this manual to your list of manuals |
Page 76 highlights
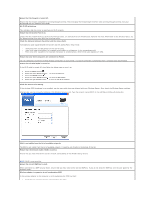
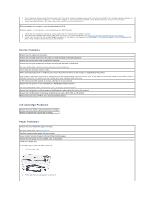
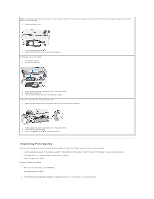
Scanned image blank. Your original is not placed correctly on the scanner glass. Place your original face down on the right front corner of the scanner glass. Proofsheet scan unsuccessful. Probable Cause 1 The scanner glass is dirty. Ensure that the scanner glass is completely clean or the proofsheet might not scan properly . For more information, see Cleaning the Scanner Glass. Probable Cause 2 Memory Card or Camera Changed Ensure that the same memory card inserted or camera connected you used to print the proofsheet. Probable Cause 3 Proofsheet not placed correctly on scanner glass. Place the proofsheet on the front right of the scanner glass. Transferring Pictures Problems l If you are trying to transfer pictures from a memory card and a PictBridge camera is connected, remove it. l Close unnecessary software applications, and minimize remaining application windows. Follow any messages on the screen that may have been hidden by other windows. l Disconnect and then reconnect the USB cable from the printer to the computer. l Ensure that you are using the USB cable included with your printer. l Ensure that Adobe Photoshop Album SE software is installed. If you choose Custom installation, ensure to install the printer driver. l Un-install, and then reinstall Adobe Photoshop Album SE software. l Ensure that your computer meets the minimum requirements. NOTE: The printer is compatible with the Dell 8-in-1-card reader (sold separately). Other Dell USB card readers may work with the printer; however, other manufacturers' card readers are not supported. Wireless Network Problem Cannot print using Wi-Fi from my computer. Ensure that there are at least three bars (green color) in your printer to indicate a minimum Wi-Fi signal strength. Poor signal strength affects the print performance and also the print reliability. Check the placement of the printer and router. Ensure the correct placement of the printer and router to optimize the Wi-Fi signal strength. Ensure that your computer is connected to a wireless network. 1. Click Start® Control Panel. 2. Double-click Network Connections. The Wireless Network Connection icon should state that is connected with a valid IP address. If the Wireless Network Connection icon states that it is connected with an invalid IP address or not connected, go to Dell Wireless Support Center for assistance or troubleshooting your wireless network. Check that you are connected to correct network. Ensure that the SSID of the printer and the computer are same. To verify, print a Network Configuration Settings page from the printer with the following steps and verify that the SSID is the same as in the computer. Check the Network Status 1. Press the Menu button . 2. Press the down Arrow button to scroll to Network. 3. Press the Select button . 4. Scroll to Status and then press the Select button to view the network details.
-
 1
1 -
2
-
3
-
4
-
5
-
6
-
7
-
8
-
9
-
10
-
11
-
12
-
13
-
14
-
15
-
16
-
17
-
18
-
19
-
20
-
21
-
22
-
23
-
24
-
25
-
26
-
27
-
28
-
29
-
30
-
31
-
32
-
33
-
34
-
35
-
36
-
37
-
38
-
39
-
40
-
41
-
42
-
43
-
44
-
45
-
46
-
47
-
48
-
49
-
50
-
51
-
52
-
53
-
54
-
55
-
56
-
57
-
58
-
59
-
60
-
61
-
62
-
63
-
64
-
65
-
66
-
67
-
68
-
69
-
70
-
 71
71 -
 72
72 -
 73
73 -
 74
74 -
 75
75 -
 76
76 -
 77
77 -
 78
78 -
 79
79 -
 80
80 -
 81
81 -
82
-
83
-
84
-
85
-
86
-
87
-
88
-
89
-
90
 |
 |
