Dell P703w User Guide - Page 20
Copying From a Thick Book, Changing Copy Settings
 |
View all Dell P703w manuals
Add to My Manuals
Save this manual to your list of manuals |
Page 20 highlights
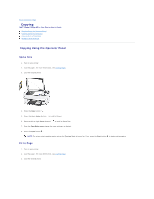
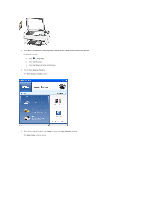
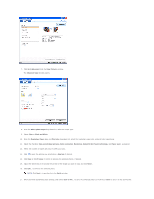
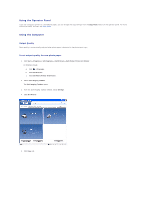
NOTE: Click Cancel to undo the changes made. 18. Click Next > to go to the Finish window. 19. When you finish customizing your settings, click Copy or Finish. The picture(s) are scanned and copy progress information appears that shows the progress of the copy. Copying From a Thick Book 1. Turn on your printer. 2. Load the paper. For more information, see Loading Paper. 3. Load the original thick book. Your printer functions normally even with the top cover open. You can lift the top cover from the hinges. NOTE: To get a better Copy quality, cover the extra space on the scanner glass with a white blank paper, if the size of the book is lesser than the scanner glass. 4. Press the Copy button . 5. Press the down Arrow button to scroll to Output. 6. Press the left or right Arrow button to scroll to Same Size/Fit to Page/Scale Percent/Photo Layout. 7. Press the down Arrow button to scroll to Size. 8. Press the left or right Arrow button to change the size (10-500). 9. From the Copy Mode menu change the copy settings, as desired. 10. Press the Start button . NOTE: The printer starts making copies unless the Preview Mode is turned on. If so, press Start to begin making copies. Changing Copy Settings
-
 1
1 -
2
-
3
-
4
-
5
-
6
-
7
-
8
-
9
-
10
-
11
-
12
-
13
-
14
-
 15
15 -
 16
16 -
 17
17 -
 18
18 -
 19
19 -
 20
20 -
 21
21 -
 22
22 -
 23
23 -
 24
24 -
 25
25 -
26
-
27
-
28
-
29
-
30
-
31
-
32
-
33
-
34
-
35
-
36
-
37
-
38
-
39
-
40
-
41
-
42
-
43
-
44
-
45
-
46
-
47
-
48
-
49
-
50
-
51
-
52
-
53
-
54
-
55
-
56
-
57
-
58
-
59
-
60
-
61
-
62
-
63
-
64
-
65
-
66
-
67
-
68
-
69
-
70
-
71
-
72
-
73
-
74
-
75
-
76
-
77
-
78
-
79
-
80
-
81
-
82
-
83
-
84
-
85
-
86
-
87
-
88
-
89
-
90
 |
 |
