Dell P703w User Guide - Page 19
Kodak Perfect Touch technology
 |
View all Dell P703w manuals
Add to My Manuals
Save this manual to your list of manuals |
Page 19 highlights
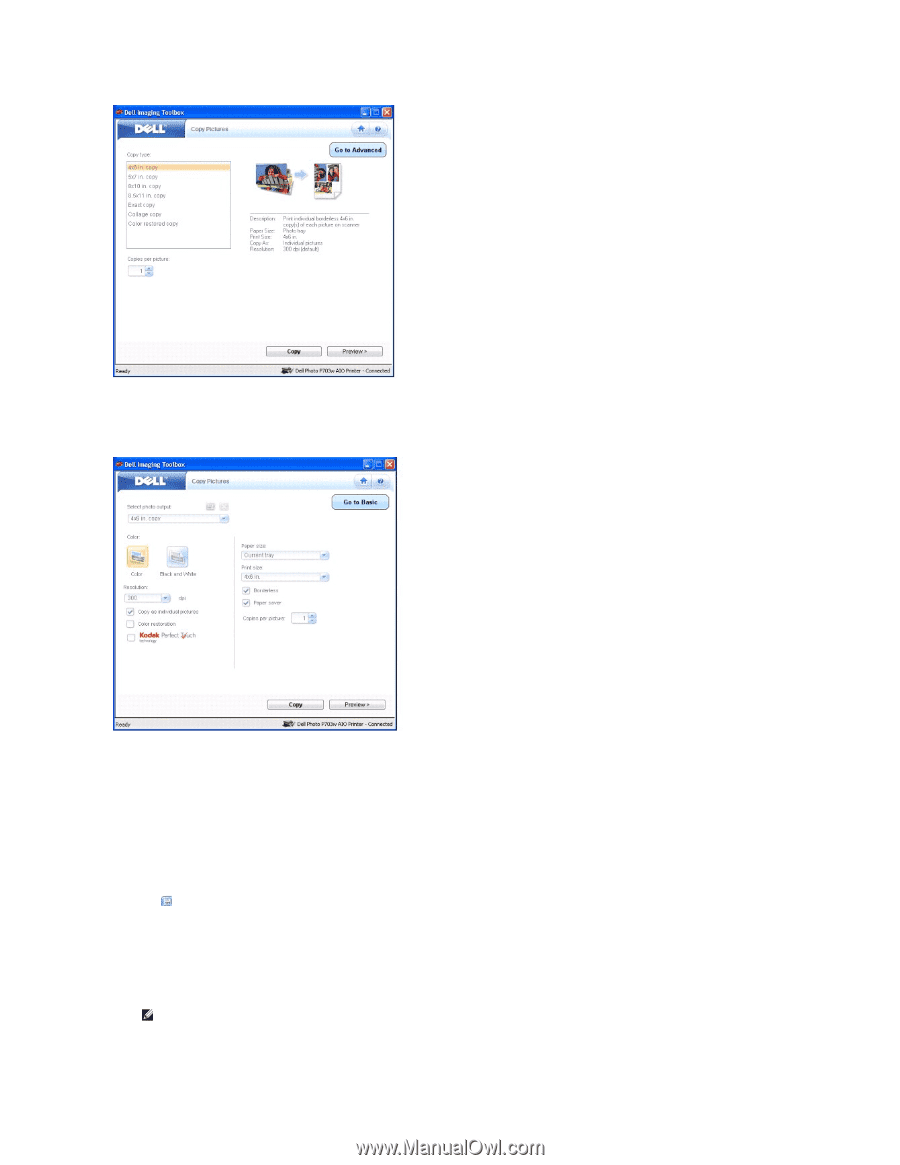
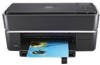
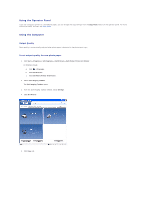
7. Click Go to Advanced from the Copy Pictures window. The Advanced Copy window opens. 8. From the Select photo output drop-down list, select an output type. 9. Select Color or Black and White. 10. From the Resolution, Paper size, and Print size drop-down list, select the resolution, paper size, and print size respectively. 11. Select the checkbox Copy as individual pictures, Color restoration, Borderless, Kodak Perfect Touch technology, and Paper saver, as desired. 12. Select the number of Copies per picture (1-99) you want. 13. Click to save the options you selected as a Shortcut, if desired. 14. Click Copy or click Preview > button to preview the scanned photos, if desired. 15. Adjust the dotted box to fit around the portion of the image you want to copy and click Next>. 16. Click Edit... to enhance the selected photo. NOTE: Click Next > to go directly to the Finish window. 17. When you finish customizing your settings, click either Save to File... to save the enhanced picture at new file or Save to save it to the scanned file.
-
 1
1 -
2
-
3
-
4
-
5
-
6
-
7
-
8
-
9
-
10
-
11
-
12
-
13
-
 14
14 -
 15
15 -
 16
16 -
 17
17 -
 18
18 -
 19
19 -
 20
20 -
 21
21 -
 22
22 -
 23
23 -
 24
24 -
25
-
26
-
27
-
28
-
29
-
30
-
31
-
32
-
33
-
34
-
35
-
36
-
37
-
38
-
39
-
40
-
41
-
42
-
43
-
44
-
45
-
46
-
47
-
48
-
49
-
50
-
51
-
52
-
53
-
54
-
55
-
56
-
57
-
58
-
59
-
60
-
61
-
62
-
63
-
64
-
65
-
66
-
67
-
68
-
69
-
70
-
71
-
72
-
73
-
74
-
75
-
76
-
77
-
78
-
79
-
80
-
81
-
82
-
83
-
84
-
85
-
86
-
87
-
88
-
89
-
90
 |
 |