Dell P703w User Guide - Page 8
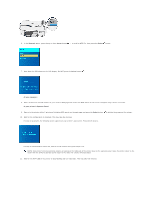
At your printer's Operator Panel, Arrow, Select, At your computer, USB connection, Wireless - all in one printer
 |
View all Dell P703w manuals
Add to My Manuals
Save this manual to your list of manuals |
Page 8 highlights
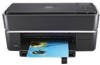
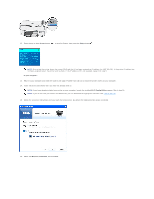
At your printer's Operator Panel: 3. Press the Menu button . 4. Press the down Arrow button to scroll to Network. 5. Press the Select button . 6. Press the down Arrow button to scroll to WiFi Radio. 7. Press the left or right Arrow button to set the parameter value to on. 8. Press the Select button . At your computer: 9. If you are using your printer with an existing computer: Go to step 10. If you are using your printer with a new Dell computer: Go to step 11. 10. Ensure that your computer is on, and then insert the Drivers and Utilities CD. The CD launches automatically. NOTE: If you do not have your Drivers and Utilities CD, you can download the appropriate software from support.dell.com. The Windows firewall settings might have to be disabled before you download the software. 11. Connect the USB cable between the port on the back of the printer and the computer. 12. Follow the on-screen instructions until you reach the below screen. By default the USB connection option is selected. 13. Select the Wireless connection, and click Next.
-
 1
1 -
2
-
 3
3 -
 4
4 -
 5
5 -
 6
6 -
 7
7 -
 8
8 -
 9
9 -
 10
10 -
 11
11 -
 12
12 -
 13
13 -
14
-
15
-
16
-
17
-
18
-
19
-
20
-
21
-
22
-
23
-
24
-
25
-
26
-
27
-
28
-
29
-
30
-
31
-
32
-
33
-
34
-
35
-
36
-
37
-
38
-
39
-
40
-
41
-
42
-
43
-
44
-
45
-
46
-
47
-
48
-
49
-
50
-
51
-
52
-
53
-
54
-
55
-
56
-
57
-
58
-
59
-
60
-
61
-
62
-
63
-
64
-
65
-
66
-
67
-
68
-
69
-
70
-
71
-
72
-
73
-
74
-
75
-
76
-
77
-
78
-
79
-
80
-
81
-
82
-
83
-
84
-
85
-
86
-
87
-
88
-
89
-
90
 |
 |