Dell P703w User Guide - Page 37
Disabling the Upgrade
 |
View all Dell P703w manuals
Add to My Manuals
Save this manual to your list of manuals |
Page 37 highlights
7. Remove and discard the orange protective cap. 8. Place the new printhead into the carriage. 9. Push firmly against the target label on the printhead until it clicks into place. 10. Reinstall the ink cartridges into the printhead. For more information, see the steps 7 and 8 under the section Replacing Ink Cartridges. 11. Close the scanner base unit. Disabling the Upgrade To enable or disable the Dell Imaging Toolbox from automatically checking for software updates each time it starts: 1. Click Start® Programs® Dell Printers® Dell Photo P703w AIO Printer. In Windows Vista®: a. Click ® Programs. b. Click Dell Printers.
-
 1
1 -
2
-
3
-
4
-
5
-
6
-
7
-
8
-
9
-
10
-
11
-
12
-
13
-
14
-
15
-
16
-
17
-
18
-
19
-
20
-
21
-
22
-
23
-
24
-
25
-
26
-
27
-
28
-
29
-
30
-
31
-
 32
32 -
 33
33 -
 34
34 -
 35
35 -
 36
36 -
 37
37 -
 38
38 -
 39
39 -
 40
40 -
 41
41 -
 42
42 -
43
-
44
-
45
-
46
-
47
-
48
-
49
-
50
-
51
-
52
-
53
-
54
-
55
-
56
-
57
-
58
-
59
-
60
-
61
-
62
-
63
-
64
-
65
-
66
-
67
-
68
-
69
-
70
-
71
-
72
-
73
-
74
-
75
-
76
-
77
-
78
-
79
-
80
-
81
-
82
-
83
-
84
-
85
-
86
-
87
-
88
-
89
-
90
 |
 |

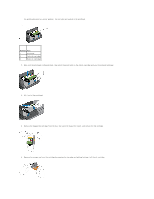
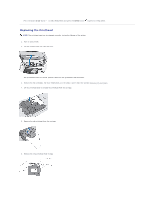
7.
Remove and discard the orange protective cap.
8.
Place the new printhead into the carriage.
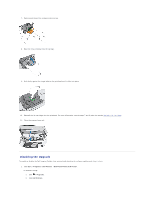
9.
Push firmly against the target label on the printhead until it clicks into place.
10.
Reinstall the ink cartridges into the printhead. For more information, see the steps 7 and 8 under the section
Replacing Ink Cartridges
.
11.
Close the scanner base unit.
Disabling the Upgrade
To enable or disable the Dell Imaging Toolbox from automatically checking for software updates each time it starts:
1.
Click
Start
®
Programs
®
Dell Printers
®
Dell Photo P703w AIO Printer
.
In
Windows Vista
®
:
a.
Click
®
Programs
.
b.
Click
Dell Printers
.