Dell P703w User Guide - Page 41
Printing Photos From a Memory Card or USB Key Using the Operator Panel, Printing Tagged Photos DPOF - windows 8
 |
View all Dell P703w manuals
Add to My Manuals
Save this manual to your list of manuals |
Page 41 highlights
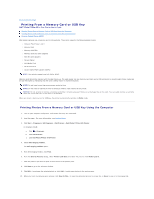
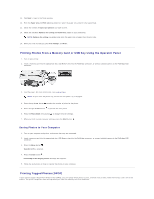
11. Click Next > to go to the Finish window. 12. From the Paper size and Print size drop-down list, select the paper size and print size respectively. 13. Select the number of Copies per pictures you want to print. 14. Select the checkbox Optimize for cutting and Borderless, based on your preference. NOTE: Optimize for cutting is available only when the paper size is bigger than the print size. 15. When you finish customizing your Print settings, click Print. Printing Photos From a Memory Card or USB Key Using the Operator Panel 1. Turn on your printer. 2. Insert a memory card into the appropriate slot, USB Memory key into the PictBridge connector, or connect a digital camera to the PictBridge/USB connector. 3. Load the paper. For more information, see Loading Paper. NOTE: To print from the photo tray, ensure that the photo tray is engaged. 4. Press the up Arrow button to select the number of prints for the photo. 5. Press the right Arrow button to preview the next photo. 6. Press the Photo Mode menu button to change the print settings. 7. When you finish customizing your settings, press the Start button . Saving Photos to Your Computer 1. Turn on your computer and printer, and ensure that they are connected. 2. Insert a memory card into the appropriate slot, USB Memory key into the PictBridge connector, or connect a digital camera to the PictBridge/USB connector. 3. Press the Menu button . Transfer to PC is selected. 4. Press the Start button . Connecting to the imaging service message box appears. 5. Follow the instructions on how to transfer the photos to your computer. Printing Tagged Photos (DPOF) If your camera supports Digital Print Order Format (DPOF), you can specify which photos to print, and how many of each, while the memory card is still in the camera. The printer recognizes these settings when you insert the memory card into the printer.
-
 1
1 -
2
-
3
-
4
-
5
-
6
-
7
-
8
-
9
-
10
-
11
-
12
-
13
-
14
-
15
-
16
-
17
-
18
-
19
-
20
-
21
-
22
-
23
-
24
-
25
-
26
-
27
-
28
-
29
-
30
-
31
-
32
-
33
-
34
-
35
-
 36
36 -
 37
37 -
 38
38 -
 39
39 -
 40
40 -
 41
41 -
 42
42 -
 43
43 -
 44
44 -
 45
45 -
 46
46 -
47
-
48
-
49
-
50
-
51
-
52
-
53
-
54
-
55
-
56
-
57
-
58
-
59
-
60
-
61
-
62
-
63
-
64
-
65
-
66
-
67
-
68
-
69
-
70
-
71
-
72
-
73
-
74
-
75
-
76
-
77
-
78
-
79
-
80
-
81
-
82
-
83
-
84
-
85
-
86
-
87
-
88
-
89
-
90
 |
 |
