Dell P703w User Guide - Page 81
Message, Cause, Action/Solution, Dell Imaging Toolbox, Paper Messages, Select, Start, Print Messages - ink
 |
View all Dell P703w manuals
Add to My Manuals
Save this manual to your list of manuals |
Page 81 highlights
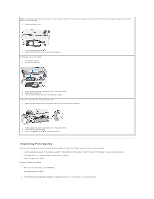
Message Black ink cartridge is low. Cause Ink remaining in black tank is less than 15 percent. Black ink cartridge needs replacing. The black ink cartridge has reached its end of life and needs to be replaced. Black ink cartridge not recognized. Black ink cartridge has an Invalid Manufacturer Code. New updates are available to optimize your print quality. Better performance can be achieved with the currently installed ink cartridges, if a firmware upgrade is performed. Action/Solution Black ink cartridge needs to be replaced soon. Order for the Ink cartridge. Install a new Dell approved black ink cartridge for best results. Install a new Dell approved black ink cartridge for best results. Upgrade your printer's firmware for best results. Black ink cartridge is not inserted properly. Black ink cartridge is not installed. An improper electrical connection to the ink cartridge was detected. NOTE: Use the Dell Imaging Toolbox to upgrade. Reinstall the black ink cartridge. Black ink cartridge is not installed or an incorrect or damaged ink cartridge is installed. Install a new Dell approved black ink cartridge for best results. Message Paper jam 1. Clear the paper jam. 2. Press the Select button on the printer. Paper Messages Cause Action/Solution The printer has detected an error condition that indicates the paper may be jammed in the printer or failed to feed from the input tray. NOTE: For best result, use only Dell ink cartridges & paper for your printer. 1. Disengage the photo paper tray, if engaged. 2. Turn off your printer for 5 seconds, and then turn it back on. 3. Any paper stuck in the printer should automatically eject. 4. If the paper does not automatically eject, disconnect the power from the printer and carefully remove any paper stuck in the printer including paper pieces. Paper is loaded incorrectly. Print carriage jam. Dell paper not recognized. Proofsheet no longer valid. Photo paper was loaded upside down. For some reason, most likely a paper jam, the carriage cannot travel freely. The Dell paper loaded needs a later version of firmware. NOTE: Remove the jammed papers from the Rear access door. 5. Remove the paper supply from the paper tray. Carefully fan the paper to keep the sheets from sticking together. 6. Reload the paper tray. Do not overfill. 7. Reconnect the power to the printer. 8. Re-engage the photo paper tray, if desired, then press the Start button to resume printing for a computer print job. You have to start a local print job over. 9. If the problem persists, call Dell service for assistance. Load photo paper print-side down. Clear the jammed paper and press Select button to continue. Upgrade your printer's firmware. The device used to print the proofsheet was removed. A new session number is assigned each time a Proofsheet is printed. When the printer scans the Proofsheet it must match the current session number. Print a new proofsheet. Message Printhead missing or not installed correctly. Printer requires calibration. Calibration unsuccessful Print Messages Cause The printer has detected that a Printhead is not installed. The printer has detected that you have installed a new Printhead and now it must be calibrated. Calibration sheet not inserted correctly. Cannot read calibration sheet. The printer detected a calibration sheet, but can not read it. Action/Solution Install the printhead. Press the Start button to continue. Check calibration sheet placement and press the Select button to continue. Press the Select button.
-
 1
1 -
2
-
3
-
4
-
5
-
6
-
7
-
8
-
9
-
10
-
11
-
12
-
13
-
14
-
15
-
16
-
17
-
18
-
19
-
20
-
21
-
22
-
23
-
24
-
25
-
26
-
27
-
28
-
29
-
30
-
31
-
32
-
33
-
34
-
35
-
36
-
37
-
38
-
39
-
40
-
41
-
42
-
43
-
44
-
45
-
46
-
47
-
48
-
49
-
50
-
51
-
52
-
53
-
54
-
55
-
56
-
57
-
58
-
59
-
60
-
61
-
62
-
63
-
64
-
65
-
66
-
67
-
68
-
69
-
70
-
71
-
72
-
73
-
74
-
75
-
 76
76 -
 77
77 -
 78
78 -
 79
79 -
 80
80 -
 81
81 -
 82
82 -
 83
83 -
 84
84 -
 85
85 -
 86
86 -
87
-
88
-
89
-
90
 |
 |
