Dell PowerEdge C6420 EMC Installation and Service Manual - Page 69
Installing the air shroud
 |
View all Dell PowerEdge C6420 manuals
Add to My Manuals
Save this manual to your list of manuals |
Page 69 highlights
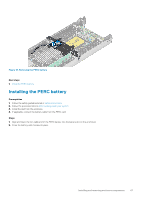
Figure 20. Removing the air shroud Next steps 1. Install the air shroud. Installing the air shroud Prerequisites 1. Follow the safety guidelines listed in Safety instructions. Steps 1. Insert the air shroud into the sled, aligning the shroud hinge with slot on the sled. NOTE: Ensure that both the SATA cables are routed through the air shroud cable guide slot behind the air shroud latches. NOTE: Ensure that neither of the cables are pinched or pressed under the air shroud. 2. Press the air shroud until the locks click into place. Installing and removing enclosure components 69
-
 1
1 -
2
-
3
-
4
-
5
-
6
-
7
-
8
-
9
-
10
-
11
-
12
-
13
-
14
-
15
-
16
-
17
-
18
-
19
-
20
-
21
-
22
-
23
-
24
-
25
-
26
-
27
-
28
-
29
-
30
-
31
-
32
-
33
-
34
-
35
-
36
-
37
-
38
-
39
-
40
-
41
-
42
-
43
-
44
-
45
-
46
-
47
-
48
-
49
-
50
-
51
-
52
-
53
-
54
-
55
-
56
-
57
-
58
-
59
-
60
-
61
-
62
-
63
-
 64
64 -
 65
65 -
 66
66 -
 67
67 -
 68
68 -
 69
69 -
 70
70 -
 71
71 -
 72
72 -
 73
73 -
 74
74 -
75
-
76
-
77
-
78
-
79
-
80
-
81
-
82
-
83
-
84
-
85
-
86
-
87
-
88
-
89
-
90
-
91
-
92
-
93
-
94
-
95
-
96
-
97
-
98
-
99
-
100
-
101
-
102
-
103
-
104
-
105
-
106
-
107
-
108
-
109
-
110
-
111
-
112
-
113
-
114
-
115
-
116
-
117
-
118
-
119
-
120
-
121
-
122
-
123
-
124
-
125
-
126
-
127
-
128
-
129
 |
 |

Figure 20. Removing the air shroud
Next steps
1.
Install the air shroud
.
Installing the air shroud
Prerequisites
1.
Follow the safety guidelines listed in
Safety instructions
.
Steps
1.
Insert the air shroud into the sled, aligning the shroud hinge with slot on the sled.
NOTE:
Ensure that both the SATA cables are routed through the air shroud cable guide slot behind the air shroud
latches.
NOTE:
Ensure that neither of the cables are pinched or pressed under the air shroud.
2.
Press the air shroud until the locks click into place.
Installing and removing enclosure components
69