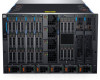
Dell PowerEdge MX7000 EMC OpenManage Enterprise-Modular Edition Version 1.00.1 - Page 17
Initial configuration
 |
View all Dell PowerEdge MX7000 manuals
Add to My Manuals
Save this manual to your list of manuals |
Page 17 highlights
Initial configuration Dell EMC recommends the following configuration threshold for better performance of the chassis. If the configuration exceeds the threshold, then some features including firmware update, backup, and restore may not work as expected. This may also affect system performance. Component Count Templates 320 Alert Policy 50 Identity pool 501 Network (VLAN) 214 Catalog 50 Baseline 50 To configure a chassis: 1 Click Devices > Chassis > View Details > Configure > Initial Configuration. The Chassis Deployment Wizard is displayed. NOTE: You can configure the chassis using an existing chassis profile. 2 In the Import Profile tab, click Import to open the Import Profile window. Enter details of the network share, where the chassis profile is located and click Import. 3 In the Time Configuration tab, select the Configure Time Settings to configure the time zone and timestamp of the configuration. 4 Select the Use NTP check box to configure the primary, secondary, or tertiary NTP addresses and click Next. NOTE: It is recommended that at least three valid NTP servers, which synchronize to a single time source, are used to ensure reliable synchronization. If you select multiple NTP servers, OME-Modular selects the NTP server algorithmically. The Activity and Alerts tab is displayed. 5 Configure the email, SNMP, and system log settings and click Next. The iDRAC tab is displayed. 6 Select the Configure iDRAC Quick Deploy Settings check box to configure the password to access the iDRAC web interface and the management IPs, and click Next. You can select the slots to which the iDRAC Quick Deploy settings must be applied. The Network IOM tab is displayed. 7 Select the Configure I/O Module Quick Deploy Settings check box to configure the password to access the IOM console and management IPs, and click Next. The Firmware tab is displayed. 8 Select the Configure all devices to use following catalog check box, select the network share type and click Catalog to open the Add Firmware Catalog window. 9 Enter a name for the catalog, select the catalog source, and click Finish to save the changes and return to the Chassis Deployment Wizard. 10 Click Next to view the Proxy tab and configure the proxy settings. OME-Modular uses the proxy settings to access the Dell EMC website for the latest catalogs. You can also enable the HTTP proxy settings and proxy authentication. 11 Click Next to view the Group Definition tab. 12 Select Create Group to configure the chassis group settings. 13 Click Next to view the Summary tab. Logging in to OME-Modular 17
-
 1
1 -
2
-
3
-
4
-
5
-
6
-
7
-
8
-
9
-
10
-
11
-
 12
12 -
 13
13 -
 14
14 -
 15
15 -
 16
16 -
 17
17 -
 18
18 -
 19
19 -
 20
20 -
 21
21 -
 22
22 -
23
-
24
-
25
-
26
-
27
-
28
-
29
-
30
-
31
-
32
-
33
-
34
-
35
-
36
-
37
-
38
-
39
-
40
-
41
-
42
-
43
-
44
-
45
-
46
-
47
-
48
-
49
-
50
-
51
-
52
-
53
-
54
-
55
-
56
-
57
-
58
-
59
-
60
-
61
-
62
-
63
-
64
-
65
-
66
-
67
-
68
-
69
-
70
-
71
-
72
-
73
-
74
-
75
-
76
-
77
-
78
-
79
-
80
-
81
-
82
-
83
-
84
-
85
-
86
-
87
-
88
-
89
-
90
-
91
-
92
-
93
-
94
-
95
-
96
 |
 |
