Dell PowerEdge SC1435 Hardware Owner's Manual - Page 55
Removing the Optical Drive from the Drive Tray, Hard Drives
 |
View all Dell PowerEdge SC1435 manuals
Add to My Manuals
Save this manual to your list of manuals |
Page 55 highlights
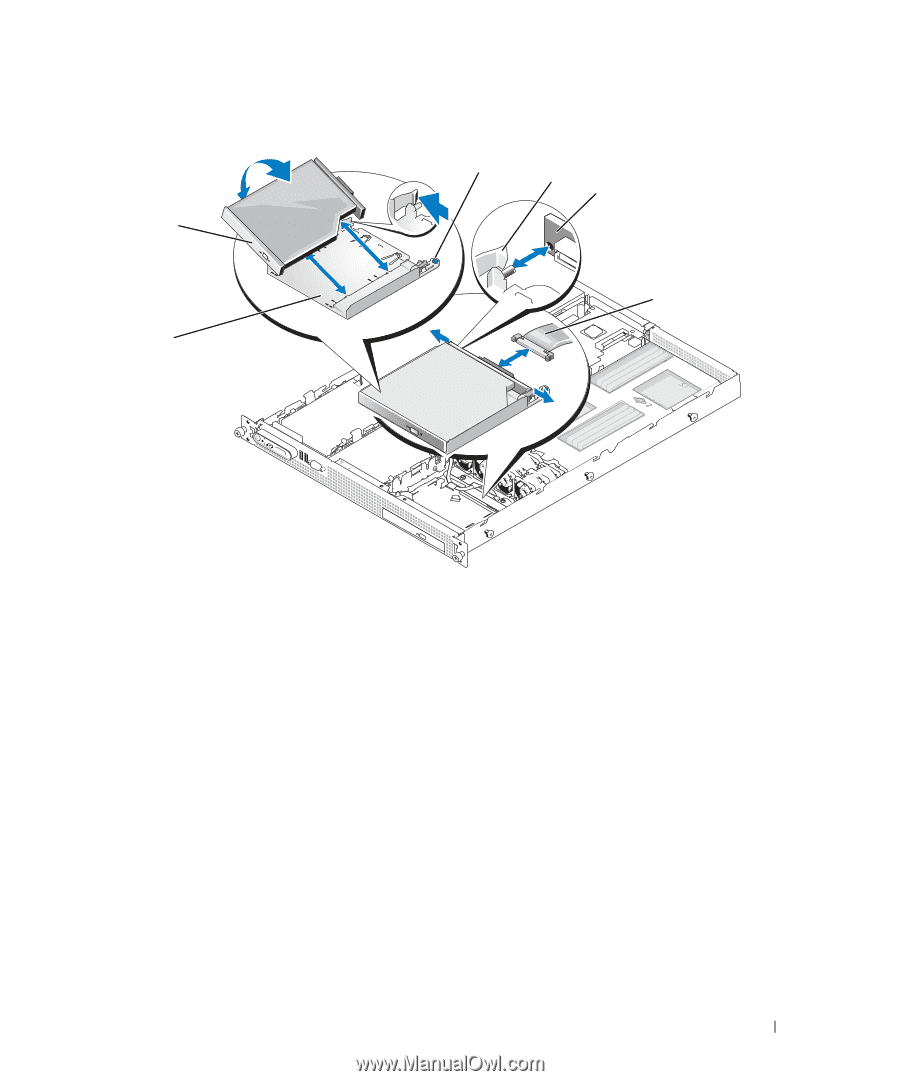
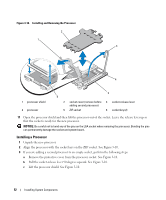
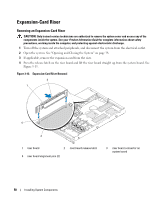
Figure 3-11. Removing and Installing the Optical Drive 3 2 1 4 5 6 1 drive tray 4 interposer board retention tabs (2) 2 optical drive 5 interposer board 3 tray release tab 6 optical-drive cable Removing the Optical Drive from the Drive Tray 1 Remove the interposer board from the drive by deflecting the tab at each end of the board. 2 To remove the drive from the tray, push outward on the left retention tab at the back of the tray so as to bend the tray wall out slightly and then pull up on the left side of the drive to disengage. To install a new drive in the tray, fit the drive into the tray, then fit the interposer board onto the back of the drive. Hard Drives This subsection describes how to install and configure SAS or SATA hard drives in the system's two internal hard-drive bays. Installing System Components 55
-
 1
1 -
2
-
3
-
4
-
5
-
6
-
7
-
8
-
9
-
10
-
11
-
12
-
13
-
14
-
15
-
16
-
17
-
18
-
19
-
20
-
21
-
22
-
23
-
24
-
25
-
26
-
27
-
28
-
29
-
30
-
31
-
32
-
33
-
34
-
35
-
36
-
37
-
38
-
39
-
40
-
41
-
42
-
43
-
44
-
45
-
46
-
47
-
48
-
49
-
 50
50 -
 51
51 -
 52
52 -
 53
53 -
 54
54 -
 55
55 -
 56
56 -
 57
57 -
 58
58 -
 59
59 -
 60
60 -
61
-
62
-
63
-
64
-
65
-
66
-
67
-
68
-
69
-
70
-
71
-
72
-
73
-
74
-
75
-
76
-
77
-
78
-
79
-
80
-
81
-
82
-
83
-
84
-
85
-
86
-
87
-
88
-
89
-
90
-
91
-
92
-
93
-
94
-
95
-
96
-
97
-
98
-
99
-
100
-
101
-
102
-
103
-
104
-
105
-
106
-
107
-
108
-
109
-
110
-
111
-
112
-
113
-
114
-
115
-
116
-
117
-
118
-
119
-
120
-
121
-
122
-
123
-
124
-
125
-
126
-
127
-
128
-
129
-
130
-
131
-
132
 |
 |