Dell Studio Hybrid D140G Studio Hybrid Service Manual - Page 27
Installing the RF Receiver Board, Installing the Front I/O Panel, Installing the Drive Cage,
 |
View all Dell Studio Hybrid D140G manuals
Add to My Manuals
Save this manual to your list of manuals |
Page 27 highlights
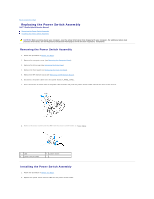
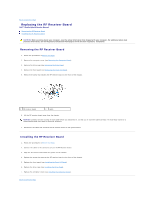
3. Align the power switch holder with the corresponding slot on the chassis and gently push the power switch holder until it snaps into place. 4. Connect the power cable to the system board(F_PANEL_CON1). 5. Replace the RF receiver board (see Installing the RF Receiver Board). 6. Replace the front panel (see Installing the Front I/O Panel). 7. Replace the drive cage (see Installing the Drive Cage). 8. Replace the computer cover (see Installing the Computer Cover). Back to Contents Page
-
 1
1 -
2
-
3
-
4
-
5
-
6
-
7
-
8
-
9
-
10
-
11
-
12
-
13
-
14
-
15
-
16
-
17
-
18
-
19
-
20
-
21
-
 22
22 -
 23
23 -
 24
24 -
 25
25 -
 26
26 -
 27
27 -
 28
28 -
 29
29 -
 30
30 -
 31
31 -
 32
32 -
33
-
34
-
35
-
36
-
37
-
38
-
39
-
40
-
41
-
42
 |
 |

3.
Align the power switch holder with the corresponding slot on the chassis and gently push the power switch holder until it snaps into place.
4.
Connect the power cable to the system board(F_PANEL_CON1).
5.
Replace the RF receiver board (see
Installing the RF Receiver Board
).
6.
Replace the front panel (see
Installing the Front I/O Panel
).
7.
Replace the drive cage (see
Installing the Drive Cage
).
8.
Replace the computer cover (see
Installing the Computer Cover
).
Back to Contents Page