Dell XPS Owners Manual - Page 68
Addressing Memory With 4-GB Configurations, Installing Memory
 |
View all Dell XPS manuals
Add to My Manuals
Save this manual to your list of manuals |
Page 68 highlights
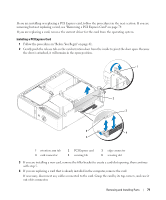
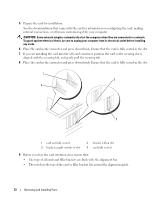
Addressing Memory With 4-GB Configurations Your computer supports a maximum of 4 GB of memory when you use two 2-GB DIMMs. Current operating systems, such as Microsoft® Windows® XP, can use a maximum of 4 GB of address space; however, the amount of memory available to the operating system is less than 4 GB. Certain components within the computer require address space in the 4-GB range. Any address space reserved for these components cannot be used by computer memory. Installing Memory CAUTION: Before you begin any of the procedures in this section, follow the safety instructions located in the Product Information Guide. NOTICE: To prevent static damage to components inside your computer, discharge static electricity from your body before you touch any of your computer's electronic components. You can do so by touching an unpainted metal surface on the computer chassis. 1 Follow the procedures in "Before You Begin" on page 61. 2 Remove the CD/DVD drive (see "Removing a CD/DVD Drive" on page 81). 3 Remove the optional Media Card Reader or optional floppy drive, (see "Removing a Media Card Reader" on page 85 or "Removing a Floppy Drive" on page 89) if installed. 4 Press out the securing clip at each end of the memory module connector. 1 2 3 1 memory connector closest to processor 2 securing clips (2) 3 connector 68 Removing and Installing Parts
-
 1
1 -
2
-
3
-
4
-
5
-
6
-
7
-
8
-
9
-
10
-
11
-
12
-
13
-
14
-
15
-
16
-
17
-
18
-
19
-
20
-
21
-
22
-
23
-
24
-
25
-
26
-
27
-
28
-
29
-
30
-
31
-
32
-
33
-
34
-
35
-
36
-
37
-
38
-
39
-
40
-
41
-
42
-
43
-
44
-
45
-
46
-
47
-
48
-
49
-
50
-
51
-
52
-
53
-
54
-
55
-
56
-
57
-
58
-
59
-
60
-
61
-
62
-
 63
63 -
 64
64 -
 65
65 -
 66
66 -
 67
67 -
 68
68 -
 69
69 -
 70
70 -
 71
71 -
 72
72 -
 73
73 -
74
-
75
-
76
-
77
-
78
-
79
-
80
-
81
-
82
-
83
-
84
-
85
-
86
-
87
-
88
-
89
-
90
-
91
-
92
-
93
-
94
-
95
-
96
-
97
-
98
-
99
-
100
-
101
-
102
-
103
-
104
-
105
-
106
-
107
-
108
-
109
-
110
-
111
-
112
-
113
-
114
-
115
-
116
-
117
-
118
-
119
-
120
-
121
-
122
-
123
-
124
-
125
-
126
-
127
-
128
-
129
-
130
-
131
-
132
-
133
-
134
-
135
-
136
 |
 |