Epson 2450 Scanner Basics - Page 35
image-processing or Smart Panel application.
 |
UPC - 010343837836
View all Epson 2450 manuals
Add to My Manuals
Save this manual to your list of manuals |
Page 35 highlights
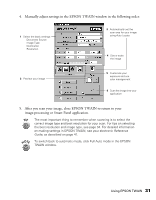
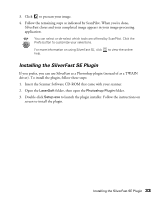
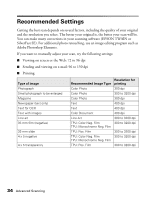
4. Manually adjust settings in the EPSON TWAIN window in the following order: 1 Select the basic settings: Document Source Image Type Destination Resolution 3 Automatically set the scan area for your image using Auto Locate 4 Size or scale the image 2 Preview your image 5 Customize your exposure and use color management 6 Scan the image into your application 5. After you scan your image, close EPSON TWAIN to return to your image-processing or Smart Panel application. The most important thing to remember when scanning is to select the correct image type and best resolution for your scan. For tips on selecting the best resolution and image type, see page 34. For detailed information on making settings in EPSON TWAIN, see your electronic Reference Guide, as described on page 41. To switch back to automatic mode, click Full Auto mode in the EPSON TWAIN window. Using EPSON TWAIN 31
-
 1
1 -
2
-
3
-
4
-
5
-
6
-
7
-
8
-
9
-
10
-
11
-
12
-
13
-
14
-
15
-
16
-
17
-
18
-
19
-
20
-
21
-
22
-
23
-
24
-
25
-
26
-
27
-
28
-
29
-
 30
30 -
 31
31 -
 32
32 -
 33
33 -
 34
34 -
 35
35 -
 36
36 -
 37
37 -
 38
38 -
 39
39 -
 40
40 -
41
-
42
-
43
-
44
-
45
-
46
-
47
-
48
-
49
-
50
-
51
-
52
-
53
-
54
-
55
-
56
-
57
-
58
 |
 |
