Epson 2450 Scanner Basics - Page 9
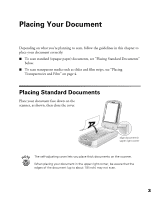
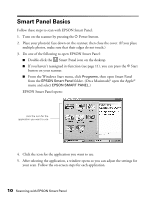
With the white side facing toward, you, partially insert the lower tabs
 |
UPC - 010343837836
View all Epson 2450 manuals
Add to My Manuals
Save this manual to your list of manuals |
Page 9 highlights
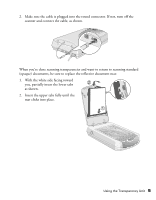
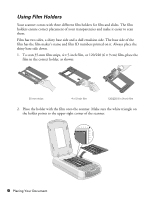
2. Make sure the cable is plugged into the round connector. If not, turn off the scanner and connect the cable, as shown. When you're done scanning transparencies and want to return to scanning standard (opaque) documents, be sure to replace the reflective document mat: 1. With the white side facing toward you, partially insert the lower tabs as shown. 2. Insert the upper tabs fully until the mat clicks into place. Using the Transparency Unit 5
-
 1
1 -
2
-
3
-
 4
4 -
 5
5 -
 6
6 -
 7
7 -
 8
8 -
 9
9 -
 10
10 -
 11
11 -
 12
12 -
 13
13 -
 14
14 -
15
-
16
-
17
-
18
-
19
-
20
-
21
-
22
-
23
-
24
-
25
-
26
-
27
-
28
-
29
-
30
-
31
-
32
-
33
-
34
-
35
-
36
-
37
-
38
-
39
-
40
-
41
-
42
-
43
-
44
-
45
-
46
-
47
-
48
-
49
-
50
-
51
-
52
-
53
-
54
-
55
-
56
-
57
-
58
 |
 |

Using the Transparency Unit
5
2.
Make sure the cable is plugged into the round connector. If not, turn off the
scanner and connect the cable, as shown.
When you
’
re done scanning transparencies and want to return to scanning standard
(opaque) documents, be sure to replace the reflective document mat:
1.
With the white side facing toward
you, partially insert the lower tabs
as shown.
2.
Insert the upper tabs fully until the
mat clicks into place.