Epson ActionNote 650C User Manual - Page 18
Setting Up the Computer, For more information about powering the computer with
 |
View all Epson ActionNote 650C manuals
Add to My Manuals
Save this manual to your list of manuals |
Page 18 highlights
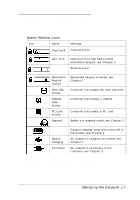
Position the connector on the AC adapter cable so the side with the arrow faces up. Then connect the cable to the AC adapter port on the right side of the computer. Plug the adapter's power cord into an electrical outlet. The green power light on the adapter comes on and the AC Power icon (the plug) appears in the computer's System Window. (See page 1-7 for a description of the System Window icons.) For more information about powering the computer with the AC adapter, see Chapter 3. For instructions on connecting optional equipment to your computer, see Chapter 4. 1-4 Setting Up the Computer
-
 1
1 -
2
-
3
-
4
-
5
-
6
-
7
-
8
-
9
-
10
-
11
-
12
-
 13
13 -
 14
14 -
 15
15 -
 16
16 -
 17
17 -
 18
18 -
 19
19 -
 20
20 -
 21
21 -
 22
22 -
 23
23 -
24
-
25
-
26
-
27
-
28
-
29
-
30
-
31
-
32
-
33
-
34
-
35
-
36
-
37
-
38
-
39
-
40
-
41
-
42
-
43
-
44
-
45
-
46
-
47
-
48
-
49
-
50
-
51
-
52
-
53
-
54
-
55
-
56
-
57
-
58
-
59
-
60
-
61
-
62
-
63
-
64
-
65
-
66
-
67
-
68
-
69
-
70
-
71
-
72
-
73
-
74
-
75
-
76
-
77
-
78
-
79
-
80
-
81
-
82
-
83
-
84
-
85
-
86
-
87
-
88
-
89
-
90
-
91
-
92
-
93
-
94
-
95
-
96
-
97
-
98
-
99
-
100
-
101
-
102
-
103
-
104
-
105
-
106
-
107
-
108
-
109
-
110
-
111
-
112
-
113
-
114
 |
 |

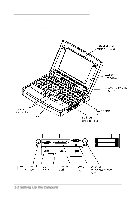
Position the connector on the AC adapter cable so the side with
the arrow faces up. Then connect the cable to the AC adapter
port on the right side of the computer.
Plug the adapter’s power cord into an electrical outlet. The
green power light on the adapter comes on and the AC Power
icon (the plug) appears in the computer’s System Window. (See
page 1-7 for a description of the System Window icons.)
For more information about powering the computer with the
AC adapter, see Chapter 3. For instructions on connecting
optional equipment to your computer, see Chapter 4.
1-4 Setting Up the Computer