Epson P400 User Manual - Page 117
Using Ink Density Optimization, Cleaning the Paper Guide Rollers
 |
View all Epson P400 manuals
Add to My Manuals
Save this manual to your list of manuals |
Page 117 highlights
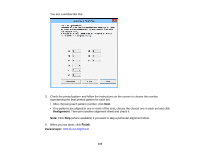
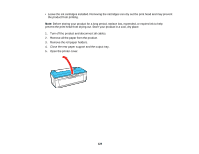
Using Ink Density Optimization Your product can automatically agitate the ink cartridges to eliminate any inconsistencies in ink density, called Auto Ink Density Optimization. Note: Ink Density Optimization does not consume ink. By default, the setting is set to On and we recommend leaving it turned on. If you turn off Auto Ink Density Optimization, run the Ink Density Optimization utility manually once a week, as described here. 1. Do one of the following: • Windows: Access the Windows Desktop, right-click the product icon in the Windows taskbar, and select Printer Settings. Click the Utility tab and select Printer and Option Information. • OS X: In the Apple menu or the Dock, select System Preferences. Select Print & Fax, Print & Scan, or Printers & Scanners, select your product, and select Options & Supplies. Select Utility and select Open Printer Utility. 2. Select Ink Density Optimization and follow the on-screen instructions. The power light starts flashing. Optimization is finished in about 30 seconds. Note: Do not open the printer cover or front manual feed tray while the power light is flashing. Parent topic: Adjusting Print Quality Cleaning the Paper Guide Rollers If you see ink on the back of a printout, you can clean the paper guide rollers to remove any excess ink. If plain paper isn't effective, you can use Epson Ink Jet Printer Cleaning Sheets (part number S041150) to clean the rollers. A cleaning sheet will help remove dust from the rollers, which can cause a loss of traction and prevent paper from feeding properly. Caution: Remove the instruction sheet attached to the Epson Ink Jet Printer Cleaning Sheets and do not follow the steps on it; they are not correct for your printer. Do not use the cleaning sheets that come with certain Epson special papers; they may jam inside your printer. 117
-
 1
1 -
2
-
3
-
4
-
5
-
6
-
7
-
8
-
9
-
10
-
11
-
12
-
13
-
14
-
15
-
16
-
17
-
18
-
19
-
20
-
21
-
22
-
23
-
24
-
25
-
26
-
27
-
28
-
29
-
30
-
31
-
32
-
33
-
34
-
35
-
36
-
37
-
38
-
39
-
40
-
41
-
42
-
43
-
44
-
45
-
46
-
47
-
48
-
49
-
50
-
51
-
52
-
53
-
54
-
55
-
56
-
57
-
58
-
59
-
60
-
61
-
62
-
63
-
64
-
65
-
66
-
67
-
68
-
69
-
70
-
71
-
72
-
73
-
74
-
75
-
76
-
77
-
78
-
79
-
80
-
81
-
82
-
83
-
84
-
85
-
86
-
87
-
88
-
89
-
90
-
91
-
92
-
93
-
94
-
95
-
96
-
97
-
98
-
99
-
100
-
101
-
102
-
103
-
104
-
105
-
106
-
107
-
108
-
109
-
110
-
111
-
 112
112 -
 113
113 -
 114
114 -
 115
115 -
 116
116 -
 117
117 -
 118
118 -
 119
119 -
 120
120 -
 121
121 -
 122
122 -
123
-
124
-
125
-
126
-
127
-
128
-
129
-
130
-
131
-
132
-
133
-
134
-
135
-
136
-
137
-
138
-
139
-
140
-
141
-
142
-
143
-
144
-
145
-
146
-
147
-
148
-
149
-
150
-
151
-
152
-
153
-
154
-
155
-
156
-
157
-
158
-
159
-
160
-
161
-
162
-
163
-
164
-
165
-
166
-
167
-
168
-
169
-
170
-
171
-
172
-
173
 |
 |