Epson P400 User Manual - Page 49
Print Quality Options - Windows, Color Management Options - Windows
 |
View all Epson P400 manuals
Add to My Manuals
Save this manual to your list of manuals |
Page 49 highlights
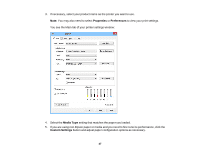
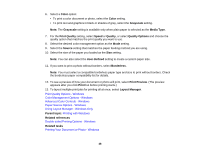
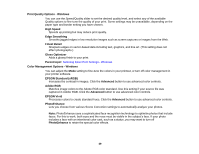
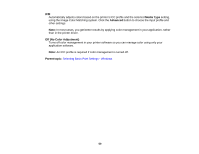
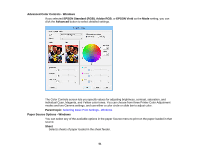
Print Quality Options - Windows You can use the Speed/Quality slider to set the desired quality level, and select any of the available Quality options to fine-tune the quality of your print. Some settings may be unavailable, depending on the paper type and border setting you have chosen. High Speed Speeds up printing but may reduce print quality. Edge Smoothing Smooths jagged edges in low-resolution images such as screen captures or images from the Web. Finest Detail Sharpens edges on vector-based data including text, graphics, and line art. (This setting does not affect photographs.) Gloss Optimizer Adds a glossy finish to your print. Parent topic: Selecting Basic Print Settings - Windows Color Management Options - Windows You can adjust the Mode setting to fine-tune the colors in your printout, or turn off color management in your printer software. EPSON Standard (sRGB) Increases the contrast in images. Click the Advanced button to use advanced color controls. Adobe RGB Matches image colors to the Adobe RGB color standard. Use this setting if your source file was captured in Adobe RGB. Click the Advanced button to use advanced color controls. EPSON Vivid Processes colors to create standard hues. Click the Advanced button to use advanced color controls. PhotoEnhance Lets you choose from various Scene Correction settings to automatically analyze your photos. Note: PhotoEnhance uses a sophisticated face recognition technology to optimize photos that include faces. For this to work, both eyes and the nose must be visible in the subject's face. If your photo includes a face with an intentional color cast, such as a statue, you may want to turn off PhotoEnhance to retain the special color effects. 49
-
 1
1 -
2
-
3
-
4
-
5
-
6
-
7
-
8
-
9
-
10
-
11
-
12
-
13
-
14
-
15
-
16
-
17
-
18
-
19
-
20
-
21
-
22
-
23
-
24
-
25
-
26
-
27
-
28
-
29
-
30
-
31
-
32
-
33
-
34
-
35
-
36
-
37
-
38
-
39
-
40
-
41
-
42
-
43
-
 44
44 -
 45
45 -
 46
46 -
 47
47 -
 48
48 -
 49
49 -
 50
50 -
 51
51 -
 52
52 -
 53
53 -
 54
54 -
55
-
56
-
57
-
58
-
59
-
60
-
61
-
62
-
63
-
64
-
65
-
66
-
67
-
68
-
69
-
70
-
71
-
72
-
73
-
74
-
75
-
76
-
77
-
78
-
79
-
80
-
81
-
82
-
83
-
84
-
85
-
86
-
87
-
88
-
89
-
90
-
91
-
92
-
93
-
94
-
95
-
96
-
97
-
98
-
99
-
100
-
101
-
102
-
103
-
104
-
105
-
106
-
107
-
108
-
109
-
110
-
111
-
112
-
113
-
114
-
115
-
116
-
117
-
118
-
119
-
120
-
121
-
122
-
123
-
124
-
125
-
126
-
127
-
128
-
129
-
130
-
131
-
132
-
133
-
134
-
135
-
136
-
137
-
138
-
139
-
140
-
141
-
142
-
143
-
144
-
145
-
146
-
147
-
148
-
149
-
150
-
151
-
152
-
153
-
154
-
155
-
156
-
157
-
158
-
159
-
160
-
161
-
162
-
163
-
164
-
165
-
166
-
167
-
168
-
169
-
170
-
171
-
172
-
173
 |
 |
