Epson PhotoPC 3100Z User Manual - Page 20
Using the Camera Dial and Turning On the Camera, Image Matching and DPOF. See
 |
View all Epson PhotoPC 3100Z manuals
Add to My Manuals
Save this manual to your list of manuals |
Page 20 highlights
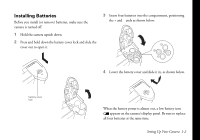
Using the Camera Dial and Turning On the Camera The camera dial has six settings: three for taking pictures and three for performing other functions, such as setting up your camera or playing photos back on the LCD screen. camera dial To turn on the camera, remove the lens cap, then press the POWER button in the center of the dial. (Press it again to turn the camera off.) POWER button Camera dial settings include the following: Use this setting for video clip capture, continuous shooting, interval shooting, and panorama stitching. See Chapter 3 for details. Use this setting to take photos with the LCD screen. See page 2-3 for details. Use this setting to take photos with the optical viewfinder. See page 2-1 for details. Use this setting to play back and delete photos and video clips, and add audio recordings to your photos. See Chapter 6 for details. Use this setting whenever you are connecting your camera to the computer. Also use it for PRINT Image Matching and DPOF. See Chapter 8 for details. Use this setting to set up or view information about your camera on the Setup screen. See Chapter 1 and Chapter 7 for information. Setting Up Your Camera 1-7
-
 1
1 -
2
-
3
-
4
-
5
-
6
-
7
-
8
-
9
-
10
-
11
-
12
-
13
-
14
-
 15
15 -
 16
16 -
 17
17 -
 18
18 -
 19
19 -
 20
20 -
 21
21 -
 22
22 -
 23
23 -
 24
24 -
 25
25 -
26
-
27
-
28
-
29
-
30
-
31
-
32
-
33
-
34
-
35
-
36
-
37
-
38
-
39
-
40
-
41
-
42
-
43
-
44
-
45
-
46
-
47
-
48
-
49
-
50
-
51
-
52
-
53
-
54
-
55
-
56
-
57
-
58
-
59
-
60
-
61
-
62
-
63
-
64
-
65
-
66
-
67
-
68
-
69
-
70
-
71
-
72
-
73
-
74
-
75
-
76
-
77
-
78
-
79
-
80
-
81
-
82
-
83
-
84
-
85
-
86
-
87
-
88
-
89
-
90
-
91
-
92
-
93
-
94
-
95
-
96
-
97
-
98
-
99
-
100
-
101
-
102
-
103
-
104
-
105
-
106
-
107
-
108
-
109
-
110
-
111
-
112
-
113
-
114
-
115
-
116
-
117
-
118
-
119
-
120
-
121
-
122
-
123
-
124
-
125
-
126
-
127
-
128
-
129
-
130
-
131
-
132
-
133
-
134
-
135
-
136
-
137
-
138
-
139
-
140
-
141
-
142
-
143
-
144
-
145
-
146
-
147
-
148
-
149
-
150
-
151
-
152
-
153
-
154
-
155
-
156
-
157
-
158
-
159
-
160
-
161
-
162
-
163
-
164
-
165
-
166
-
167
-
168
-
169
-
170
-
171
-
172
-
173
-
174
-
175
-
176
-
177
-
178
-
179
-
180
-
181
-
182
-
183
-
184
-
185
-
186
-
187
-
188
-
189
-
190
-
191
-
192
-
193
 |
 |
