Epson TM-L90 Technical Reference - Page 38
Setting Procedure
 |
View all Epson TM-L90 manuals
Add to My Manuals
Save this manual to your list of manuals |
Page 38 highlights
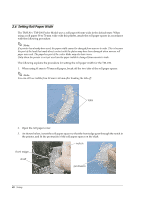
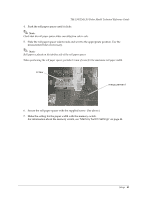
2.5.2 Setting Procedure 1. Turn off the power. 2. Pull the cover open lever, and open the roll paper cover. 3. Push the body case outward (in the direction of the 2 arrows) and remove the cutter cover. cutter cover 4. Remove the single screw retaining the cutter unit and loosen the screw indicated by the circle in the illustration below. Remove this screw 5. Lift the top of the cutter unit upward and remove it. Loosen this screw Cutter unit Lift upwards 38 Setup
-
 1
1 -
2
-
3
-
4
-
5
-
6
-
7
-
8
-
9
-
10
-
11
-
12
-
13
-
14
-
15
-
16
-
17
-
18
-
19
-
20
-
21
-
22
-
23
-
24
-
25
-
26
-
27
-
28
-
29
-
30
-
31
-
32
-
 33
33 -
 34
34 -
 35
35 -
 36
36 -
 37
37 -
 38
38 -
 39
39 -
 40
40 -
 41
41 -
 42
42 -
 43
43 -
44
-
45
-
46
-
47
-
48
-
49
-
50
-
51
-
52
-
53
-
54
-
55
-
56
-
57
-
58
-
59
-
60
-
61
-
62
-
63
-
64
-
65
-
66
-
67
-
68
-
69
-
70
-
71
-
72
-
73
-
74
-
75
-
76
-
77
-
78
-
79
-
80
-
81
-
82
-
83
-
84
-
85
-
86
-
87
-
88
-
89
-
90
-
91
-
92
-
93
-
94
-
95
-
96
-
97
-
98
-
99
-
100
-
101
-
102
-
103
-
104
-
105
-
106
-
107
-
108
-
109
-
110
-
111
-
112
-
113
-
114
-
115
-
116
-
117
-
118
-
119
-
120
-
121
-
122
-
123
-
124
-
125
-
126
-
127
-
128
-
129
-
130
-
131
-
132
-
133
-
134
-
135
-
136
-
137
-
138
-
139
-
140
-
141
-
142
-
143
-
144
-
145
-
146
-
147
-
148
-
149
-
150
-
151
-
152
-
153
-
154
-
155
-
156
-
157
-
158
-
159
-
160
-
161
-
162
-
163
-
164
-
165
-
166
-
167
-
168
-
169
-
170
-
171
-
172
-
173
-
174
-
175
-
176
-
177
-
178
-
179
-
180
-
181
-
182
-
183
-
184
-
185
-
186
-
187
-
188
-
189
-
190
-
191
-
192
-
193
-
194
-
195
-
196
-
197
-
198
-
199
-
200
-
201
-
202
-
203
-
204
-
205
-
206
-
207
-
208
-
209
-
210
-
211
-
212
 |
 |

38
Setup
2.5.2
Setting Procedure
1.
Turn off the power.
2.
Pull the cover open lever, and open the roll paper cover.
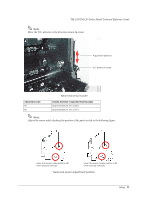
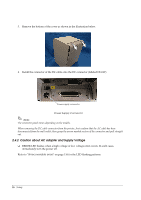
3.
Push the body case outward (in the direction of the 2 arrows) and remove the cutter cover.
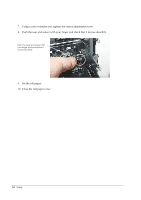
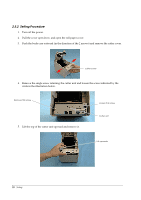
4.
Remove the single screw retaining the cutter unit and loosen the screw indicated by the
circle in the illustration below.
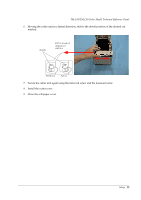
5.
Lift the top of the cutter unit upward and remove it.
cutter cover
Remove this screw
Cutter unit
Loosen this screw
Lift upwards