HTC Verizon Wireless SMT5800 User Manual - Page 55
Setting Up E-mail Accounts, View and reply to MMS messages
 |
View all HTC Verizon Wireless SMT5800 manuals
Add to My Manuals
Save this manual to your list of manuals |
Page 55 highlights
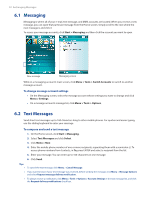
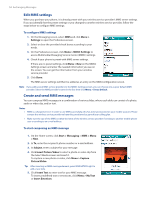
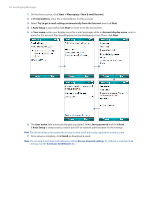
Exchanging Messages 55 6. Click Insert Audio to insert an audio clip. Select an audio clip on the Select Audio screen. To record a new audio clip, click Menu > Capture Audio 7. Click Send to send the message. Notes • To send a copy of this message to others, access Cc and Bcc by clicking Menu > Options > Send Options. • To remove the photo, text, or audio, select the item and press ( ). View and reply to MMS messages To receive MMS messages • On any MMS message folder screen, click Menu > Send/Receive. By default, messages are automatically downloaded to your phone. To view an MMS message You can view MMS messages in several ways. • Press ENTER to view and play the message on your phone. Click Pause or Menu > Stop to pause or stop the playback of the message. • Click Menu > Object View to see a list of files included in the message. To open a file, select it and click Open. To save a file, select it, and click Save, Menu > Save Audio, or Menu > Save Photo. • View each slide included in the message by clicking Menu > Next. To reply to an MMS message • Click Menu > Reply > Reply to reply to the sender of the message, or click Menu > Reply > Reply All to reply to all persons listed in the To and CC boxes of the message. Click Menu > Reply > Forward to forward the message to someone else. 6.4 Setting Up E-mail Accounts Before you can send and receive e-mail, you need to set up your e-mail account on your phone. You can set up the following types of e-mail accounts on your phone: • Outlook e-mail that you synchronize with your PC or your company's Exchange Server • Internet e-mail account that you have from an Internet Service Provider (ISP) • Work account that you access using a VPN connection • Other web-based e-mail accounts such as Gmail, Yahoo! Mail, etc. Set up your SMT5800 to synchronize Outlook e-mail with the computer If you have installed the synchronization software on your PC and created a partnership with your phone, then your phone is ready to send and receive Outlook e-mail. If you have not yet installed the synchronization software nor created a partnership, please do so by following the procedures in Chapter 3. Tip To set up your company e-mail account so that you can access Outlook e-mail messages wirelessly, you must set up your phone to synchronize via a wireless LAN or over-the-air connection with your company's Exchange Server. For more information about synchronizing with your company e-mail server, see Chapter 7. Set up a new e-mail account You can easily set up an e-mail account that you have with an Internet service provider (ISP), a web-based email or an account that you access using a VPN server connection (typically a work account) on your phone.
-
 1
1 -
2
-
3
-
4
-
5
-
6
-
7
-
8
-
9
-
10
-
11
-
12
-
13
-
14
-
15
-
16
-
17
-
18
-
19
-
20
-
21
-
22
-
23
-
24
-
25
-
26
-
27
-
28
-
29
-
30
-
31
-
32
-
33
-
34
-
35
-
36
-
37
-
38
-
39
-
40
-
41
-
42
-
43
-
44
-
45
-
46
-
47
-
48
-
49
-
 50
50 -
 51
51 -
 52
52 -
 53
53 -
 54
54 -
 55
55 -
 56
56 -
 57
57 -
 58
58 -
 59
59 -
 60
60 -
61
-
62
-
63
-
64
-
65
-
66
-
67
-
68
-
69
-
70
-
71
-
72
-
73
-
74
-
75
-
76
-
77
-
78
-
79
-
80
-
81
-
82
-
83
-
84
-
85
-
86
-
87
-
88
-
89
-
90
-
91
-
92
-
93
-
94
-
95
-
96
-
97
-
98
-
99
-
100
-
101
-
102
-
103
-
104
-
105
-
106
-
107
-
108
-
109
-
110
-
111
-
112
-
113
-
114
-
115
-
116
 |
 |