HTC Verizon Wireless SMT5800 User Manual - Page 56
Messaging > New E-mail Account, Auto Setup - review
 |
View all HTC Verizon Wireless SMT5800 manuals
Add to My Manuals
Save this manual to your list of manuals |
Page 56 highlights
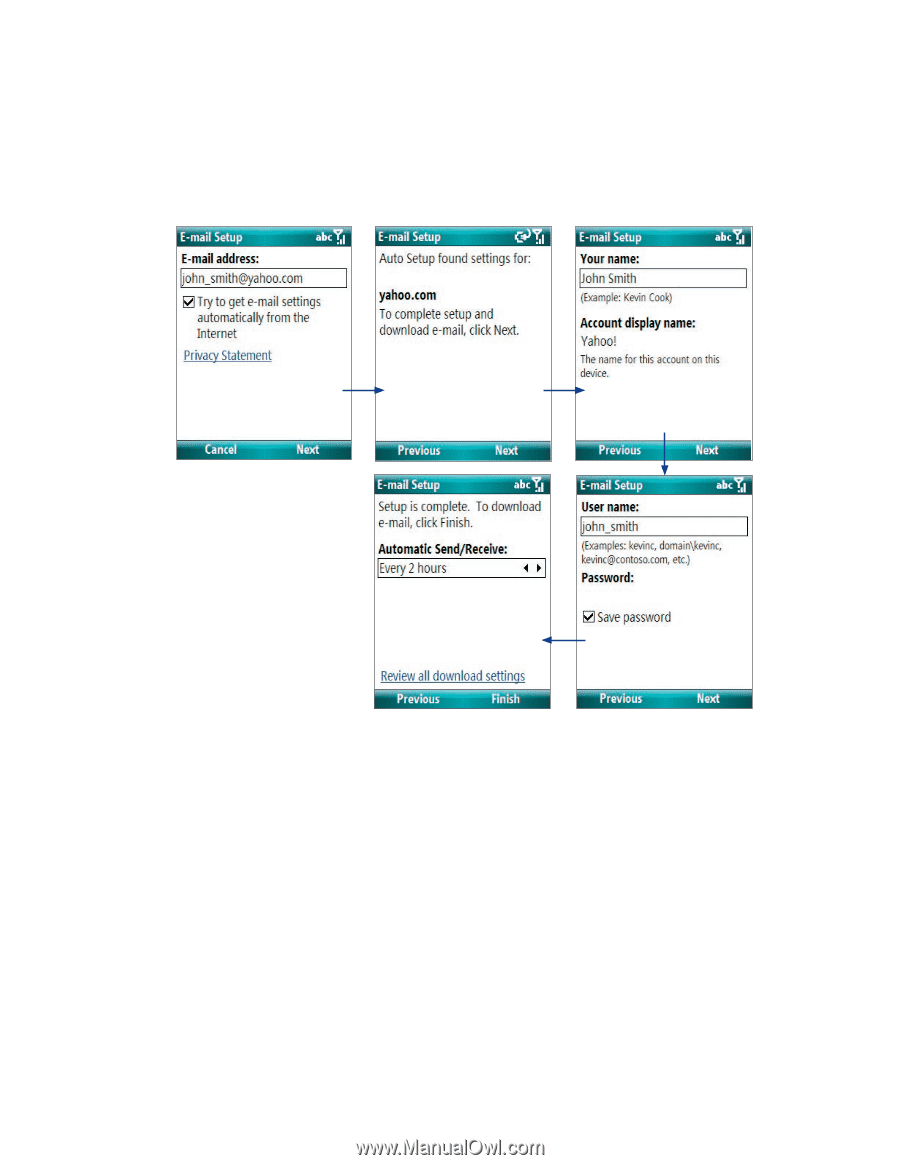
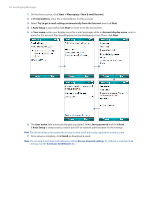
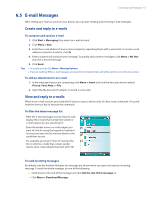
56 Exchanging Messages 1. On the Home screen, click Start > Messaging > New E-mail Account. 2. In E-mail address, enter the e-mail address for this account. 3. Select Try to get e-mail settings automatically from the Internet and click Next. 4. If Auto Setup is successful, click Next to move on to the next screen. 5. In Your name, enter your display name for e-mail messages while in Account display name, enter a name for the account that should appear on the Messaging screen. Then, click Next. 6. The User name field automatically gets populated. Select Save password and click Next. If Auto Setup is unsuccessful, contact your ISP or network administrator for the settings. Note The domain name is not required for an account with an ISP but may be required for a work account. 7. Once setup is complete, click Finish to download e-mails. Note You can view e-mail download settings by clicking Review downand settings. To configure e-mail download settings, click the Automatic Send/Receive box.
-
 1
1 -
2
-
3
-
4
-
5
-
6
-
7
-
8
-
9
-
10
-
11
-
12
-
13
-
14
-
15
-
16
-
17
-
18
-
19
-
20
-
21
-
22
-
23
-
24
-
25
-
26
-
27
-
28
-
29
-
30
-
31
-
32
-
33
-
34
-
35
-
36
-
37
-
38
-
39
-
40
-
41
-
42
-
43
-
44
-
45
-
46
-
47
-
48
-
49
-
50
-
 51
51 -
 52
52 -
 53
53 -
 54
54 -
 55
55 -
 56
56 -
 57
57 -
 58
58 -
 59
59 -
 60
60 -
 61
61 -
62
-
63
-
64
-
65
-
66
-
67
-
68
-
69
-
70
-
71
-
72
-
73
-
74
-
75
-
76
-
77
-
78
-
79
-
80
-
81
-
82
-
83
-
84
-
85
-
86
-
87
-
88
-
89
-
90
-
91
-
92
-
93
-
94
-
95
-
96
-
97
-
98
-
99
-
100
-
101
-
102
-
103
-
104
-
105
-
106
-
107
-
108
-
109
-
110
-
111
-
112
-
113
-
114
-
115
-
116
 |
 |