HP 303B Maintenance & Service Guide: HP 303B Microtower Business PC - Page 27
Drives, Installing Additional Drives, label the package Fragile: Handle With Care.
 |
View all HP 303B manuals
Add to My Manuals
Save this manual to your list of manuals |
Page 27 highlights
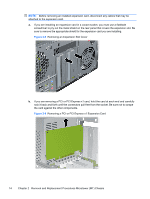
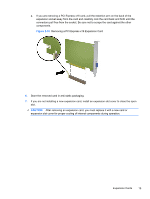
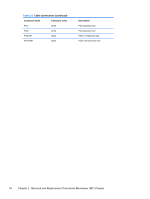
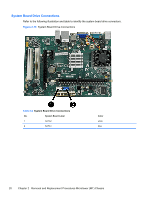
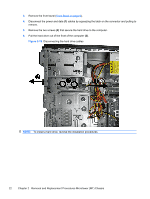
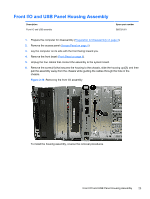
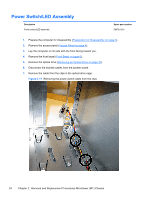
Drives Description 16X DVD±RW SuperMulti drive with LightScribe 16X DVD-ROM drive 500 GB hard drive 320 GB hard drive 160 GB hard drive SATA HDD cable, 6.5 inch, with latch SATA HDD cable PATA to SATA adapter Spare part number 581600-001 581599-001 586720-001 586969-001 586718-001 448670-001 507509-001 449283-001 The computer supports one optical drive and one hard drive. This section describes the procedure for replacing or upgrading the drives. A Torx T-15 screwdriver is needed to remove and install the guide screws on a drive. Installing Additional Drives When installing additional drives, follow these guidelines: ● Connect the primary SATA hard drive to the blue primary SATA connector on the system board labeled SATA1. ● Connect the SATA optical drive to the white SATA connector on the system board labeled SATA2. CAUTION: To prevent loss of work and damage to the computer or drive: If you are inserting or removing a drive, shut down the operating system properly, turn off the computer, and unplug the power cord. Do not remove a drive while the computer is on or in standby mode. Before handling a drive, ensure that you are discharged of static electricity. While handling a drive, avoid touching the connector. Handle a drive carefully; do not drop it. Do not use excessive force when inserting a drive. Avoid exposing a hard drive to liquids, temperature extremes, or products that have magnetic fields such as monitors or speakers. If a drive must be mailed, place the drive in a bubble-pack mailer or other protective packaging and label the package "Fragile: Handle With Care." Drives 19
-
 1
1 -
2
-
3
-
4
-
5
-
6
-
7
-
8
-
9
-
10
-
11
-
12
-
13
-
14
-
15
-
16
-
17
-
18
-
19
-
20
-
21
-
 22
22 -
 23
23 -
 24
24 -
 25
25 -
 26
26 -
 27
27 -
 28
28 -
 29
29 -
 30
30 -
 31
31 -
 32
32 -
33
-
34
-
35
-
36
-
37
-
38
-
39
-
40
-
41
-
42
-
43
-
44
-
45
-
46
-
47
-
48
-
49
-
50
-
51
-
52
-
53
-
54
-
55
-
56
-
57
-
58
-
59
-
60
-
61
-
62
-
63
-
64
-
65
-
66
-
67
-
68
-
69
-
70
-
71
-
72
-
73
-
74
-
75
-
76
-
77
-
78
-
79
-
80
-
81
-
82
-
83
-
84
-
85
-
86
-
87
 |
 |