HP 303B Maintenance & Service Guide: HP 303B Microtower Business PC - Page 35
Power Supply, WARNING
 |
View all HP 303B manuals
Add to My Manuals
Save this manual to your list of manuals |
Page 35 highlights
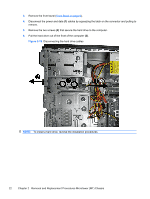
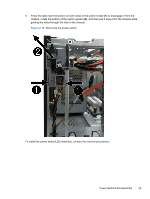
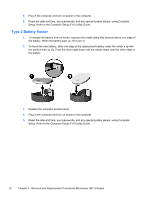
Power Supply Description Power supply Spare part number 570028-001 NOTE: Power supply appearance may vary. WARNING! Voltage is always present on the system board when the computer is plugged into an active AC outlet. To avoid possible personal injury and damage to the equipment the power cord should be disconnected from the computer and/or the AC outlet before opening the computer. NOTE: When installing a new power supply, be sure to set the red switch to the setting (230 V or 115 V) appropriate for the country in which the computer is used. Spare power supplies normally arrive set for 230 V. 1. Prepare the computer for disassembly (Preparation for Disassembly on page 3). 2. Remove the access panel (Access Panel on page 4). 3. Lay the computer on its side with the rear facing toward you. 4. Disconnect all power cables from the mass storage devices and from the system board. 5. Place the computer on its side. 6. Locate the power supply at the top of the computer. NOTE: Noting the location, type and orientation of the power connectors is extremely important. Failure to correctly restore all power connectors appropriately will prevent the computer or components from working successfully. 7. Disconnect the following power cables: ● Power cable from the optical drive and hard drive. ● 20-pin connector from the system board. The connector has a latch that must be pressed to detach the it from the system board. ● 4-pin connector from the system board. Power Supply 27
-
 1
1 -
2
-
3
-
4
-
5
-
6
-
7
-
8
-
9
-
10
-
11
-
12
-
13
-
14
-
15
-
16
-
17
-
18
-
19
-
20
-
21
-
22
-
23
-
24
-
25
-
26
-
27
-
28
-
29
-
 30
30 -
 31
31 -
 32
32 -
 33
33 -
 34
34 -
 35
35 -
 36
36 -
 37
37 -
 38
38 -
 39
39 -
 40
40 -
41
-
42
-
43
-
44
-
45
-
46
-
47
-
48
-
49
-
50
-
51
-
52
-
53
-
54
-
55
-
56
-
57
-
58
-
59
-
60
-
61
-
62
-
63
-
64
-
65
-
66
-
67
-
68
-
69
-
70
-
71
-
72
-
73
-
74
-
75
-
76
-
77
-
78
-
79
-
80
-
81
-
82
-
83
-
84
-
85
-
86
-
87
 |
 |