HP 303B Maintenance & Service Guide: HP 303B Microtower Business PC - Page 30
Removal and Replacement Procedures Microtower MT Chassis,
 |
View all HP 303B manuals
Add to My Manuals
Save this manual to your list of manuals |
Page 30 highlights
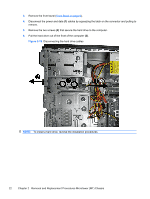
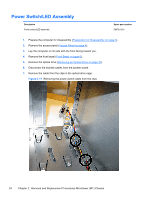
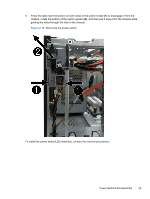
3. Remove the front bezel (Front Bezel on page 6). 4. Disconnect the power and data (1) cables by squeezing the latch on the connector and pulling to remove. 5. Remove the two screws (2) that secure the hard drive to the computer. 6. Pull the hard drive out of the front of the computer (3). Figure 2-15 Disconnecting the hard drive cables NOTE: To install a hard drive, reverse the installation procedures. 22 Chapter 2 Removal and Replacement Procedures Microtower (MT) Chassis
-
 1
1 -
2
-
3
-
4
-
5
-
6
-
7
-
8
-
9
-
10
-
11
-
12
-
13
-
14
-
15
-
16
-
17
-
18
-
19
-
20
-
21
-
22
-
23
-
24
-
 25
25 -
 26
26 -
 27
27 -
 28
28 -
 29
29 -
 30
30 -
 31
31 -
 32
32 -
 33
33 -
 34
34 -
 35
35 -
36
-
37
-
38
-
39
-
40
-
41
-
42
-
43
-
44
-
45
-
46
-
47
-
48
-
49
-
50
-
51
-
52
-
53
-
54
-
55
-
56
-
57
-
58
-
59
-
60
-
61
-
62
-
63
-
64
-
65
-
66
-
67
-
68
-
69
-
70
-
71
-
72
-
73
-
74
-
75
-
76
-
77
-
78
-
79
-
80
-
81
-
82
-
83
-
84
-
85
-
86
-
87
 |
 |

3.
Remove the front bezel (
Front Bezel
on page
6
).
4.
Disconnect the power and data
(1)
cables by squeezing the latch on the connector and pulling to
remove.
5.
Remove the two screws
(2)
that secure the hard drive to the computer.
6.
Pull the hard drive out of the front of the computer
(3)
.
Figure 2-15
Disconnecting the hard drive cables
NOTE:
To install a hard drive, reverse the installation procedures.
22
Chapter 2
Removal and Replacement Procedures Microtower (MT) Chassis