HP 5100 HP LaserJet 5100 Series - User Guide - Page 15
Printer Parts and Locations, Printer Basics - paper jam
 |
UPC - 808736092500
View all HP 5100 manuals
Add to My Manuals
Save this manual to your list of manuals |
Page 15 highlights
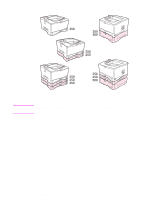
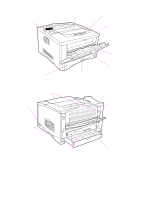
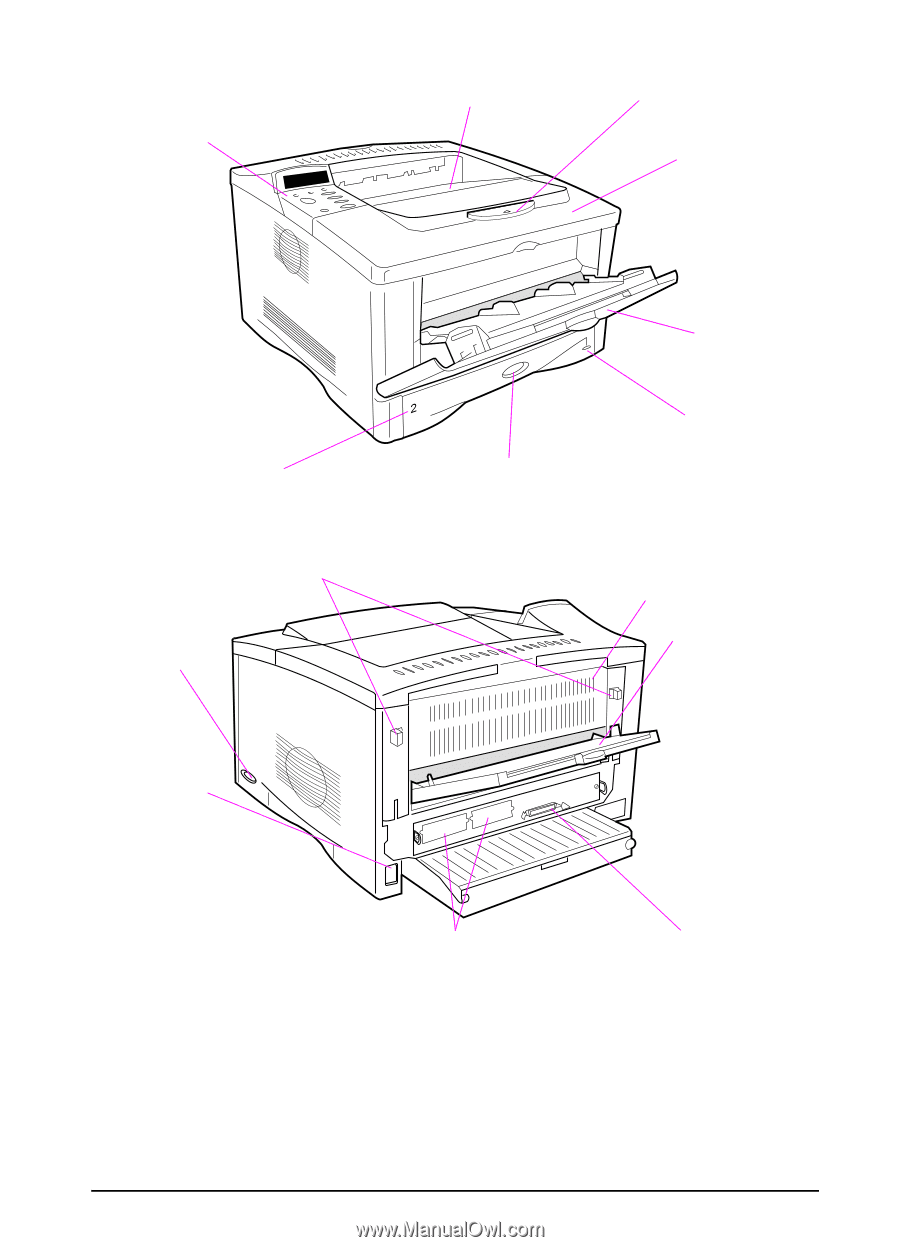
Printer Parts and Locations Control panel and display Top output bin Paper stop Top cover Product and serial numbers (located on the underside of the top cover) Tray 1 (100-sheet) Tray 2 (250-sheet) Paper size indicator (set with dial inside tray) Paper level indicator Latches (to open rear door) Power switch Rear door (paper jam access) Rear output bin (straight-through paper path) Power connector Figure 2 Network, I/O, or optional hard disk (EIO slots) Printer Parts (front and rear views) Parallel interface connector ENWW Chapter 1: Printer Basics 7
-
 1
1 -
2
-
3
-
4
-
5
-
6
-
7
-
8
-
9
-
 10
10 -
 11
11 -
 12
12 -
 13
13 -
 14
14 -
 15
15 -
 16
16 -
 17
17 -
 18
18 -
 19
19 -
 20
20 -
21
-
22
-
23
-
24
-
25
-
26
-
27
-
28
-
29
-
30
-
31
-
32
-
33
-
34
-
35
-
36
-
37
-
38
-
39
-
40
-
41
-
42
-
43
-
44
-
45
-
46
-
47
-
48
-
49
-
50
-
51
-
52
-
53
-
54
-
55
-
56
-
57
-
58
-
59
-
60
-
61
-
62
-
63
-
64
-
65
-
66
-
67
-
68
-
69
-
70
-
71
-
72
-
73
-
74
-
75
-
76
-
77
-
78
-
79
-
80
-
81
-
82
-
83
-
84
-
85
-
86
-
87
-
88
-
89
-
90
-
91
-
92
-
93
-
94
-
95
-
96
-
97
-
98
-
99
-
100
-
101
-
102
-
103
-
104
-
105
-
106
-
107
-
108
-
109
-
110
-
111
-
112
-
113
-
114
-
115
-
116
-
117
-
118
-
119
-
120
-
121
-
122
-
123
-
124
-
125
-
126
-
127
-
128
-
129
-
130
-
131
-
132
-
133
-
134
-
135
-
136
-
137
-
138
-
139
-
140
-
141
-
142
-
143
-
144
-
145
-
146
-
147
-
148
-
149
-
150
-
151
-
152
-
153
-
154
-
155
-
156
-
157
-
158
-
159
-
160
-
161
-
162
-
163
-
164
-
165
-
166
-
167
-
168
-
169
-
170
-
171
-
172
-
173
-
174
-
175
-
176
-
177
-
178
-
179
-
180
-
181
-
182
-
183
-
184
-
185
-
186
-
187
-
188
-
189
 |
 |
ENWW
Chapter 1:
Printer Basics
7
Printer Parts and Locations
Figure 2
Printer Parts
(front and rear views)
Control
panel and
display
Paper stop
Top output bin
Tray 1
(100-sheet)
Tray 2
(250-sheet)
Paper level
indicator
Top cover
Paper size indicator
(set with dial inside tray)
Product and
serial numbers
(located on the
underside of
the top cover)
Power
switch
Rear output bin
(straight-through
paper path)
Power
connector
Rear door
(paper jam access)
Latches
(to open rear door)
Network, I/O, or optional
hard disk (EIO slots)
Parallel interface
connector