HP 5100 HP LaserJet 5100 Series - User Guide - Page 81
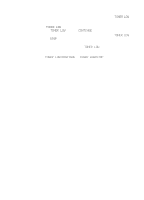
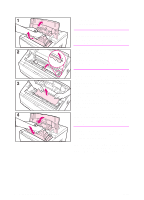
Using the green handles, lift the, cold water. Hot water sets toner into
 |
UPC - 808736092500
View all HP 5100 manuals
Add to My Manuals
Save this manual to your list of manuals |
Page 81 highlights
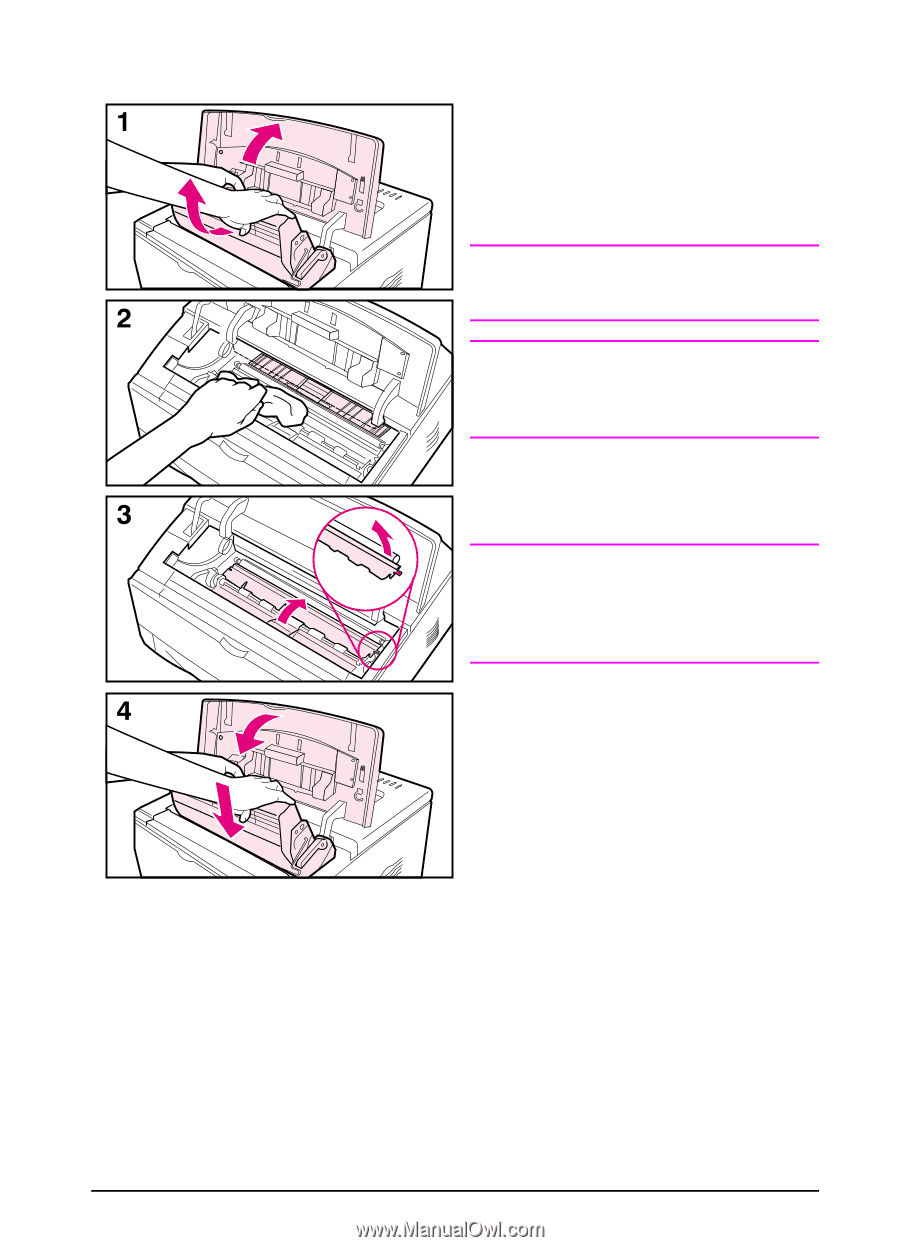
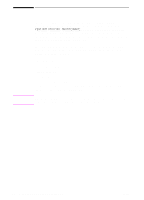
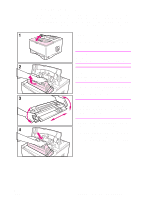
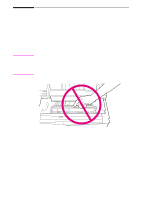
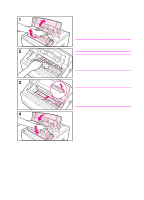
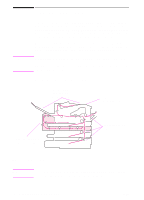
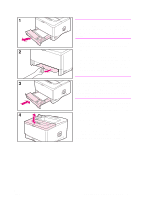
Cleaning the Printer Before beginning these steps, turn the printer off and unplug the power cord. 1 Open the top cover and remove the print cartridge. WARNING! Avoid reaching too far into the printer. The adjacent fusing area might be hot! Caution To prevent damage to the print cartridge, do not expose it to light for more than a few minutes. 2 Wipe any dust or dirt off the paper feed guides (shaded areas) with a dry, lint-free cloth. Note If toner gets on your clothing, wipe it off with a dry cloth and wash clothing in cold water. (Hot water sets toner into fabric.) 3 Using the green handles, lift the paper access plates and wipe off any residue with a dry, lint-free cloth. 4 Close the paper access plates, replace the print cartridge, close the top cover, plug in the power cord, and turn the printer on. ENWW Chapter 3: Printer Maintenance 73
-
 1
1 -
2
-
3
-
4
-
5
-
6
-
7
-
8
-
9
-
10
-
11
-
12
-
13
-
14
-
15
-
16
-
17
-
18
-
19
-
20
-
21
-
22
-
23
-
24
-
25
-
26
-
27
-
28
-
29
-
30
-
31
-
32
-
33
-
34
-
35
-
36
-
37
-
38
-
39
-
40
-
41
-
42
-
43
-
44
-
45
-
46
-
47
-
48
-
49
-
50
-
51
-
52
-
53
-
54
-
55
-
56
-
57
-
58
-
59
-
60
-
61
-
62
-
63
-
64
-
65
-
66
-
67
-
68
-
69
-
70
-
71
-
72
-
73
-
74
-
75
-
 76
76 -
 77
77 -
 78
78 -
 79
79 -
 80
80 -
 81
81 -
 82
82 -
 83
83 -
 84
84 -
 85
85 -
 86
86 -
87
-
88
-
89
-
90
-
91
-
92
-
93
-
94
-
95
-
96
-
97
-
98
-
99
-
100
-
101
-
102
-
103
-
104
-
105
-
106
-
107
-
108
-
109
-
110
-
111
-
112
-
113
-
114
-
115
-
116
-
117
-
118
-
119
-
120
-
121
-
122
-
123
-
124
-
125
-
126
-
127
-
128
-
129
-
130
-
131
-
132
-
133
-
134
-
135
-
136
-
137
-
138
-
139
-
140
-
141
-
142
-
143
-
144
-
145
-
146
-
147
-
148
-
149
-
150
-
151
-
152
-
153
-
154
-
155
-
156
-
157
-
158
-
159
-
160
-
161
-
162
-
163
-
164
-
165
-
166
-
167
-
168
-
169
-
170
-
171
-
172
-
173
-
174
-
175
-
176
-
177
-
178
-
179
-
180
-
181
-
182
-
183
-
184
-
185
-
186
-
187
-
188
-
189
 |
 |