HP 8100C HP Digital Sender 8100C - (English) User Guide, C7707-90005
HP 8100C - Digital Sender - Document Scanner Manual
 |
View all HP 8100C manuals
Add to My Manuals
Save this manual to your list of manuals |
HP 8100C manual content summary:
- HP 8100C | HP Digital Sender 8100C - (English) User Guide, C7707-90005 - Page 1
- HP 8100C | HP Digital Sender 8100C - (English) User Guide, C7707-90005 - Page 2
- HP 8100C | HP Digital Sender 8100C - (English) User Guide, C7707-90005 - Page 3
- HP 8100C | HP Digital Sender 8100C - (English) User Guide, C7707-90005 - Page 4
use of this information. NOTICE TO U.S. GOVERNMENT USERS: RESTRICTED RIGHTS COMMERCIAL COMPUTER SOFTWARE: "Use, duplication, or disclosure by the Government is subject to restrictions as avoid electrical shock, use only supplied power cords and connect only to properly grounded (3-hole) wall outlets. - HP 8100C | HP Digital Sender 8100C - (English) User Guide, C7707-90005 - Page 5
3 - HP 8100C | HP Digital Sender 8100C - (English) User Guide, C7707-90005 - Page 6
4 - HP 8100C | HP Digital Sender 8100C - (English) User Guide, C7707-90005 - Page 7
fax service, fax a document to one or more destinations. Send to an H PJetSend-enabled printer - Send documents to HPJetSendenabled printers on your LAN/WAN network. (For more information about HPJetSend technology and a list of HPJetSend-enabled printers, visit www.jetsend.com.) The digital sender - HP 8100C | HP Digital Sender 8100C - (English) User Guide, C7707-90005 - Page 8
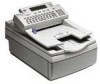
6 Before using the digital sender, use the diagram below to familiarize yourself with the parts of the digital sender . Document input tray Document output tray Document lever Control panel Power switch (on back) - HP 8100C | HP Digital Sender 8100C - (English) User Guide, C7707-90005 - Page 9
7 ADF unit (raises to reveal glass) Glass - HP 8100C | HP Digital Sender 8100C - (English) User Guide, C7707-90005 - Page 10
Selects single-sided or double-sided original. When referring to this key in this manual, it will be shown like this: SINGLE-/DOUBLE-SIDED. 5 Tab key - a "?".) 8 Alphabetic keys - Enter letters and symbols for names, passwords, and destinations. 9 Enter key - Accepts information on the control - HP 8100C | HP Digital Sender 8100C - (English) User Guide, C7707-90005 - Page 11
just above the ENTER key. When referring to this key in this manual, it will be shown like this: BACKSPACE. 11 Numeric keys - Enter your language (except English). 12 Special characters sticker - Contains instructions for accessing the special characters available for your language (except English - HP 8100C | HP Digital Sender 8100C - (English) User Guide, C7707-90005 - Page 12
Fax numbers book and the public Fax lists book. If the administrator has disabled guest usage, you cannot use the digital sender. If guest usage is enabled, you can: Use the digital sender. Use the Public E-Mail addresses book and lists book. Use the public Fax numbers book and lists book. You do - HP 8100C | HP Digital Sender 8100C - (English) User Guide, C7707-90005 - Page 13
Receive confirmations prompt. Note To receive confirmations, your e-mail server and the links between your e-mail and the recipient's e-mail must support Delivery Service Notification (DSN). c To receive a copy of every e-mail message you send, press YES (F1) at the Auto CC prompt. 8 Press OK - HP 8100C | HP Digital Sender 8100C - (English) User Guide, C7707-90005 - Page 14
Receive confirmations prompt. Note To receive confirmations, your e-mail server and the links between your e-mail and the recipient's e-mail must support Delivery Service Notification (DSN). c To receive a copy of every e-mail message you send, press YES (F1) at the Auto CC prompt. 9 Press OK - HP 8100C | HP Digital Sender 8100C - (English) User Guide, C7707-90005 - Page 15
to contact the administrator. Do one of the following: Access the Users menu and change your profile as you added it. Click here to see instructions. As you are e-mailing a document, accessing Lists, or logging in, type your user name and password, and then press MODIFY (F3). - HP 8100C | HP Digital Sender 8100C - (English) User Guide, C7707-90005 - Page 16
14 This user guide provides instructions to help you use the digital sender, and it will also help you troubleshoot if you experience a problem. Additionally, the digital sender itself houses Help to assist yo u The Help for the digital sender contains context-sensitive Help. When you press , help - HP 8100C | HP Digital Sender 8100C - (English) User Guide, C7707-90005 - Page 17
15 The HP Digital Sender8100C lets you send a variety of single- and double-sided documents to e-mail addresses and distribution lists. You can also send to any fax number if your company subscribes to an Internet fax service. Sending a document is a simple, two-step process: 1. Load the document. - HP 8100C | HP Digital Sender 8100C - (English) User Guide, C7707-90005 - Page 18
HP Digital Sender8100C is both a sheetfed and a flatbed digital sender (for all functions except printing to a blackand-white HPJetSend-enable printer, for which the limit is 20 pages). Documents can range free of glue, correction fluid, or wet ink. Additionalyl , you should avoid multipart forms - HP 8100C | HP Digital Sender 8100C - (English) User Guide, C7707-90005 - Page 19
. Place these types of documents on the glass one at a time and send them. See "To load a document on the glass" on pa ge19 for instructions. Note The maximum length the glass can accept is 297 mm(11.7 inches). If your document is longer but you need to use the glass - HP 8100C | HP Digital Sender 8100C - (English) User Guide, C7707-90005 - Page 20
." CAUTION Before using the ADF, remove from the document anything such as self-adhesive notes, paper clips, or staples, that could get caught in the digital sender and damage it. 1 Raise the ADF unit and ensure nothing is on the glass. Then, close ADF unit. 2 Move the paper load lever to the - HP 8100C | HP Digital Sender 8100C - (English) User Guide, C7707-90005 - Page 21
19 1 1 Raise the ADF unit to reveal the glass. 2 Place the page face down on the glass, top edge toward the back. 3 Align the document in the upper-right corner of the glass. 4 Lower the ADF unit. 2 3 4 - HP 8100C | HP Digital Sender 8100C - (English) User Guide, C7707-90005 - Page 22
: e-mail addresses or distribution lists fax numbers or distribution lists (if your company subscribes to a supported Internet fax service) HPJetSend-enabled printers When you e-mail from the digital sender, it creates a message and attaches your document as a file. You can send to e-mail addresses - HP 8100C | HP Digital Sender 8100C - (English) User Guide, C7707-90005 - Page 23
saving any settings. 1 Press E-MAIL (F1). If guest usage is disabled, then only registered users can use the digital sender. This login screen opens: Welcome -- please sign in. Name: Password: BACK Otherwise, the main e-mail dialog box opens: From: Subject: To: BACK 2 Do one of the following: If - HP 8100C | HP Digital Sender 8100C - (English) User Guide, C7707-90005 - Page 24
e-mail destination: Type an e-mail address. Begin typing the name of an address or distribution list stored in an e-mail book. As you type, the digital sender completes the name. Use the and keys to scroll destinations in an e-mail book. Begin typing the name of an e-mail address on an LDAP - HP 8100C | HP Digital Sender 8100C - (English) User Guide, C7707-90005 - Page 25
Note Your company's e-mail server, not the digital sender, validates the e-mail addresses, so the digital sender does not notify you if you sent to an already have. If your recipients do not have Reader, they can download a free copy of it for Windows or Macintosh from Adobe's Imaging program. - HP 8100C | HP Digital Sender 8100C - (English) User Guide, C7707-90005 - Page 26
company has Internet fax service,you can send documents from the digital sender to fax destinations. If the service is not configured, you it) and press ENTER. Then, type your password (if set) and press ENTER. This dialog box opens: Fax: Billing: BACK 2 Do one of the following - HP 8100C | HP Digital Sender 8100C - (English) User Guide, C7707-90005 - Page 27
and press . After the last page, press SEND (F4). If fax destinations are busy, the numbers are retried as many times as the Internet fax service specifies. Note The digital sender does not notify you if you sent to an invalid fax destination. - HP 8100C | HP Digital Sender 8100C - (English) User Guide, C7707-90005 - Page 28
built into printers, scanners, and computer software.HPJetSend-enabled devices can connect, "talk" to each other, and exchange information directly from the network. It is server- and program-independent. To find out more about HPJetSend technology or view a list of supported printers, visit www - HP 8100C | HP Digital Sender 8100C - (English) User Guide, C7707-90005 - Page 29
and press . After the last page, press SEND (F4). 1 Press PRINT (F3). The list of HPJetSend-enabled printers appears. 2 Press NEW (F3). 3 Type the DNS name or IP address for the HP JetSend-enabled printer you want to add. If you do not know this information, see the administrator. 4 Click here to - HP 8100C | HP Digital Sender 8100C - (English) User Guide, C7707-90005 - Page 30
type of document you have. Use this setting Color Document B/W Document Color-B/W Photo For this type of document The original has a mix of text and images. Or, the original has a mix of color and black-and- white areas. The original contains text that must be clearly transmitted.Or, the original - HP 8100C | HP Digital Sender 8100C - (English) User Guide, C7707-90005 - Page 31
following: Click here to finish sending to e-mail. Click here to finish sending to a fax destination. Click here to finish sending to an HPJetSend-enabled printer. - HP 8100C | HP Digital Sender 8100C - (English) User Guide, C7707-90005 - Page 32
30 - HP 8100C | HP Digital Sender 8100C - (English) User Guide, C7707-90005 - Page 33
31 If you are a registered user, you can store frequently used e-mail addresses and fax numbers in books. You can also build distribution lists of e-mail addresses or fax numbers so you can easily send documents to groups of people. To become a registered user, see "Managing your user profile" on p - HP 8100C | HP Digital Sender 8100C - (English) User Guide, C7707-90005 - Page 34
32 The digital sender stores addresses and fax numbers in the following address books under the Lists menu: Your Personal E-Mail addresses book Stores personal e-mail addresses that you - HP 8100C | HP Digital Sender 8100C - (English) User Guide, C7707-90005 - Page 35
ENTER. The login dialog box opens. 3 Type your user name (or use the and keys to scroll to it) and press ENTER. Then, type your password (if set) and press ENTER. Note If you are prompted to become a registered user, press YES (F1) or see the administrator 4 Scroll the list of - HP 8100C | HP Digital Sender 8100C - (English) User Guide, C7707-90005 - Page 36
34 If you are a registered user, you can store e-mail addresses inyour Personal E-Mail addresses book and use the entries when you e-mail a document. Use the procedures in this section to add, modfiy, and delete addresses fromyour Personal E-Mail addresses book. Note You can view and use - HP 8100C | HP Digital Sender 8100C - (English) User Guide, C7707-90005 - Page 37
press ENTER. Then, type your password (if set) and press ENTER. This dialog box opens: Name: SEARCH BACK 4 Add an address by doing one of the following: Type a name for this entry in the Name field and press ADD (F1). If the administrator set the digital sender to work with an LDAP server - HP 8100C | HP Digital Sender 8100C - (English) User Guide, C7707-90005 - Page 38
name (or use the and keys to scroll to it) and press ENTER. Then, type your password (if set) and press ENTER. This dialog box opens: Name: JH Arp [email protected] S. [email protected] Maria P. [email protected] MODIFY SEARCH DELETE BACK 4 Select an entry using one of these - HP 8100C | HP Digital Sender 8100C - (English) User Guide, C7707-90005 - Page 39
37 YourPersonal E-Mail lists book contains distribution lists you create using e-mail addresses. Distribution lists are useful if you regularly send e-mail to the same group of people. E-mail distribution lists can only consist of e-mail addresses. You cannot create distribution lists containing - HP 8100C | HP Digital Sender 8100C - (English) User Guide, C7707-90005 - Page 40
list . The login dialog box opens. 3 Type your user name (or use the and keys to scroll to it) and press ENTER. Then, type your password (if set) and press ENTER. This dialog box opens: List name: MODIFY DELETE BACK 4 In the List name field, type a name for this list and - HP 8100C | HP Digital Sender 8100C - (English) User Guide, C7707-90005 - Page 41
list . The login dialog box opens. 3 Type your user name (or use the and keys to scroll to it) and press ENTER. Then, type your password (if set) and press ENTER. This dialog box opens: List name: Bergamo Firenze Milano MODIFY DELETE BACK 4 Select a distribution list using one of these ways - HP 8100C | HP Digital Sender 8100C - (English) User Guide, C7707-90005 - Page 42
40 Use this procedure to change or delete e-mail addresses from a distribution list in your Personal E-Mail lists book. While in a selected distribution list, you can change the information for an e-mail address contained in the list, as long as the address is from your Personal E-Mail address book. - HP 8100C | HP Digital Sender 8100C - (English) User Guide, C7707-90005 - Page 43
list . The login dialog box opens. 3 Type your user name (or use the and keys to scroll to it) and press ENTER. Then, type your password (if set) and press ENTER. This dialog box opens: List name: Bergamo Firenze Milano MODIFY DELETE BACK 4 Select a list using one of these ways: Begin - HP 8100C | HP Digital Sender 8100C - (English) User Guide, C7707-90005 - Page 44
list . The login dialog box opens. 3 Type your user name (or use the and keys to scroll to it) and press ENTER. Then, type your password (if set) and press ENTER. This dialog box opens: List name: Bergamo Firenze Milano BACK 4 Select a distribution list using one of these ways: Begin typing - HP 8100C | HP Digital Sender 8100C - (English) User Guide, C7707-90005 - Page 45
43 Registered users and the administrator can add, change, or delete fax numbers stored in the Fax numbers book. Because these are public fax numbers, any other registered user can also see, change, or delete any fax number. Note The administrator can change entries in the public Fax numbers or - HP 8100C | HP Digital Sender 8100C - (English) User Guide, C7707-90005 - Page 46
including the long-distance prefix (such as a 1), an area code, or other numbers needed for long distance. Because you are faxing using an Internet fax service provider,you must type all of these numbers. Note Do not include any code such as a 9you dial to get an outsideline from a PBXphone system - HP 8100C | HP Digital Sender 8100C - (English) User Guide, C7707-90005 - Page 47
select Fax numbers and press ENTER. 3 Type your user name (or use the and keys to scroll to it) and press ENTER. Then, type your password (if set) and press ENTER. This dialog box opens: Name: Berlin office Lyon office Venezia office MODIFY DELETE BACK 4 Select fax number using one of - HP 8100C | HP Digital Sender 8100C - (English) User Guide, C7707-90005 - Page 48
select Fax lists and press ENTER. 3 Type your user name (or use the and keys to scroll to it) and press ENTER. Then, type your password (if set) and press ENTER. 4 When the dialog box shown below opens, type a name for this new fax list in the List name field and - HP 8100C | HP Digital Sender 8100C - (English) User Guide, C7707-90005 - Page 49
lists and press ENTER. 3 Type your user name (or use the and keys to scroll to it) and press ENTER. Then, type your password (if set) and press ENTER. This dialog box opens: List name: E. European offices--02155555555 E. North Am. offices--12085555555 W. European offices--44171555555 BACK 4 Select - HP 8100C | HP Digital Sender 8100C - (English) User Guide, C7707-90005 - Page 50
48 7 Repeat step 6 to add more fax numbers to this list. 8 When finished, press BACK (F4). 9 Repeat steps 4 through 8 to add more fax numbers to other fax lists. 10 When finished, press BACK (F4). CAUTION Use this procedure to modify fax numbers in or delete fax numbers from a distribution list. - HP 8100C | HP Digital Sender 8100C - (English) User Guide, C7707-90005 - Page 51
Fax lists and press ENTER. 3 Type your user name (or use the and keys to scroll to it) and press ENTER. Then, type your password (if set) and press ENTER. This dialog box opens: List name: E. European offices E. North Am. offices W. European offices MODIFY DELETE BACK 4 Select a list using - HP 8100C | HP Digital Sender 8100C - (English) User Guide, C7707-90005 - Page 52
The login dialog box opens. 3 Type your user name (or use the and keys to scroll to it) and press ENTER. Then, type your password (if set) and press ENTER. This dialog box opens: List name: E. European offices E. North Am. offices W. European offices MODIFY DELETE BACK 4 Select a distribution - HP 8100C | HP Digital Sender 8100C - (English) User Guide, C7707-90005 - Page 53
51 This chapter is your guide for resolving problems that might occur while you are using the HP Digital Sender 8100C. The chapter is divided into the following sections: Clearing paper jams. See pag e52. Troubleshooting the digital sender. See pag e56. Typicalyl , messages appear on the control - HP 8100C | HP Digital Sender 8100C - (English) User Guide, C7707-90005 - Page 54
2 3 4 When you have a paper jam, the control panel displays this message Paper Jam Detected! Clear jam and press OK. Or Press HELP for instruction . Use the appropriate procedure below to clear the jam. CAUTION Only remove jams after raising the control panel. Removing jammed paper with the control - HP 8100C | HP Digital Sender 8100C - (English) User Guide, C7707-90005 - Page 55
, and reload the document. 7 Move the document lever to the number 3 position. 8 The destinations to which you were sending 26 are still set in the digital sender. Press to begin sending the document again. 7 - HP 8100C | HP Digital Sender 8100C - (English) User Guide, C7707-90005 - Page 56
54 1 2 3 4 1 Move the document lever to the number 1 position. 2 While holding down on the document input tray, raise the control panel. 3 While holding the document output tray down, raise the document input tray (and the control panel). 4 Remove the jammed paper. - HP 8100C | HP Digital Sender 8100C - (English) User Guide, C7707-90005 - Page 57
, and reinsert the stack. 7 Move the document lever to the number 3 position. 26 8 The destinations to which you were sending are still set in the digital sender. Press to begin sending the document again. 7 - HP 8100C | HP Digital Sender 8100C - (English) User Guide, C7707-90005 - Page 58
" on p age59. General digital sender troubleshootin Problem Actions Digital sender is not sending documents Control panel is not working Digital sender does not accept your password . Image quality is poor. Make sure the power cord is securely connected to the digital sender and is plugged into - HP 8100C | HP Digital Sender 8100C - (English) User Guide, C7707-90005 - Page 59
digital sender troubleshooting (continued Problem Actions When using the ADF, the digital sender does not feed the document at all. Ensure that the document lever is being used correctyl . Otherwise, the digital sender the user must open it using the Imaging program. If the recipient does not - HP 8100C | HP Digital Sender 8100C - (English) User Guide, C7707-90005 - Page 60
58 General digital sender troubleshooting (continued Problem Actions A fax transmission you sent did not arrive at the destination fax machine. The receiving fax machine might be turned off or experiencing an error condition such as out of paper or toner. Check with the recipient. Make sure you - HP 8100C | HP Digital Sender 8100C - (English) User Guide, C7707-90005 - Page 61
administrator. Internal error. codes Digital Sender halted. Internal problem. Turn the digital sender off and then back on. If the problem persists, note the codes and contact the administrator. Invalid credentials. Check account name and password. The name and password that have Contact the - HP 8100C | HP Digital Sender 8100C - (English) User Guide, C7707-90005 - Page 62
LDAP search could not complete because of a problem with a network connection or LDAP server. Turn the digital sender off and then back on. If the problem persists, contact the administrator. Low resources. There is not enough space on the hard drive to process the job (for example,because too - HP 8100C | HP Digital Sender 8100C - (English) User Guide, C7707-90005 - Page 63
messages (continued Message Description Action Search error. An unexpected problem occurred in the LDAP search. Sorry, you have typed an incorrect password. Please retype your password. The digital sender did not recogniz the password you typed. Sorry. The database is full. Please contact - HP 8100C | HP Digital Sender 8100C - (English) User Guide, C7707-90005 - Page 64
You are being asked to confirm that Contact the administrator. all the destinations. Do you really you want to reset the digital sender want to proceed? to the factory defaults. This will clear your changes. Do you You are being asked to confirm that Contact the administrator. really want to - HP 8100C | HP Digital Sender 8100C - (English) User Guide, C7707-90005 - Page 65
. Contact the administrator. You need to become a registered Only registered users are allowed to user to use this digital sender. Please use the digital sender, and only the contact the administrator. administrator can make you a registered user Contact the administrator. You need to - HP 8100C | HP Digital Sender 8100C - (English) User Guide, C7707-90005 - Page 66
64 - HP 8100C | HP Digital Sender 8100C - (English) User Guide, C7707-90005 - Page 67
of such defects during the warranty period, HP will, at its option, either repair or replace products which prove to be defective. Replacement parts may be either new or likenew. 2 HP warrants that HP software will not fail to execute its programming instructions, for the period specified above, due - HP 8100C | HP Digital Sender 8100C - (English) User Guide, C7707-90005 - Page 68
software, interfacing, parts or supplies not supplied by HP, unauthorized modification or misuse, operation outside of the published environmental specifications for the product, or improper site preparation or maintenance. Operation of the digital sender deemed digital sender abuse and all repairs - HP 8100C | HP Digital Sender 8100C - (English) User Guide, C7707-90005 - Page 69
, when used in accordance with the Product documentation provided by HP (including any instructions for installing patches or upgrades), provided that all other products(e.g., hardware, software, firmware) used in combination with such HP product(s) properly exchange date data. The duration of the - HP 8100C | HP Digital Sender 8100C - (English) User Guide, C7707-90005 - Page 70
For all other support information, such as obtaining printer drivers or help using an online server, see "HP support" on page 70. If you need a replacement part or information not listed in one of these two tables, see the administrator guide . Customer Support and Product Repair Assistance for the - HP 8100C | HP Digital Sender 8100C - (English) User Guide, C7707-90005 - Page 71
telephone number below for your country to obtain support during the warranty period. If you require support after your warranty has expired, additional product repair services, or if your country is not listed below, see the administrator guide. Argentina Australia Brazil Canada China Chile Hong - HP 8100C | HP Digital Sender 8100C - (English) User Guide, C7707-90005 - Page 72
these services World Wide Web URL - Firmware upgrades, printer drivers, updated HPprinter software, plus product and support information may be obtained from the following URLs: for HP Digital Sender 8100C www.digitalsender.hp.com in the U.S. www.hp.com in Europe www2.hp.com Printer drivers - HP 8100C | HP Digital Sender 8100C - (English) User Guide, C7707-90005 - Page 73
warranty 65 Acrobat Reader attaching 23 downloading and installing 23 location 23 adding address book passwords 11 e-mail addresses 34 registered Reader. See Acrobat Reader agreements service 70 alphabetic keys 8 Alt key 8 America Online support service 70 applications. See programs attachments - HP 8100C | HP Digital Sender 8100C - (English) User Guide, C7707-90005 - Page 74
57 sent as faxes not arriving 58 types supported 16 double-sided sending with ADF 17 sending with glass 17 Double-Sided key 8 drivers, printer 70 DSN (Delivery Service Notification) 11, 12 duplex. See double-sided E e-mail configuration problem 61 server unavailable 59 e-mail addresses adding 34 - HP 8100C | HP Digital Sender 8100C - (English) User Guide, C7707-90005 - Page 75
loading 19 sending double-sided documents 17 glass, scanner 6 Go key 8 guest users 10 H hardware repair assistance 68 troubleshooting 56 warranty 65 Help key 8 online for digital sender 14 HP authorized dealers 70 HP JetSend. See JetSend HP Support Assistant compact disc 70 I I-fax. See Internet fax - HP 8100C | HP Digital Sender 8100C - (English) User Guide, C7707-90005 - Page 76
color 28 PIN (personal identification number), invalid 60 power switch 6 PRINT function key 26 print quality problem 56 printers color 26 documents not arriving 58 drivers 70 printing color documents 26 documents 26 problems. See troubleshooting product features 5 profiles, user. See user profiles - HP 8100C | HP Digital Sender 8100C - (English) User Guide, C7707-90005 - Page 77
and accessories warranty 65 support agreements 70 support and service language options 68 options worldwide 68 warranty information 66 Support Assistant compact disc 70 switch, power 6 T Tab key 8 To field 20 trays document input 6 document output 6 troubleshooting control panel 56 DNS configuration - HP 8100C | HP Digital Sender 8100C - (English) User Guide, C7707-90005 - Page 78
66 year 2000 67 websites Adobe Systems Incorporated 23 HP 70 weight, paper 16 white pages when sending 56 WINS (Windows Internet Naming Service) configuration problem 62 World Wide Web support service 70 worldwide, support options 68 WWW support service 70 Y Y2K warranty 67 year 2000 warranty 67 - HP 8100C | HP Digital Sender 8100C - (English) User Guide, C7707-90005 - Page 79
- HP 8100C | HP Digital Sender 8100C - (English) User Guide, C7707-90005 - Page 80
-
 1
1 -
 2
2 -
 3
3 -
 4
4 -
 5
5 -
 6
6 -
 7
7 -
8
-
9
-
10
-
11
-
12
-
13
-
14
-
15
-
16
-
17
-
18
-
19
-
20
-
21
-
22
-
23
-
24
-
25
-
26
-
27
-
28
-
29
-
30
-
31
-
32
-
33
-
34
-
35
-
36
-
37
-
38
-
39
-
40
-
41
-
42
-
43
-
44
-
45
-
46
-
47
-
48
-
49
-
50
-
51
-
52
-
53
-
54
-
55
-
56
-
57
-
58
-
59
-
60
-
61
-
62
-
63
-
64
-
65
-
66
-
67
-
68
-
69
-
70
-
71
-
72
-
73
-
74
-
75
-
76
-
77
-
78
-
79
-
80
 |
 |
