HP 8100C HP Digital Sender 8100C - (English) User Guide, C7707-90005 - Page 14
E-Mail, Password, Confirm, Receipt, Auto BCC
 |
View all HP 8100C manuals
Add to My Manuals
Save this manual to your list of manuals |
Page 14 highlights
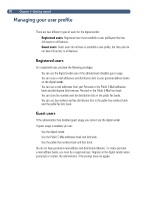
12 1 Press EMAIL (F1) or LISTS (F4). 2 If you selected LISTS in the previous step, use the and keys to select Personal E-Mail addresses or Personal E-Mail lists and press ENTER. 3 In the Name or From field, type your name and press ENTER. 4 At the Would you like to register as a user? prompt, press YES (F1). Note If the prompt does not appear, see the administrator to register. 5 In the E-Mail field, type your e-mail address and press ENTER. 6 In the Password field, type a password (optional) and press ENTER. 7 In the Confirm field, type the password you just typed and press ENTER. 8 To enable the Receipt or Auto BCC options, do the following: a Press OPTIONS (F2). b To receive an e-mail confirmation for each document you send, press YES (F1) at the Receive confirmations prompt. Note To receive confirmations, your e-mail server and the links between your e-mail and the recipient's e-mail must support Delivery Service Notification (DSN). c To receive a copy of every e-mail message you send, press YES (F1) at the Auto CC prompt. 9 Press OK (F1) twice 10 Finish sending a document to e-mail or finish adding entries to the books. See the appropriate procedure in chapter 2 (starting on page 15).
-
 1
1 -
2
-
3
-
4
-
5
-
6
-
7
-
8
-
 9
9 -
 10
10 -
 11
11 -
 12
12 -
 13
13 -
 14
14 -
 15
15 -
 16
16 -
 17
17 -
 18
18 -
 19
19 -
20
-
21
-
22
-
23
-
24
-
25
-
26
-
27
-
28
-
29
-
30
-
31
-
32
-
33
-
34
-
35
-
36
-
37
-
38
-
39
-
40
-
41
-
42
-
43
-
44
-
45
-
46
-
47
-
48
-
49
-
50
-
51
-
52
-
53
-
54
-
55
-
56
-
57
-
58
-
59
-
60
-
61
-
62
-
63
-
64
-
65
-
66
-
67
-
68
-
69
-
70
-
71
-
72
-
73
-
74
-
75
-
76
-
77
-
78
-
79
-
80
 |
 |
