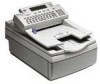
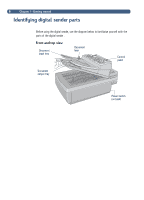
HP 8100C HP Digital Sender 8100C - (English) User Guide, C7707-90005 - Page 13
Users, E-Mail, Password, Confirm, Receipt, Auto BCC
 |
View all HP 8100C manuals
Add to My Manuals
Save this manual to your list of manuals |
Page 13 highlights
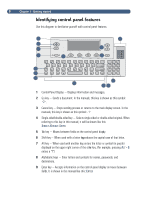
11 The administrator decides whether or not you can add a registered user profile, or if only he or she can. If you try to add yourself and are asked for the administrator password, contact the administrator. If the administrator allows you to set up your own profile, you can do so from the Users menu, or from the login dialog box the first time you send an e-mail or try to add to an e-mail or fax book.(You need a registered user profile to have personalbooks.) For more information about e-mail and fax books, see chapter 3 "Managing address books" on page 31. 1 Press ALT+SETUP (F4). 2 Press USERS (F1). This dialog box opens: Users: 3 In the Users field, type your name and press ENTER. A new dialog box opens. 4 In the E-Mail field, type your e-mail address and press ENTER. 5 In the Password field, type a password (optional) and press ENTER. 6 In the Confirm field, type the password you just typed and press ENTER. 7 To enable the Receipt or Auto BCC options, do the following: a Press OPTIONS (F2). b To receive an e-mail confirmation for each document you send, press YES (F1) at the Receive confirmations prompt. Note To receive confirmations, your e-mail server and the links between your e-mail and the recipient's e-mail must support Delivery Service Notification (DSN). c To receive a copy of every e-mail message you send, press YES (F1) at the Auto CC prompt. 8 Press OK (F1), and then press BACK (F4).
-
 1
1 -
2
-
3
-
4
-
5
-
6
-
7
-
 8
8 -
 9
9 -
 10
10 -
 11
11 -
 12
12 -
 13
13 -
 14
14 -
 15
15 -
 16
16 -
 17
17 -
 18
18 -
19
-
20
-
21
-
22
-
23
-
24
-
25
-
26
-
27
-
28
-
29
-
30
-
31
-
32
-
33
-
34
-
35
-
36
-
37
-
38
-
39
-
40
-
41
-
42
-
43
-
44
-
45
-
46
-
47
-
48
-
49
-
50
-
51
-
52
-
53
-
54
-
55
-
56
-
57
-
58
-
59
-
60
-
61
-
62
-
63
-
64
-
65
-
66
-
67
-
68
-
69
-
70
-
71
-
72
-
73
-
74
-
75
-
76
-
77
-
78
-
79
-
80
 |
 |
