HP CM6030 HP Color LaserJet CM6030/CM6040 MFP Series - Software Technical Refe - Page 193
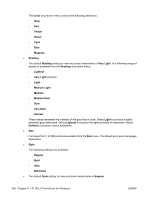
Flip s up, Booklet layout, Print on Both Sides
 |
UPC - 883585780983
View all HP CM6030 manuals
Add to My Manuals
Save this manual to your list of manuals |
Page 193 highlights
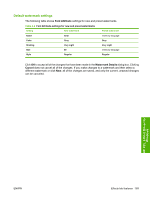
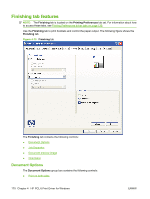
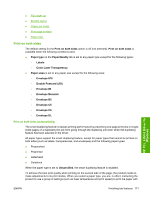
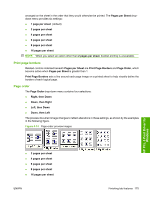
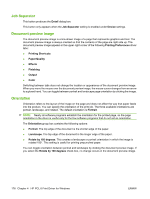
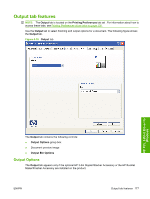
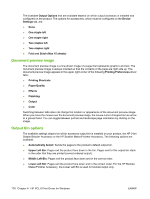
4. If a finisher is attached, follow these steps: ● The graphic and instructions for manual duplex are correct for use with long-edge feed media. Rotate the stack with the short edge as the axis, and place in the manual-feed tray. Evennumbered pages should be face up, with long-edge feed. ● If short-edge feed media is used (letter-R, for example), flip the media as shown in the graphic (short edge as the axis), and also rotate the stack 90 degrees counterclockwise and then place in Tray 1. Even-numbered pages should be face up, with long-edge feed, even though the paper started out as short-edge feed. 5. If a finisher is not attached follow these steps: ● For long-edge feed paper, rotate the stack with the long edge as the axis, and place in the manual-feed tray. Even-numbered pages should be face up, with long-edge feed. ● For short-edge feed paper, flip the media as shown in the graphic, but also rotate the stack 90 degrees counterclockwise and then place in Tray 1. Even-numbered pages should be face up, with long-edge feed, even though the paper started out as short-edge feed. Flip pages up Use the Flip pages up check box to specify the duplex-binding option. By default, the Flip pages up check box is not available. It is available only when Print on both sides is selected. The following table demonstrates the results of selecting this check box, depending on the paper orientation selected on the Finishing tab. Table 4-3 Page orientation Orientation (Finishing tab) Flip pages up selected Flip pages up not selected Portrait Short-edge binding Long-edge binding Landscape Long-edge binding Short-edge binding When Print on both sides is selected, the document preview image changes to show a spiral binding along either the left edge or the top edge of the page. In addition, a folded-over corner appears in the lower-right portion of the preview image, indicating that printing occurs on the back side. An arrow on the folded-over corner points in the direction that the pages would be flipped if they were bound together. Short-side binding is for print jobs with pages that read by flipping over like the pages of a calendar. Long-side binding is for print jobs with pages that read by turning like the pages of a book. Booklet layout The Booklet Layout drop-down menu, visible when Print on Both Sides is selected, offers choices that are based on the current paper size. The default setting for the Booklet Printing drop-down menu is Off. The other settings have the following format, where [paper size] depends on the paper size that is set on the Paper/Quality tab: ● Left Edge Binding ● Right Edge Binding When you select Left Edge Binding or Right Edge Binding, the document preview image changes to show the location of the binding. If the Pages per Sheet setting is on the default setting of 1, it automatically changes to 2 pages per sheet. If you change the Pages per Sheet setting manually to HP PCL 6 Print Driver for Windows ENWW Finishing tab features 173
-
 1
1 -
2
-
3
-
4
-
5
-
6
-
7
-
8
-
9
-
10
-
11
-
12
-
13
-
14
-
15
-
16
-
17
-
18
-
19
-
20
-
21
-
22
-
23
-
24
-
25
-
26
-
27
-
28
-
29
-
30
-
31
-
32
-
33
-
34
-
35
-
36
-
37
-
38
-
39
-
40
-
41
-
42
-
43
-
44
-
45
-
46
-
47
-
48
-
49
-
50
-
51
-
52
-
53
-
54
-
55
-
56
-
57
-
58
-
59
-
60
-
61
-
62
-
63
-
64
-
65
-
66
-
67
-
68
-
69
-
70
-
71
-
72
-
73
-
74
-
75
-
76
-
77
-
78
-
79
-
80
-
81
-
82
-
83
-
84
-
85
-
86
-
87
-
88
-
89
-
90
-
91
-
92
-
93
-
94
-
95
-
96
-
97
-
98
-
99
-
100
-
101
-
102
-
103
-
104
-
105
-
106
-
107
-
108
-
109
-
110
-
111
-
112
-
113
-
114
-
115
-
116
-
117
-
118
-
119
-
120
-
121
-
122
-
123
-
124
-
125
-
126
-
127
-
128
-
129
-
130
-
131
-
132
-
133
-
134
-
135
-
136
-
137
-
138
-
139
-
140
-
141
-
142
-
143
-
144
-
145
-
146
-
147
-
148
-
149
-
150
-
151
-
152
-
153
-
154
-
155
-
156
-
157
-
158
-
159
-
160
-
161
-
162
-
163
-
164
-
165
-
166
-
167
-
168
-
169
-
170
-
171
-
172
-
173
-
174
-
175
-
176
-
177
-
178
-
179
-
180
-
181
-
182
-
183
-
184
-
185
-
186
-
187
-
 188
188 -
 189
189 -
 190
190 -
 191
191 -
 192
192 -
 193
193 -
 194
194 -
 195
195 -
 196
196 -
 197
197 -
 198
198 -
199
-
200
-
201
-
202
-
203
-
204
-
205
-
206
-
207
-
208
-
209
-
210
-
211
-
212
-
213
-
214
-
215
-
216
-
217
-
218
-
219
-
220
-
221
-
222
-
223
-
224
-
225
-
226
-
227
-
228
-
229
-
230
-
231
-
232
-
233
-
234
-
235
-
236
-
237
-
238
-
239
-
240
-
241
-
242
-
243
-
244
-
245
-
246
-
247
-
248
-
249
-
250
-
251
-
252
-
253
-
254
-
255
-
256
-
257
-
258
-
259
-
260
-
261
-
262
-
263
-
264
-
265
-
266
-
267
-
268
-
269
-
270
-
271
-
272
-
273
-
274
-
275
-
276
-
277
-
278
-
279
-
280
-
281
-
282
-
283
-
284
-
285
-
286
-
287
-
288
-
289
-
290
-
291
-
292
-
293
-
294
-
295
-
296
-
297
-
298
-
299
-
300
-
301
-
302
-
303
-
304
-
305
-
306
-
307
-
308
-
309
-
310
-
311
-
312
-
313
-
314
-
315
-
316
-
317
-
318
-
319
-
320
-
321
-
322
-
323
-
324
-
325
-
326
 |
 |
