HP CM6030 HP Color LaserJet CM6030/CM6040 MFP Series - Software Technical Refe - Page 250
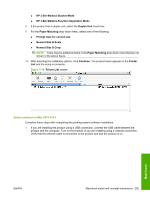
HP 3-Bin Mailbox-Stacker Mode
 |
UPC - 883585780983
View all HP CM6030 manuals
Add to My Manuals
Save this manual to your list of manuals |
Page 250 highlights
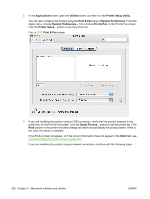
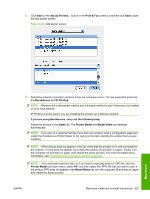
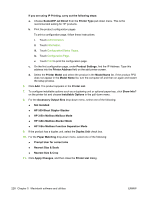
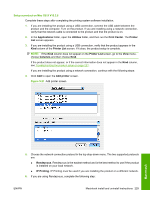
If you are using Rendezvous, carry out the following step: Select the product in the Name list. The Printer Model and Model Name are selected automatically. NOTE: If you are on a network that has more than one product, print a configuration page and match the Rendezvous Printer Name to the name on the list to identify the product that you are installing. NOTE: If the product does not appear in the list, verify that the product is on and connected to the network. If it still does not appear, try turning the product off and then on again. Finally, turn the computer off and then on again, then restart the setup process. For more troubleshooting information, see Troubleshooting the product setup on page 231. NOTE: If the automatic selection fails, or if you want to manually select a PPD file, click the Printer Model drop-down menu, choose HP, and then choose the PPD file that you want to add. If the product PPD does not appear in the Model Name list, turn the computer off and then on again and restart the setup process. If you are using IP Printing, carry out the following steps: Print the product configuration pages. a. From the Home screen, touch Administration. b. Touch Information. c. Touch Configuration/Status Pages. d. Touch Print. e. On the second configuration page, under IPv4, find the IP Address. Type this address into the Printer's Address field. f. Choose Printer Model and then choose the product in the Model Name list. 7. Click Add. The product appears in the Printer List. 8. Select the product, go to the Printers menu, and choose Show Info. 9. Choose Installable Options from the top drop-down menu. 10. For the Accessory Output Bins drop-down menu, select one of the following: ● Not Installed ● HP 500-Sheet Stapler-Stacker ● HP 3-Bin Mailbox-Mailbox Mode ● HP 3-Bin Mailbox-Stacker Mode ● HP 3-Bin Mailbox-Function Separation Mode 11. If the product has a duplex unit, select the Duplex Unit check box. 230 Chapter 5 Macintosh software and utilities ENWW
-
 1
1 -
2
-
3
-
4
-
5
-
6
-
7
-
8
-
9
-
10
-
11
-
12
-
13
-
14
-
15
-
16
-
17
-
18
-
19
-
20
-
21
-
22
-
23
-
24
-
25
-
26
-
27
-
28
-
29
-
30
-
31
-
32
-
33
-
34
-
35
-
36
-
37
-
38
-
39
-
40
-
41
-
42
-
43
-
44
-
45
-
46
-
47
-
48
-
49
-
50
-
51
-
52
-
53
-
54
-
55
-
56
-
57
-
58
-
59
-
60
-
61
-
62
-
63
-
64
-
65
-
66
-
67
-
68
-
69
-
70
-
71
-
72
-
73
-
74
-
75
-
76
-
77
-
78
-
79
-
80
-
81
-
82
-
83
-
84
-
85
-
86
-
87
-
88
-
89
-
90
-
91
-
92
-
93
-
94
-
95
-
96
-
97
-
98
-
99
-
100
-
101
-
102
-
103
-
104
-
105
-
106
-
107
-
108
-
109
-
110
-
111
-
112
-
113
-
114
-
115
-
116
-
117
-
118
-
119
-
120
-
121
-
122
-
123
-
124
-
125
-
126
-
127
-
128
-
129
-
130
-
131
-
132
-
133
-
134
-
135
-
136
-
137
-
138
-
139
-
140
-
141
-
142
-
143
-
144
-
145
-
146
-
147
-
148
-
149
-
150
-
151
-
152
-
153
-
154
-
155
-
156
-
157
-
158
-
159
-
160
-
161
-
162
-
163
-
164
-
165
-
166
-
167
-
168
-
169
-
170
-
171
-
172
-
173
-
174
-
175
-
176
-
177
-
178
-
179
-
180
-
181
-
182
-
183
-
184
-
185
-
186
-
187
-
188
-
189
-
190
-
191
-
192
-
193
-
194
-
195
-
196
-
197
-
198
-
199
-
200
-
201
-
202
-
203
-
204
-
205
-
206
-
207
-
208
-
209
-
210
-
211
-
212
-
213
-
214
-
215
-
216
-
217
-
218
-
219
-
220
-
221
-
222
-
223
-
224
-
225
-
226
-
227
-
228
-
229
-
230
-
231
-
232
-
233
-
234
-
235
-
236
-
237
-
238
-
239
-
240
-
241
-
242
-
243
-
244
-
 245
245 -
 246
246 -
 247
247 -
 248
248 -
 249
249 -
 250
250 -
 251
251 -
 252
252 -
 253
253 -
 254
254 -
 255
255 -
256
-
257
-
258
-
259
-
260
-
261
-
262
-
263
-
264
-
265
-
266
-
267
-
268
-
269
-
270
-
271
-
272
-
273
-
274
-
275
-
276
-
277
-
278
-
279
-
280
-
281
-
282
-
283
-
284
-
285
-
286
-
287
-
288
-
289
-
290
-
291
-
292
-
293
-
294
-
295
-
296
-
297
-
298
-
299
-
300
-
301
-
302
-
303
-
304
-
305
-
306
-
307
-
308
-
309
-
310
-
311
-
312
-
313
-
314
-
315
-
316
-
317
-
318
-
319
-
320
-
321
-
322
-
323
-
324
-
325
-
326
 |
 |
