HP DeskJet Ink Advantage Ultra 5730 User Guide - Page 119
Applications, Align, All Settings, Information and Support, Test Print Test
 |
View all HP DeskJet Ink Advantage Ultra 5730 manuals
Add to My Manuals
Save this manual to your list of manuals |
Page 119 highlights
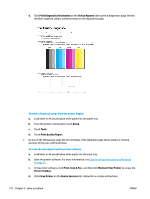
Always make sure the paper you are printing on is flat. For best results when printing images, use HP Advanced Photo Paper. Store specialty paper in its original packaging inside a resealable plastic bag on a flat surface in a cool, dry place. When you are ready to print, remove only the paper you plan to use immediately. When you have finished printing, return any unused photo paper to the plastic bag. This prevents the photo paper from curling. 5. Align the printhead. To align the printhead from the software a. Load Letter or A4 plain, white paper in the input tray. b. Open HP Utility. NOTE: HP Utility is located in the HP folder in the Applications folder at the top level of the hard disk. c. Select your printer from the list of devices at the left of the window. d. Click Align. e. Click Align and follow the onscreen instructions. f. Click All Settings to return to the Information and Support pane. 6. Print a test page. To print a test page a. Load Letter or A4 plain, white paper in the input tray. b. Open HP Utility. NOTE: HP Utility is located in the HP folder in the Applications folder at the top level of the hard disk. c. Select your printer from the list of devices at the left of the window. d. Click Test Page. e. Click the Print Test Page button, and follow the onscreen instructions. 7. If the diagnostic page shows steaks or missing portions of the text or colored boxes, clean the printhead automatically. To automatically clean the printhead a. Load Letter or A4 plain, white paper in the paper tray. b. Open HP Utility. NOTE: HP Utility is located in the HP folder in the Applications folder at the top level of the hard disk. c. Select your printer from the list of devices at the left of the window. d. Click Clean Printheads. ENWW Printing issues 113
-
 1
1 -
2
-
3
-
4
-
5
-
6
-
7
-
8
-
9
-
10
-
11
-
12
-
13
-
14
-
15
-
16
-
17
-
18
-
19
-
20
-
21
-
22
-
23
-
24
-
25
-
26
-
27
-
28
-
29
-
30
-
31
-
32
-
33
-
34
-
35
-
36
-
37
-
38
-
39
-
40
-
41
-
42
-
43
-
44
-
45
-
46
-
47
-
48
-
49
-
50
-
51
-
52
-
53
-
54
-
55
-
56
-
57
-
58
-
59
-
60
-
61
-
62
-
63
-
64
-
65
-
66
-
67
-
68
-
69
-
70
-
71
-
72
-
73
-
74
-
75
-
76
-
77
-
78
-
79
-
80
-
81
-
82
-
83
-
84
-
85
-
86
-
87
-
88
-
89
-
90
-
91
-
92
-
93
-
94
-
95
-
96
-
97
-
98
-
99
-
100
-
101
-
102
-
103
-
104
-
105
-
106
-
107
-
108
-
109
-
110
-
111
-
112
-
113
-
 114
114 -
 115
115 -
 116
116 -
 117
117 -
 118
118 -
 119
119 -
 120
120 -
 121
121 -
 122
122 -
 123
123 -
 124
124 -
125
-
126
-
127
-
128
-
129
-
130
-
131
-
132
-
133
-
134
-
135
-
136
-
137
-
138
-
139
-
140
-
141
-
142
-
143
-
144
-
145
-
146
-
147
-
148
-
149
-
150
-
151
-
152
-
153
-
154
-
155
-
156
-
157
-
158
-
159
-
160
-
161
-
162
-
163
-
164
-
165
-
166
-
167
-
168
-
169
-
170
-
171
-
172
-
173
-
174
-
175
-
176
-
177
-
178
-
179
-
180
-
181
-
182
-
183
-
184
-
185
-
186
-
187
-
188
 |
 |
