HP Deskjet 840/842/843c HP DeskJet 840C Series - (English) Windows Connect Use - Page 49
About small envelopes, Printing Transparencies
 |
View all HP Deskjet 840/842/843c manuals
Add to My Manuals
Save this manual to your list of manuals |
Page 49 highlights
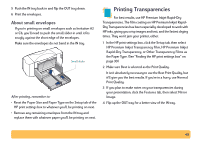
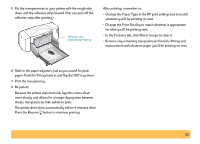
5 Push the IN tray back in and flip the OUT tray down. 6 Print the envelopes. About small envelopes If you're printing on small envelopes such as Invitation A2 or C6, you'll need to push the small slider in until it fits snugly against the short edge of the envelopes. Make sure the envelopes do not bend in the IN tray. Small slider After printing, remember to: • Reset the Paper Size and Paper Type on the Setup tab of the HP print settings box to whatever you'll be printing on next. • Remove any remaining envelopes from the IN tray and replace them with whatever paper you'll be printing on next. Printing Transparencies For best results, use HP Premium Inkjet Rapid-Dry Transparencies. The film coating on HP Premium Inkjet RapidDry Transparencies has been especially developed to work with HP inks, giving you crisp images and text, and the fastest drying times. They won't jam your printer, either. 1 In the HP print settings box, click the Setup tab, then select HP Premium Inkjet Transparency Film, HP Premium Inkjet Rapid-Dry Transparency, or Other Transparency Films as the Paper Type. (See "Finding the HP print settings box" on page 30.) 2 Make sure Best is selected as the Print Quality. It isn't absolutely necessary to use the Best Print Quality, but it'll give you the best results. If you're in a hurry, use Normal Print Quality. 3 If you plan to make notes on your transparencies during your presentation, click the Features tab, then select Mirror Image. 4 Flip up the OUT tray for a better view of the IN tray. 49
-
 1
1 -
2
-
3
-
4
-
5
-
6
-
7
-
8
-
9
-
10
-
11
-
12
-
13
-
14
-
15
-
16
-
17
-
18
-
19
-
20
-
21
-
22
-
23
-
24
-
25
-
26
-
27
-
28
-
29
-
30
-
31
-
32
-
33
-
34
-
35
-
36
-
37
-
38
-
39
-
40
-
41
-
42
-
43
-
 44
44 -
 45
45 -
 46
46 -
 47
47 -
 48
48 -
 49
49 -
 50
50 -
 51
51 -
 52
52 -
 53
53 -
 54
54 -
55
-
56
-
57
-
58
-
59
-
60
-
61
-
62
-
63
-
64
-
65
-
66
-
67
-
68
-
69
-
70
-
71
-
72
-
73
-
74
 |
 |
